


You have planned a trip to do alone and you can't wait to leave for the destination you have chosen. There is only one small problem: since you will not bring any travel companions with you, you are wondering who will take your photos to keep as a reminder of the new experience. Unless you want to rely on a few passersby, you may want to try taking pictures yourself. And then the proverb also says so ... whoever does it by himself is for three!
If you want to deepen the subject and find out how to take pictures yourself, continue reading: in the next lines, you will find explained in detail everything you need to know about it. I already anticipate that I will provide you with instructions that will be useful both in case you want to use the Reflex and the mobile phone, so you have no reason to fear: at the end of this reading, you will have no doubts about what to do.
If the topic interests you, I would say not to waste any more time in chatting and to get to work immediately. Courage: make yourself comfortable, take all the time you need to concentrate on reading the next lines and, above all, try to put into practice the instructions I will give you. I am convinced that, thanks to my "tips", you will be able to complete your "business" without the slightest difficulty. Good luck for everything!
How to take pictures yourself with the Reflex
If it is your intention to know how to take pictures yourself with the Reflex, know that it is possible to do this by using a tripod, on which to place the camera, and a shutter remote control. Alternatively, you can take advantage of the remote shutter function available on some latest generation SLRs or use the self-timer: everything is explained below.
Purchase a tripod
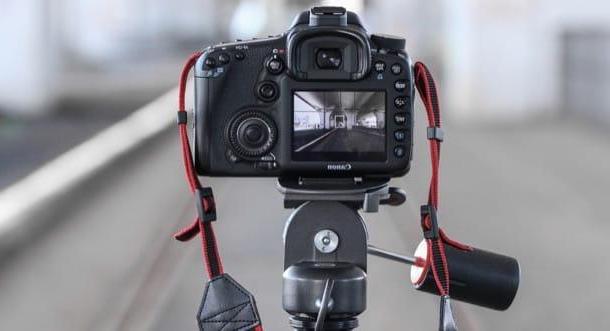
Purchase a tripod it is a must to be able to take a picture yourself with a DSLR. On the market there are various types and prices: if you do not have special needs, you can also buy cheap ones (they are easily found at 20-30 euro) or very expensive (there are some that cost even more than 150 €).
For your information, there are various types of stands, each of which is designed for certain types of use: there are stands entry-level, which allow you to secure your camera through a plate that fits with a slide system, those of middle band and finally i high-end easels, which are heavier and bulkier and therefore offer greater stability even in the most adverse weather conditions (for example when there are relatively strong gusts of wind). The latter, moreover, often consist of a fluid head that can be useful if you want to use your camera to shoot video.
Whether you decide to buy a low-end tripod or a high-end one, pay attention to the type of attachment to the machine body offered by the latter. I recommend that you buy one that integrates a quick release clip, that is a small hook that can be detached and attached to the head of the tripod: in this way, through the quick release mechanism it is possible to quickly mount (or disassemble) the camera on the same without incurring any waste of time. Also, verify that the installation system of the camera to the tripod is compatible with the one in your possession to avoid making a mistake in the purchase.
Where can you buy the tripod to use in conjunction with your camera? Both in the most well-stocked electronics stores and in those specialized in the sale of photographic accessories and, of course, also on online stores, such as Amazon.
See offer on Amazon See offer on Amazon See offer on Amazon
After purchasing the easel that is most suitable for you, follow the instructions in the user manual of the latter, so as to position the camera correctly and prevent it from falling (unfortunately I cannot give you more specific instructions in this regard, since the installation system of the camera body to the support may vary depending on the camera and tripod used).
Take the picture
After securing the camera to the tripod, turn it on via his power button and, depending on your model, take the picture using a remote shutter release, the remote shutter function or the self-timer mode.
As for using a shutter remote control, that is a hardware device to be connected to the camera to be used to take pictures remotely, know that this is usually not included in the sales package of the camera (therefore it must be purchased separately) and use a infrared technology to allow the user to take pictures at a distance, even more than 5 meters from the camera. When purchasing one, make sure it is compatible with the make and model of Reflex you own.
See offer on Amazon See offer on AmazonAlternatively, if your Reflex integrates the remote shooting via Wi-Fi, you can use it to control it via the app available for your smartphone or tablet. The procedure to be implemented varies from machine to machine: in the Reflex that I used for this tutorial (a Canon EOS 1300D), for example, you have to press the key Menu present on the machine body and then go to Wi-Fi function> Connect to smartphone> Connect. and confirm the connection to your device by selecting the button OK.
At this point, you need to start the app CameraCanonnect of Canon on your Android or iOS device, connect to the WIFI network generated by the camera (taking care before deactivating the data connection, if it was active) and follow the instructions displayed on the smartphone to complete the wizard for connecting to the SLR (basically you have to go to the settings mobile phone and select the name of the Wi-Fi network generated by the Canon in its possession).
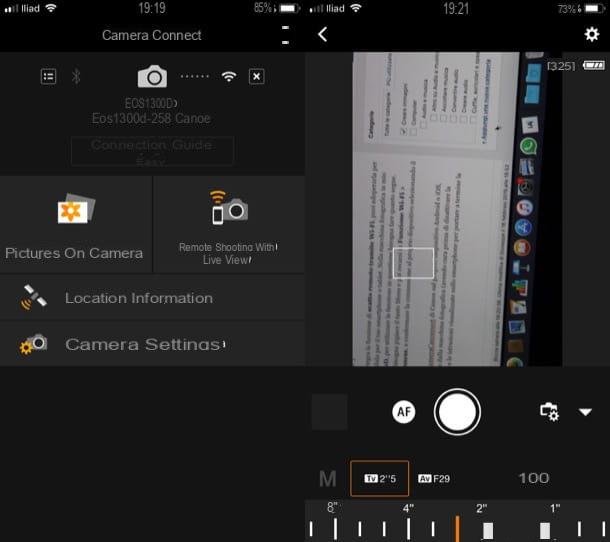
Once your device is connected to the camera, all you have to do is call the function Remote live view shooting and press on virtual shutter button that appears on the screen (if necessary you can also act on the parameters and shooting modes, exactly as you can do when you have the camera in your hand).
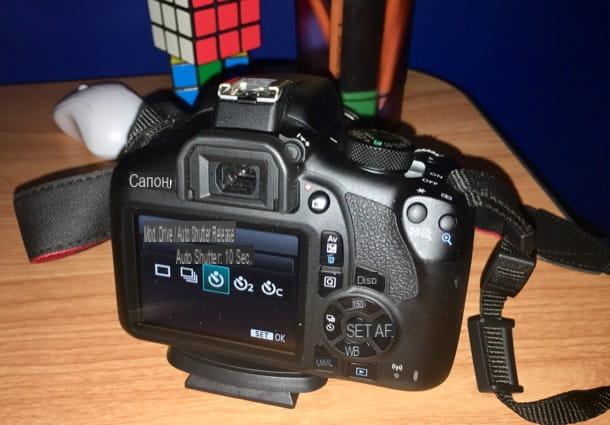
If you want, you can take a picture yourself using the self-timer function, which can also be recalled following procedures that vary from machine to machine. In the Reflex I used for this tutorial (Canon EOS 1300D), for example, you have to press the button drive / self-timer mode selection (the key depicting the timer which is present on the machine body, near the button SET), using the directional buttons select one of the self-timer modes from those available (eg. Self shot: 10 sec o Self shot: 2 sec.) and confirm the operation by pressing the button OK (on the camera body SET).
How to take photos yourself with your mobile
take photos by yourself with your mobile, you can simply take a selfie or buy a support on which to place the smartphone: in the latter case you have to set the self-timer to take the photo “remotely”: below you will find all the necessary instructions to proceed.
Purchase a stand
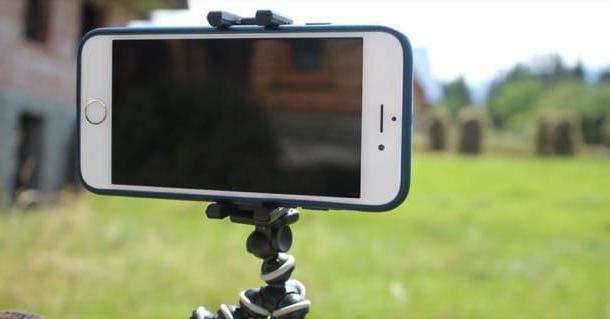
Whether you want to take a selfie or take a "classic" group photo, it could be useful (if not essential) purchase a stand suited. In the first case, I recommend that you buy a selfie stick (i.e. a rod of adjustable size, at the end of which the smartphone is attached and allows you to take self-portraits from a distance, using a special button or remote control), while for group photos you can equip yourself with a tripod or of an gorillapod (a "table" easel whose legs are made of rubberized spheres, to be used to hook the support to various surfaces).
On the market there are various types of the products just mentioned, of various prices, so evaluate which one is right for you, making sure, above all, that it is compatible with the model of mobile phone in your possession.
See offer on Amazon See offer on AmazonTake the picture

After eventually purchasing the support and hooking your smartphone to it (whether it is a selfie stick, Of a tripod, etc.), you can finally take your picture.
If it's a selfie, all you have to do is launch the app Camera on your mobile, press the button to call the front camera, extend your arm as much as possible, in such a way as to shoot your face and part of the background, and, finally, press on the shutter button visible on the screen. If you have used a selfie stick with physical shutter button, on the other hand, you can also take the photo via the latter (as long as it is compatible with your smartphone).
If, on the other hand, you want to use the self-timer function, available on both Android and iPhone, activate it as follows.
- Your Android - open the app Camera, fai tap sull'icona dell 'gear, presses on the voice timer and select one of the available options (eg. 3 seconds, 10 seconds, etc.). Please note that the procedure just indicated may differ slightly depending on the make and model of the device in your possession (as well as the version of Android installed on the latter).
- Your iPhone - open the app Camera, tap on the timer at the top right and select one of the options available from the menu that opens (eg. 3s o 10s).
After setting the timer, all you have to do is press on shutter button you see on the screen and position yourself in front of the camera of your mobile phone: at the end of the countdown the photo will be taken. Easier than that?
How to take pictures yourself


