You have decided to replace your smartphone Android with iPhone and are you looking for a way to easily transfer your photos from one phone to another? For business reasons you have to use both an Android smartphone and an iPhone and would you like to have your photos synchronized on both devices? Don't worry, I assure you that it is a much simpler operation than you might imagine. Then I'm here to give you a hand!
Give me five minutes of your free time and let me explain how to transfer photos from Android to iPhone taking advantage of various solutions, some of which are completely free and require almost no user interaction: just set them at the beginning and then they do it all by themselves. Do not you believe it? Then try them firsthand and then tell me!
All you have to do is carefully analyze the solutions I am about to suggest, identify the one that you think best suits your needs and use it according to the indications you find below. Whether you want to transfer photos from Android to iPhone one-time or want to keep the photo albums of both systems in sync, you are sure to find the one that's right for you. Happy reading and have fun!
Google Photos
The most immediate solution you can turn to for transfer photos from Android to iPhone è Google Photos. If you have never heard of it (strange!), Google Photos is a Google service that allows you to store photos and videos on the cloud - more precisely on Google Drive - in a totally automatic way.
The only limitation to which you must comply is that relating to the available storage space: only 15GB of cloud space is available for free in the Google account which, however, can be expanded by subscribing to the paid plans of Google One, which start from 1,99 , 100 euros / month for XNUMXGB of storage. More info here.
Obviously, depending on the resolution you will use to upload your multimedia files you could quickly run out of the free space provided, but I will tell you in the next lines about the compression modes for photos and videos.
But why am I recommending Google Photos to you? Simple: being Google Photos a multi-platform service, also accessible from PCs, tablets and iOS / iPadOS devices, it can be used to create a single archive of photos and videos synchronized automatically on all devices. Convenient, right? Then find out now how to use it!
To begin with, if you haven't already done so, download the official Google Photos app on your terminal Android opening the Play Store (the symbol colorful play located on the home screen), looking for it in the latter and tapping first on its icon (the colored pinwheel) and then on the button Install.
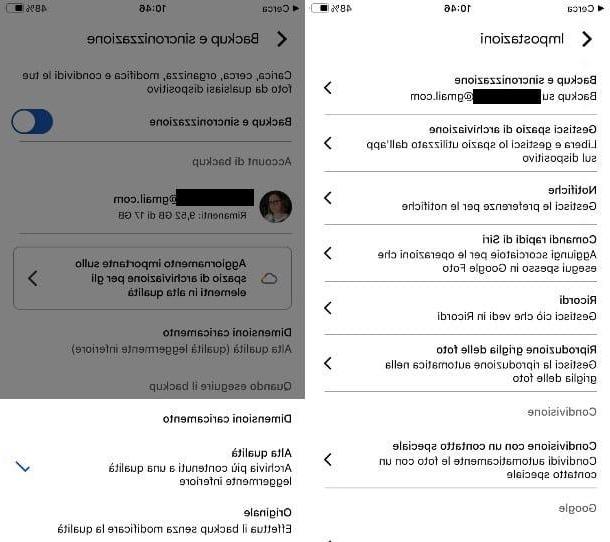
Once installation is complete, start the app Google Photos, log in with your Google account data and activate the automatic backup of photos and videos to the cloud by following the wizard. Alternatively, if you skipped this step, by tapping on your thumbnail icon at the top right, select the items Photo settings> Backup and synchronization.
At this point, make sure that the lever for the function Backup and synchronization is active (otherwise activate it yourself), tap on the item Dimensioni cartoon and choose the item High quality (up to 16MP for photos and 1080p for videos) or Original quality (without compression) from the box that appears on the screen.
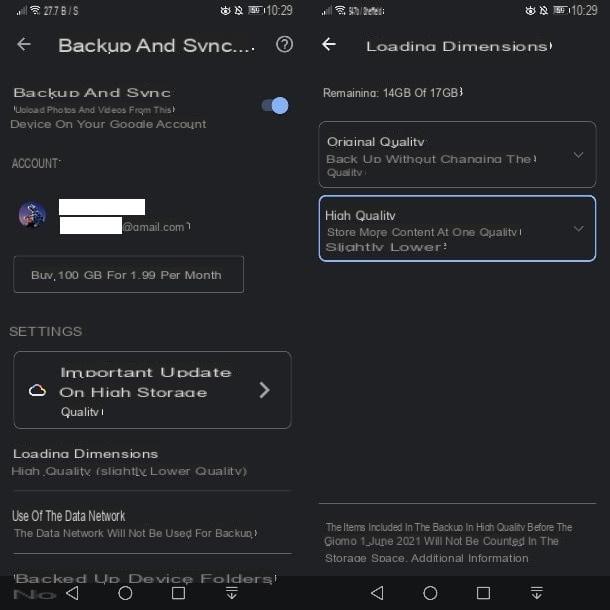
To select additional folders to be included in the synchronization of Google Photos in addition to the default ones (photos, videos, screenshots, etc.), tap on the item Device folders backed up present in the menu Backup and synchronization and move up ON the levers relating to the folders of your interest.
Now you just have to be patient. In fact, you have to wait for Google Photos to do its job and upload all the photos and videos in the Android Gallery to the cloud. You can follow the upload progress directly from the tab Gallery of the app.
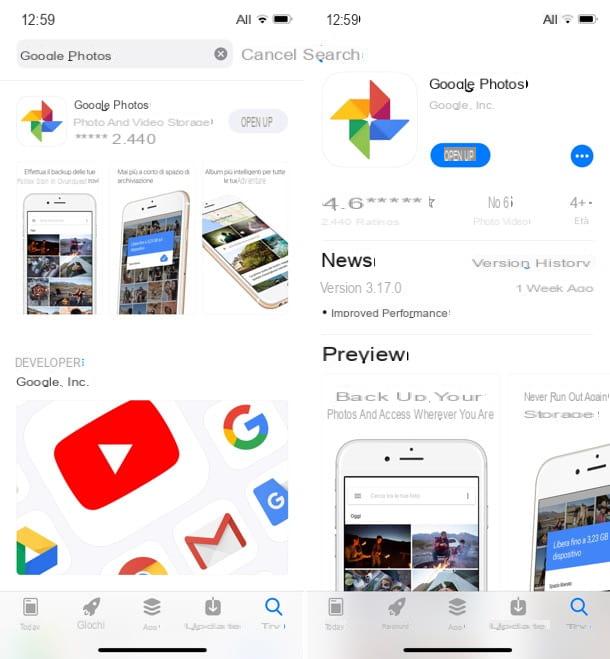
Once the backup on Android is complete, you can switch toiPhone, where you need to install the official Google Photos app. Then open theApp Store (the'letter “A” icon on a light blue background) located on the home screen, select the tab Search from the menu located below and search "Google Photos".
Once you find the app icon (the colored pinwheel) in the search results, tap on the latter and press the button Ottieni / Installa to start the application download. You may be asked to verify your identity using Touch ID, Face ID, or entering your Apple ID password.
Once the installation is complete, you need to activate the synchronization of photos (and videos) on the iPhone. Start, therefore, Google Photos, log in with your Google account data (the same one you used on Android) and authorize the app to access the photos by answering Allow to the warning that appears on the screen.
Once this is done, you need to follow the same steps that I indicated to you earlier for Android to enable data synchronization. At this point, go on Backup and synchronization, make sure the toggle for the function Backup and synchronization is active (otherwise you activate it), and set the Dimensioni cartoon su High quality.
Mission accomplished! From now on, iPhone photos and videos will also be automatically stored in Google Photos. The backup will happen when you plug your phone into a power source, so don't be scared if the backup doesn't seem instant.
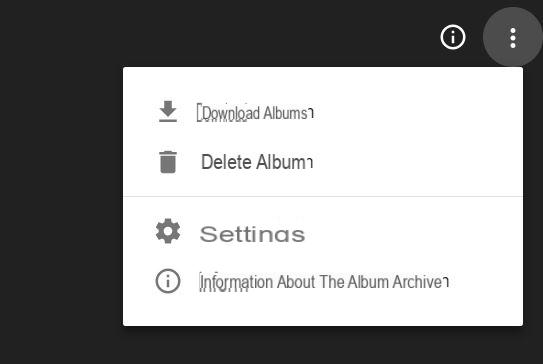
In the tab Gallery of the app you will find all the photos (and videos) you had on your Android smartphone: to download them locally on the iPhone and also view them in the app Gallery of iOS, you have to select them (by making a long tap on the thumbnail of one of them and then putting the check mark on the others), then you have to press onshare icon which is at the top right (the square icon with the arrow inside) and you have to select the option Save to device from the menu that appears below.
Alternatively, if you want to save a single photo (or a single video), select the latter, press the button ... che si trova in alto a destra e seleciona la voce Download from the menu that appears below.
If any steps are not clear to you and / or you want more information on how Google Photos works, consult the tutorial I dedicated to this excellent service signed by the giant Mountain View.
Copy photos via PC
If you do not have a fast Internet connection and / or for privacy reasons you do not want to rely on cloud-based services, you can transfer photos from Android to iPhone the "old way", ie copying images from Android to computer and then from computer to 'iPhone: it is not a very comfortable procedure, this must be said, but it is valid and effective.
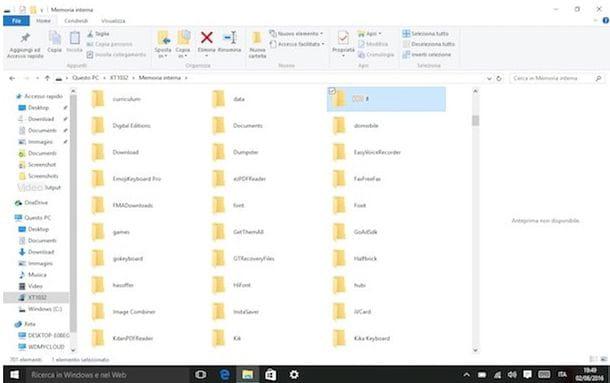
If you decide to go this route, then connect your Android smartphone to the computer using the supplied USB cable and, from the device notifications menu, select the connection mode Multimedia device (MTP). At this point, open theFile Explorer Windows (the yellow folder icon located in the taskbar), select the item PC / Computer question from the left sidebar and double-click the icon for yours smartphone.
Now all you have to do is access the folder with the photos (DCIM) and copy the images to the PC by doing the simplest of copy and paste. If you can't get your Android device to be recognized by your computer, try downloading the drivers for Windows from the manufacturer's website and installing them on your computer: you can find more information about it in my tutorial on how to connect Android to your PC.
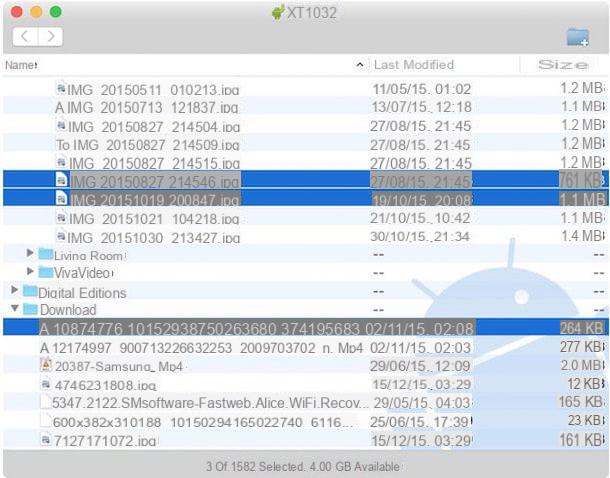
I invented a Mac, to access the memory of your Android smartphone and copy the photos to your computer you need to resort to Android File Transfer, a free application that allows you to manage the files on the memory of Android devices by operating from macOS.
Once Android File Transfer is installed (by copying its icon to the folder Applications macOS), connect the smartphone to the Mac using the supplied USB cable, activate the connection mode Multimedia device (MTP) and navigate to the folder DCIM to find, and then copy to your computer (by dragging the icons), the photos of your interest.
If any steps are not clear to you, check out my guide on how to transfer files from Android to Mac: there you will find all the information you need.
Once you have copied the photos from your Android smartphone to your computer, all you have to do is transfer them to your iPhone. Therefore, connect the "iPhone by" to the PC or Mac using the supplied Lightning cable and, if it does not start automatically, open the program iTunes. If you use Windows and have not yet installed iTunes, find out how to do it by reading my guide about it.
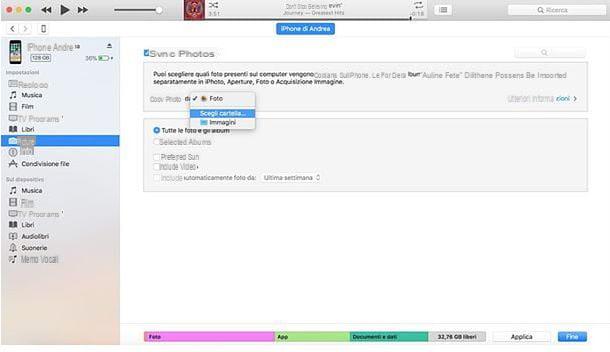
At this point, click on theiPhone located at the top left of the main iTunes window, select the item Gallery from the left sidebar and put the check mark next to the item Synchronize photos. Then set the option Choose folder from the drop-down menu at the bottom and select the folder on your computer where you copied the photos you had on your Android smartphone.
Fatto ciò, click on your button Apply and, within seconds, you will find the photos you copied from your Android smartphone into the iOS Photos app.
If any steps are not clear to you, find out in more detail how to transfer photos from computer to iPhone by reading my guide on how to archive photos on iPhone.
Please note: if iCloud Photo Library is active on your iPhone, I'm sorry, but you can't "manually" copy photos from your computer to your smartphone.
Send Anywhere
Do you have to transfer only a few photos from Android and iOS and not the entire Gallery of your device? If so, you can take advantage of Send Anywhere, an app that allows you to transfer files from one device to another (not only between Android and iPhone, but also between PCs, Macs and smartphones / tablets of various kinds) wirelessly with a very intuitive code system: you can choose the files to share, you get a numeric code, type it on the data destination device and that's it. The application is free up to 10GB per upload and with links expiring within 10 minutes (otherwise it costs $ 5,99 / month and offers 50GB of upload, 100GB of storage and links with configurable expiration).
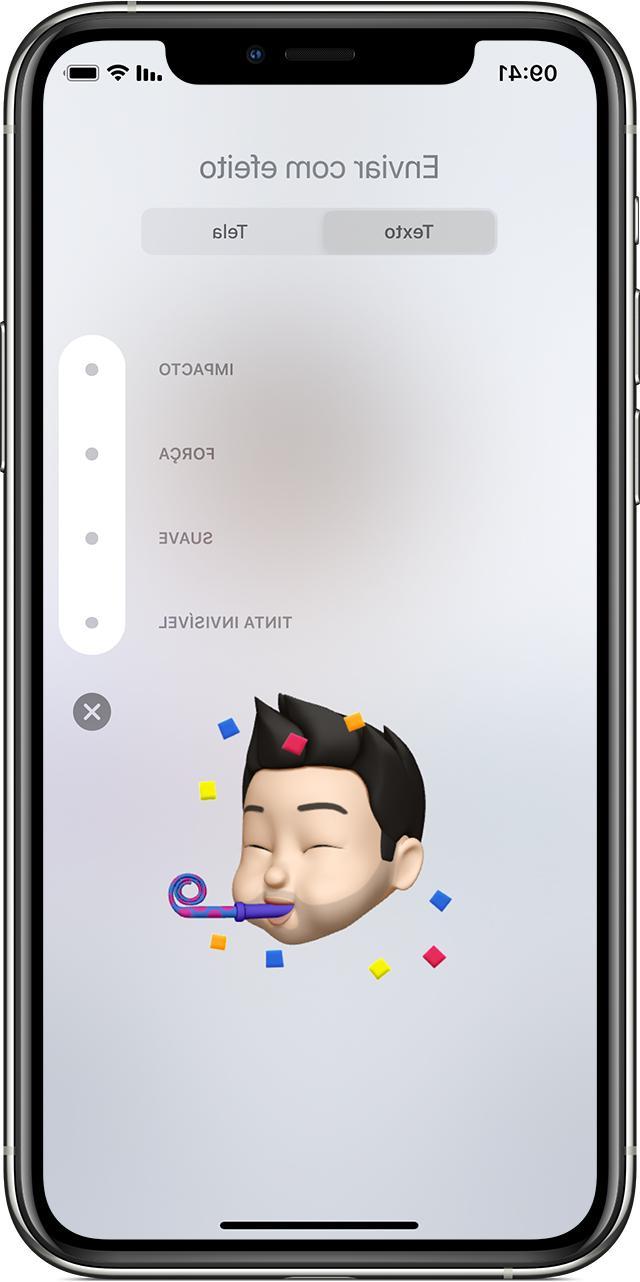
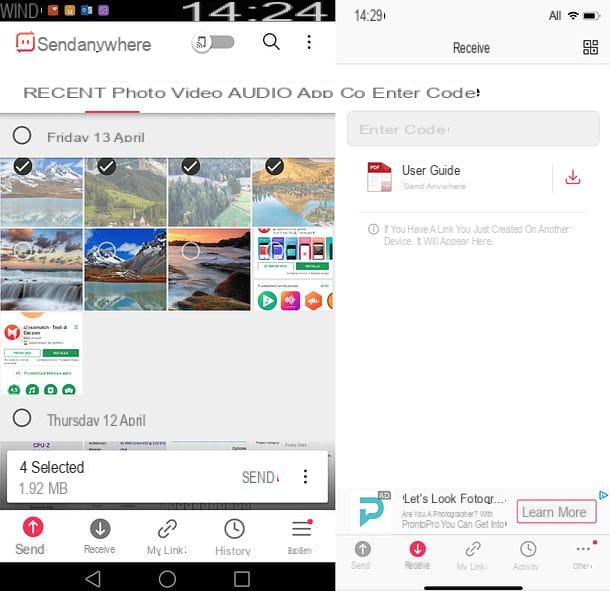
To transfer photos from Android to iPhone using Send Anywhere, start the official app of the service on your Android terminal, put the check mark next to the item I accept Terms and Privacy Policy e pigia sui pulsnti Confirm, Continue e Allow to access its main screen. At this point, select the tab Gallery, put the check mark on the thumbnails of the images to be transferred to the iPhone and press the button Send which appears below. You will get the code to type on the "iPhone by" to start the download of the selected images.
Then open the Send Anywhere app on the iPhone, give it access to the photos, select the tab You will recive and type il Numerical code you got on the android smartphone in the field insert the code. Finally, press the button You will recive and the photos will be automatically transferred to the phone memory.
Please note: if you prefer, instead of typing the numeric code, you can start the data transfer by pressing the icon QR code located at the top right of the Send Anywhere app for iPhone and framing the code displayed on the Android smartphone.
Switch to iOS
If you have not yet carried out the initial configuration procedure of your iPhone and / or are in the process of restoring the device to restore it to factory settings, you can transfer photos (and other data) from Android using Switch to iOS.
Switch to iOS is an app for Android developed by Apple, thanks to which it is possible to put the green robot system in communication with the iPhone and to transfer data from one system to another during the initial iOS configuration procedure. Among the data that can be transferred from Android to iPhone with the app in question, there are also photos.
The first step you need to take to use Switch to iOS is to install the app on your Android smartphone. With that done, you need to start the initial iOS setup process on the iPhone and get to the point where you are offered the option for migrate and date from Android.
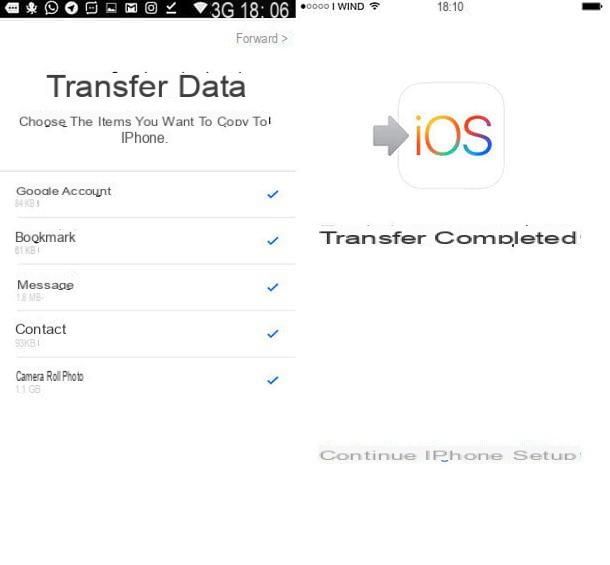
After selecting the item in question, tap the button Continue and notes the Numerical code which is displayed in the center of the screen. Then switch to the Android smartphone, start the app Switch to iOS, presses on the buttons ContinueAccept e NEXT and type il Numerical code you got from the iPhone.
Once wireless communication between Android and iOS is established (the two smartphones must be connected to the same Wi-Fi network), select the data to copy to the iPhone (for photos, choose the option Camera roll), Go forward and wait for the operation to be completed.
If any steps are not clear to you, consult my guide on what it is and how it works Switch to iOS: there you will find all the information you need on the functioning of the app.
How to transfer photos from Android to iPhone