


Would you like to transfer photos from your iPhone to your iPad without wasting time and, above all, without having to go to your computer? No problem. There are tons of solutions you can use, all of which are free.
For example, you can count on AirDrop, the data transfer technology included “standard” in all Apple devices; you can contact cloud storage services that save photos on an online space and then automatically synchronize them on all devices or, alternatively, you can install third-party applications that allow you to transfer data from one device to another in wireless. Finally, if you prefer, I remind you that you can connect the iPhone and the iPad to the computer and sync them to the same folder of images using iTunes.
You just have to choose the solution that seems most comfortable and / or best suited to your needs and take advantage of it by following the instructions I am about to give you. In short: if you want to know how to transfer photos from iPhone to iPad, below you will find all the information you need. Happy reading and have fun!
Transfer photos from iPhone to iPad using AirDrop
The easiest way to switch photos from iPhone to iPad is to use AirDrop. In case you've never heard of it, AirDrop is an Apple technology that uses Wi-Fi and Bluetooth to transfer data from one device to another wirelessly. It is natively supported by all iPhone models equal to or higher than iPhone 5, from all iPad models equal to or greater than iPad 4 and from all models of iPhone SE, iPhone Plus, iPad Mini e iPad Pro. Its operation is extremely intuitive, but before using it you have to do a couple of checks.
As already mentioned, AirDrop uses Bluetooth to create a peer-to-peer Wi-Fi network between two devices, so before using it you need to check that Bluetooth and Wi-Fi support is active on both iPhone and iPad. If you don't know how to check the Wi-Fi and Bluetooth status on your device, call up the control center wiping from the bottom of the screen to the top and, if necessary, activate the buttons related to Wi-Fi e Bluetooth (the cleats of Wi-Fi and the "B" of Bluetooth). If you don't see the buttons for activating networks but the controls for music in the control center, swipe from left to right.
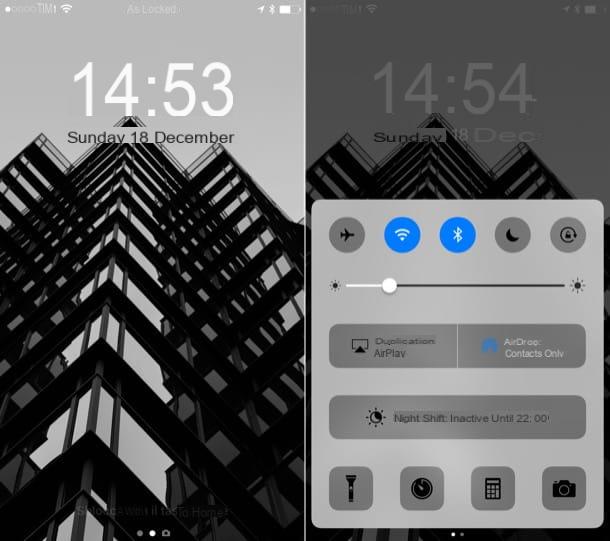
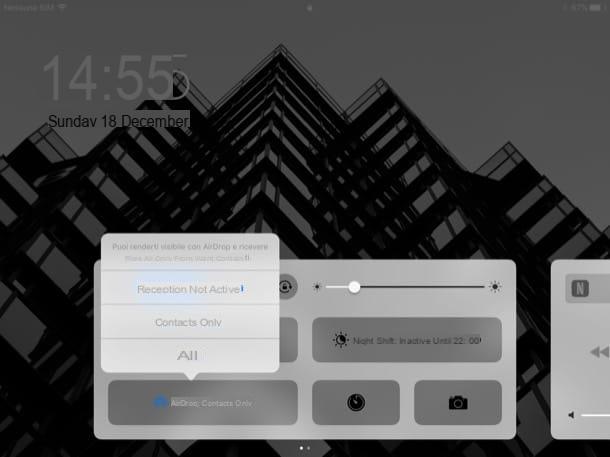
Another important thing to know is that AirDrop supports various levels of privacy: you can choose to show your device to everyone, only to contacts or to no one. To make the iPad on which you intend to copy the photos “visible”, recall the control center on the latter, "tap" on the button AirDrop (bottom left) and choose the option you prefer from the menu that opens. If the iPhone the photos came from is associated with an Apple ID that is not included in the iPad contacts, choose the option All.
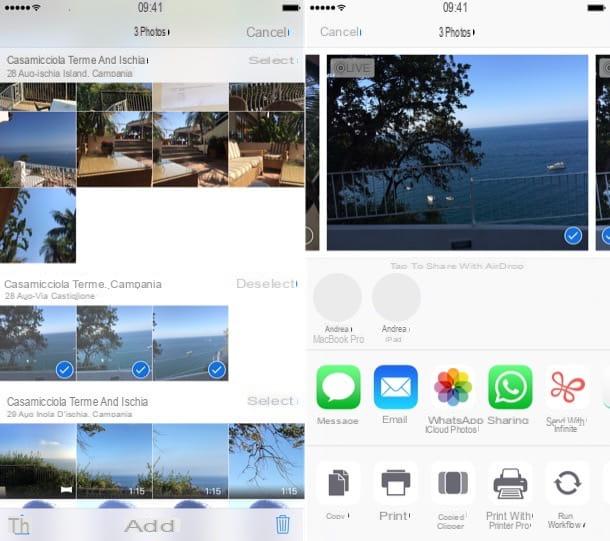
Once you have done all the checks above, you can take action. So take your iPhone, start the app Gallery e pulsing sul pulsating Select located at the top right. Now put the check mark next to the photos to copy on the iPad, press theshare icon (the arrow that goes up) and select the name of yours iPad give the menu to compare.
Finally, answer in the affirmative to the warning that appears on the iPad and the photos will be copied from one device to another. To see the iPad in the iPhone share menu, the device must have the screen turned on. The two devices do not need to be connected to the same Wi-Fi network. To learn more, read my tutorial on how AirDrop works.
Transfer photos from iPhone to iPad using cloud storage services
Another way to transfer photos from iPhone to iPad is to create a photo library synchronized with iCloud. In this way, all photos and videos taken on the iPhone are automatically downloaded to the iPad (and vice versa).
Furthermore, by installing the official iCloud client on the PC or connecting the Mac to the same Apple ID as the iPhone, the photos and videos in the iCloud library are also downloaded to the computer. All, of course, via the Internet.
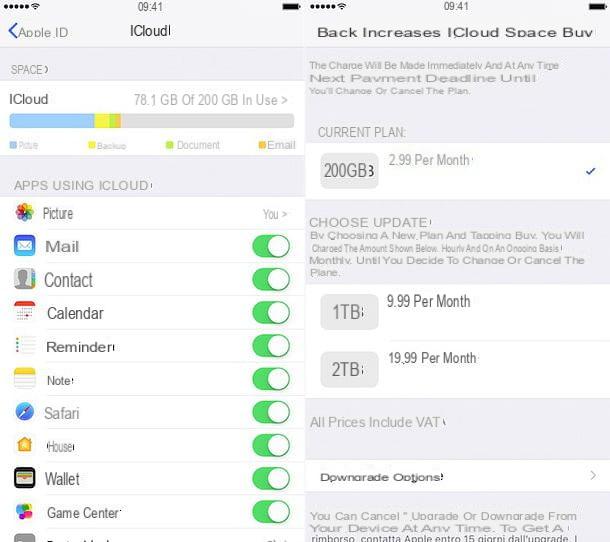
How much does it cost to create an iCloud photo library? Theoretically nothing. In practice, however, since the free space available on iCloud Drive is just 5GB, you have to subscribe to one of the paid plans of Apple's cloud storage service. The available plans are as follows: 50GB at 0,99 euros / month; 200GB for € 2,99 / month and 2 TB for € 9,99 / month.
To subscribe to one of the iCloud Drive paid plans and activate the ICloud Photo Library, you need to do the following.
- Go to the settings of iOS (the gear icon located on the home screen), select your name, then the entry for iCloud, available space graph on your account and voice Change storage plan. From the screen that opens, select the iCloud plan you want to subscribe and that's it. this operation you have to do on a single device, iPhone or iPad makes no difference. If you are using an iOS version earlier than 10.3, the menu you need to go to to change your iCloud plan is iCloud> Storage> Change Storage Plan.
- Go to the settings of iOS, then go to [Your name]> iCloud> Photos and activate the function ICloud Photo Library moving up ON the relative lever. This procedure must be implemented on both iPhone and iPad. If you are using iOS 10.2.x or earlier, the menu you need to go to to activate iCloud Photo Library is Settings> iCloud> Photos.
After activating iCloud Photo Library, you can choose whether download and keep the original versions of photos and videos on your devices or if optimize storage space on the latter, keeping the original versions of photos and videos only on iCloud (calling them if necessary on the iPhone and iPad via the Photos app). To learn more, check out my guide on how to store photos on iCloud.
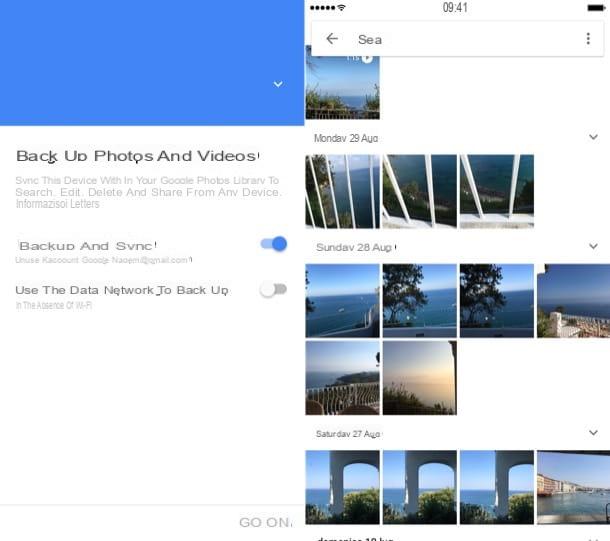
I also point out that there is a completely free alternative to the iCloud Photo Library: it is Google Photos that allows you to store photos and videos online at no cost without any space limit. The only limitation concerns the resolution of the content: photos cannot go beyond 16MP, videos cannot have a resolution higher than 1080p (Full HD). To synchronize your photo library via Google Photos, all you have to do is install the appropriate application on iPhone and iPad, start it, log in with your Google account and activate the function backup and synchronization in high quality. Uploading photos and videos to Google Drive will happen automatically.
App to transfer photos from iPhone to iPad
Are you using an iPhone or iPad model that doesn't support AirDrop? No problem. You can turn to third-party solutions that allow you to transfer files from one device to another over the Wi-Fi network.
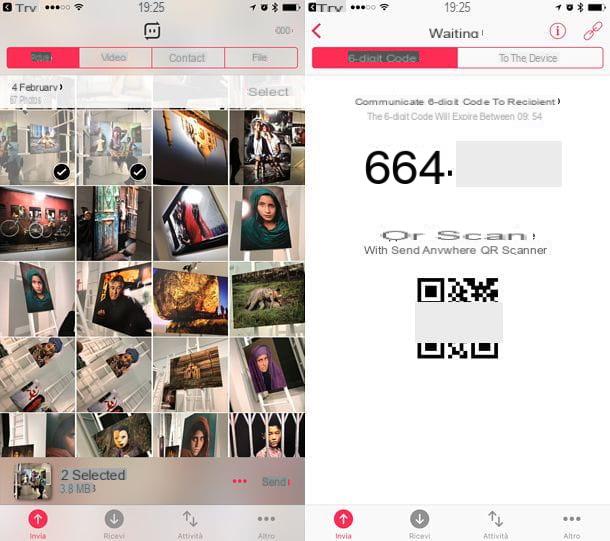
Among the best solutions of this kind is Send Anywhere, which is compatible not only with iOS devices, but also with Android devices and with computers (Windows / macOS). To use Send Anywhere, all you have to do is install its official app on iPhone and iPad, start it and select the photos to transfer to the other device.
At this point, pigia sul pulsating Send that appears below and you will get a 6-digit code to type on the other device to receive the selected images (by going to the tab You will recive Send Anywhere). Alternatively, if the iPhone and iPad are nearby and connected to the same Wi-Fi network, you can use the card To device and directly select the target device of the photos instead of using the 6-digit code.
Transfer photos from iPhone to iPad using iTunes
I don't know if you know but using iTunes you can synchronize a folder on your computer with the iPhone and iPad by copying all the photos contained in the folder in question to the latter. It is not as immediate as using AirDrop or Infinit, but in some circumstances it can come in handy.
To sync photos from your computer to your iPhone / iPad, connect the two devices using the supplied Lightning / Dock cable, launch iTunes (if it hasn't started by itself) and click oniPhone / iPad icon which appears at the top left. Then select the item Gallery from the sidebar, put the check mark next to the item Synchronize photos and choose the folder of images to copy to the device using the drop-down menu Copy photos from.
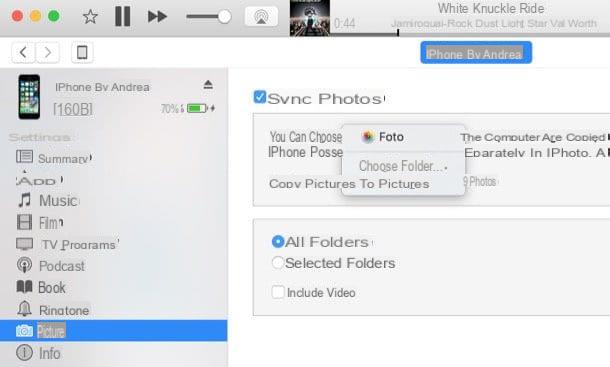
Finally, select the option All folders o Selected folders depending on whether you want to copy all the sub-folders of the selected path to the iPhone (or iPad) or just some sub-folders of your choice and press the button Applyto start the data transfer.
When finished, repeat the procedure on your other iDevice and you will get the same photo folder on iPhone and iPad. If any step of the procedure is not clear to you, consult my tutorials on how to upload photos to iPhone and how to upload photos to iPad which you can find more precise directions.
Transfer photos from iPhone to iPad using external devices
In conclusion, I would like to point out the existence of some chiavette USB/Lightning that allow you to transfer data between iOS devices and computers in a very simple way (almost like common USB sticks for PCs). Below you will find some of the best ones currently available on the market.
Transfer photos from iPhone to iPad via cable
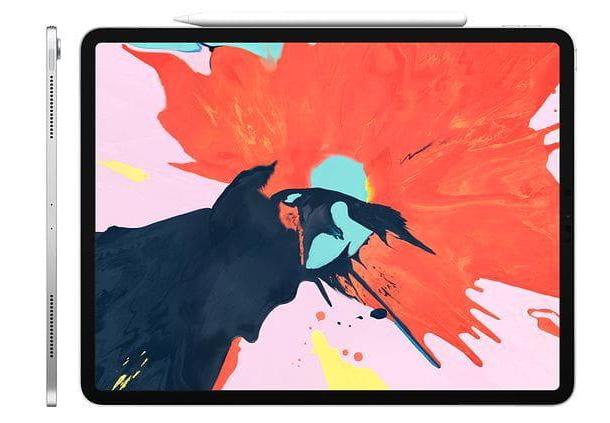
If you have one iPad Pro equipped with a USB-C port (so an iPad Pro 2018 or later), you can take advantage of a USB-C to Lightning cable to connect your iPhone directly to the tablet and proceed with importing the photos on the latter, following the procedure that is proposed to you on the screen.
How to transfer photos from iPhone to iPad


