


Do you have many beautiful photos stored on your PC that you would like to upload to your iPhone to always have them with you but you don't know how to do it? Don't despair. While it's not the first option that catches your eye when opening iTunes, I assure you that this feature is included in Apple's multimedia software and is tremendously simple to use.
To find out more, read the guide I am about to offer you: in no time at all you will find out how to transfer photos from PC to iPhone in order to have all the images you want on your smartphone, from those taken with your old mobile phone to those you downloaded from the Internet. I bet you will be amazed at how simple it is!
There is even a system to upload photos to the "iPhone by" via the Internet without having to physically connect the device to the computer, but I will deal with this in the second part of this tutorial (along with some services that allow you to send photos to your phone wirelessly without synchronizing them). Now let's focus on the more “traditional” functions and see how to manage the sharing of photos between Windows, Mac and iPhone. Happy reading and have fun!
Synchronization of photos with iTunes
Let's start with the standard procedure for transfer photos from PC to iPhone, the one that involves the use of iTunes, for syncing photos on both devices.
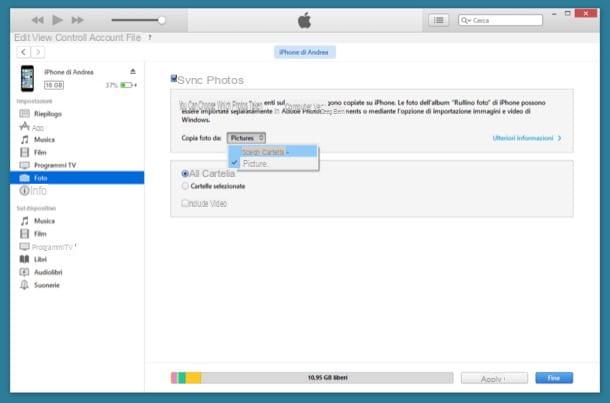
The first step you need to take is to connect your phone to your computer using the supplied Dock / Lightning cable. Then wait for iTunes to start by itself (otherwise start it yourself), select the icon of theiPhone which appears at the top left and go to the section Gallery of the program by selecting the appropriate item from the left sidebar.
At this point, put the check mark next to the item Synchronize photos, select the voice Choose folder give menu to tendin Copy photos from and select the folder that contains the photos you want to upload to your "iPhone by". To conclude, click on the button Apply and wait for the images to be transferred to your phone.
If the folder you select includes sub-folders, you can choose to sync only the ones you want to your iPhone. Just put the check mark next to the item Selected folders in iTunes and select the sub-folders to include in the data sync process.
If you are using a Mac, the image source is automatically set to Photo library. If you do not want to synchronize all the images contained in the software (which could be very many!) But only certain events or albums, put the check mark next to the item Selected albums and select the albums from the Photos library you want to copy to your phone.
Once finished transfer photos from PC to iPhone, every time you connect your "iPhone by" to the computer and perform a synchronization with iTunes, the photos added or removed from the selected folders will be copied or removed from the phone as well. You won't have to do anything.
To disable this automatism, you will have to return to the section Gallery iTunes and remove the check mark from the item Synchronize photos or from folders with images that you no longer want to automatically sync with your phone.
If you do not want to physically connect the phone to the PC, I remind you that you can enable synchronization with iTunes wirelessly (as long as both devices are connected to the same Wi-Fi network) by selecting the icon of theiPhone from the program menu, by going to the section Riepilogo and applying the segno di spunta accanto alla voce Sync with iPhone via Wi-Fi.
iTunes on macOS 10.15 Catalina and later
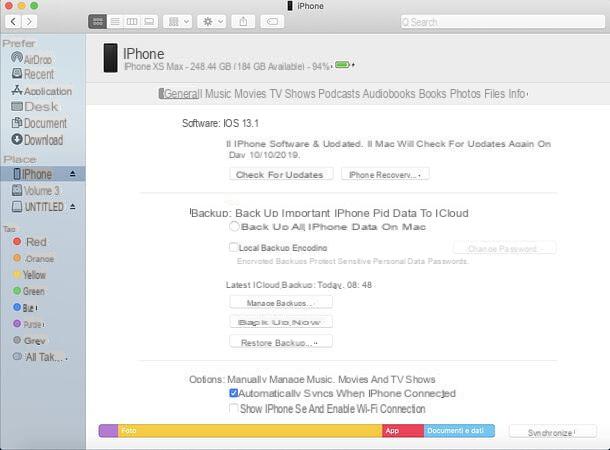
If you are using macOS 10.15 Catalina or later, you should know that iTunes is no longer included in the operating system: instead, you must use the Finder, which in these releases has the ability to interface with iOS / iPadOS devices. To do this, connect the iPhone to the Mac, select its icon from the Finder sidebar and then proceed as seen above for iTunes: the steps to take are practically the same.
Syncing Photos Online (iCloud Photo Library)
If you don't want to go through iTunes and don't want to physically connect your iPhone to your computer, you can go through ICloud Photo Library, a feature introduced by Apple in iOS 8.1 that automatically uploads photos and videos made with the iPhone to iCloud (therefore online).
ICloud Photo Library is a free service but unlike photo streaming (the iPhone's default feature that stores photos on iCloud temporarily to sync them across multiple devices), erodes iCloud Drive storage space. This means that, to use it, you must necessarily subscribe to one of the iCloud paid plans: 0,99 euros / month for 50GB, 2,99 euros / month for 200GB and 9,99 euros / month for 2TB.
Are you wondering what the ability to store photos on iCloud has to do with uploading images from computer to iPhone? I'll explain it to you right away.
By activating the iCloud Photo Library, you will have a photo archive freely accessible from your computer, iPhone, iPad and other devices and you will be able to upload new content to it using the iCloud client for Windows or the Photos app of macOS (therefore the computer). In short, you can add new photos from your computer, iPhone or iPad and all changes will be automatically synchronized on all devices.
To activate the iCloud photo library on your iPhone, go to the menu Settings> [Your Name]> iCloud> Photos of iOS (or Settings> iCloud> Photos if you are using an iOS version earlier than 10.3) and move to ON the relative levetta all'opzione ICloud Photo Library. But first remember to activate an iCloud Drive paid plan by going to Settings, pressing on you don't know, Then iCloud, selecting the chart relating to the space available on your account and choosing the voice Change storage plan from the screen that opens.
If you are using an iOS version earlier than 10.3, to change your iCloud subscription plan you have to go to the menu Settings> iCloud> Storage> Change Storage Plan. More info on the whole procedure can be found in my guide on how to store photos on iCloud.
Once the iCloud Photo Library is activated, you can copy your photos to your photo archive (and therefore also to your iPhone) in a very simple way.
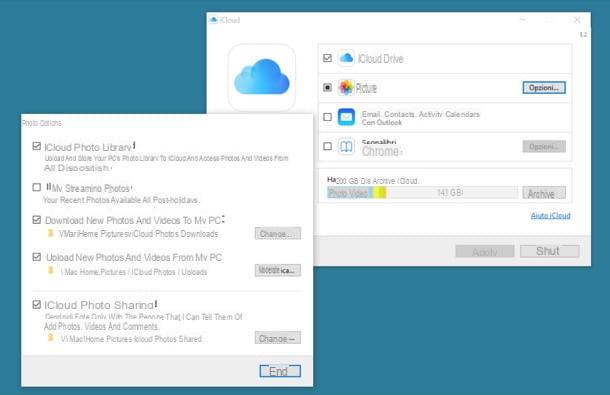
- If you are using Windows, install the iCloud client on your PC and log in using your Apple ID. when the operation is completed, click on the button options located next to the icon Gallery and make sure there is a check mark next to the items ICloud Photo Library e Upload new photos and videos from my PC. Then go to the folder ImagesiCloud PhotosUploads of your computer and copy inside the photos you want to transfer to iCloud. Within a few seconds you will see the images appear on your online space and therefore also on your iPhone.
- If you are using a Mac, open the application Gallery macOS and drag and drop the photos you want to upload to iCloud to your personal library. Of course, the synchronization with the iPhone will only work if the Mac and the "iPhone by" are associated with the same Apple ID. If you have any problems, open System preference and make sure in the menu iCloud there is a check mark next to the item Gallery.
- There is also a third way to upload photos to iCloud library. By connecting to the website iCloud.com, by logging in with your Apple ID and accessing the section Gallery, you can upload new images to your personal album by clicking on the button Charge located at the top right. The service works from any browser and operating system. Convenient, right?
Don't trust iCloud? Not happy with Apple's Photo Library? No problem, you can also copy photos from Windows, Mac or Linux to iPhone using Google Photos: a free cloud storage service offered by Google that allows you to upload photos and videos to the cloud without space limits (as long as the images do not exceed 16MP in resolution and the videos are not over the Full HD format). To take advantage of Google Photos, just activate the synchronization of the roll in iOS (via the official Google Photos app) and configure the client of the service on Windows or macOS.
EaseUS MobiMover (Windows/macOS)
If you are looking for a more complete and flexible solution to transfer photos from PC to iPhone (and vice versa), I highly recommend you take a look at EaseUS MobiMover: it is a software available for both Windows and macOS able to transfer data between two iOS devices and between iPhone / iPad and PC in a very simple way. Works with all iPhone models (starting with iPhone 8/8 Plus) and newer iPads equipped with iOS 12 or later. It supports the transfer of photos, videos, audios, books, contacts, notes, Safari bookmarks and more.
It is available in two versions: one Free with no limitations on the files you can transfer and one For (starting at € 27,95 / month) with technical support and lifetime updates. To download the software on your PC, connect to its official website and click on the button Scarica free related to Windows o MacOS, depending on the operating system installed on your computer.
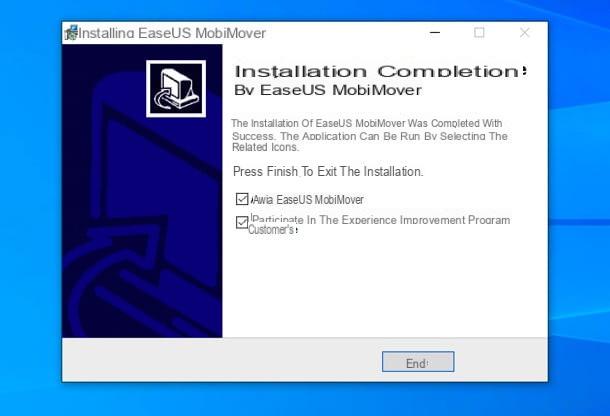
When the download is complete, if you use Windows, april il .exe file obtained and, in the window that opens, first click on the button Yes and then OK. Accept, therefore, the conditions of use of the software, putting the check mark next to the item I accept the terms of the license agreement, and complete the setup by clicking on the buttons in sequence NEXT (three consecutive times) e end. If you don't want to provide anonymous usage statistics, uncheck the box Participate in the Customer Experience Improvement Program.
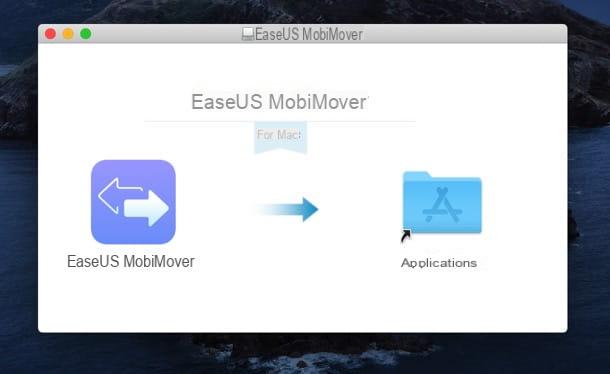
If you use a Mac, to install EaseUS MobiMover, you need to open the package .dmg obtained and drag the software icon into the folder Applications macOS: that's all. When you first start the software, you will have to respond apri I will advise you to share your schermo.
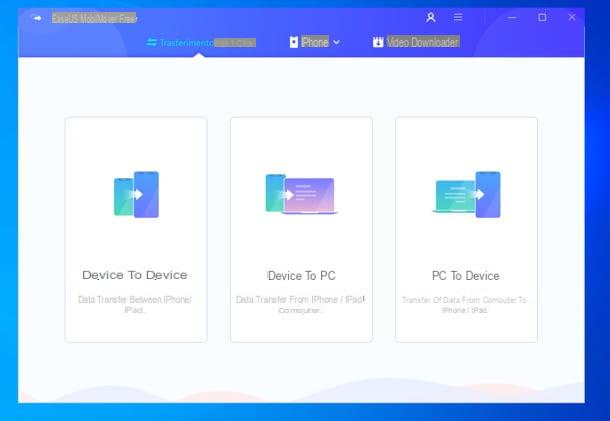
Now, no matter what operating system you use, boot up EaseUS MobiMover, connect theiPhone to the computer using the supplied Lightning cable (if you have activated the Wi-Fi connection in iTunes, you may not need it) and click on the button PC to Device.
In the next window, click on the buttons Add File e Add Folders, to select single images or photo folders to copy to iPhone, and presses the button Import, to start copying the data to your phone.
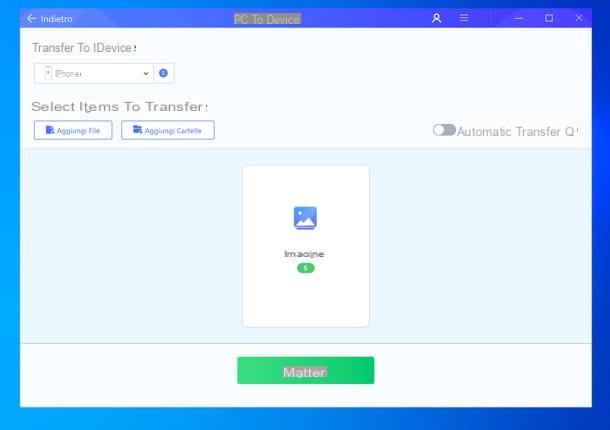
At the end of the procedure, you will find the photos in the iPhone Photos application (more precisely in the album By MobiMover). Happy? I also point out that by activating the lever Automatic transfer, you can activate the automatic copy of the images on the iPhone when it is connected to EaseUS MobiMover.
Transfer photos from PC to iPhone wirelessly
Do you want transfer photos from PC to iPhone without synchronizing them between the two devices and without using cables? Don't worry, you can do this too.
AirDrop (solo Mac)
If you're using a fairly recent Mac, you can count on AirDrop, a wireless technology based on Bluetooth and Wi-Fi that allows you to exchange data between two Apple devices. It works with most Macs manufactured after 2008 and with all iPhones starting with iPhone 5.
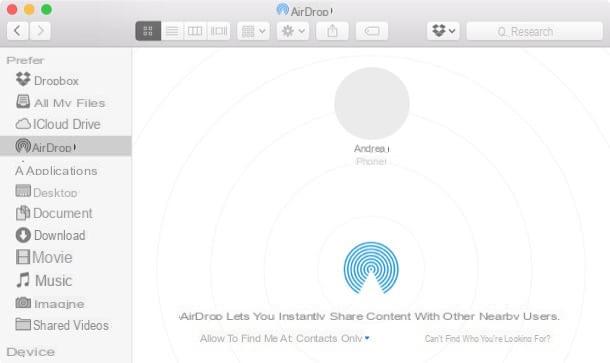
To copy photos from computer to iPhone using AirDrop, open the Finder on your Mac (the smiling face icon in the Dock bar) and select the item AirDrop from the left sidebar. At this point, turn on the iPhone and wait for your photo (or in any case the photo of the owner of the iPhone) to appear in the Finder window on the Mac. Drag the photos to be transferred to the "iPhone by" on the recipient's photo and that's it.
If you encounter any problems, make sure that Bluetooth is active on both devices and read my guide on how AirDrop works, there you will find everything explained in great detail.
Send Anywhere (Windows/macOS)
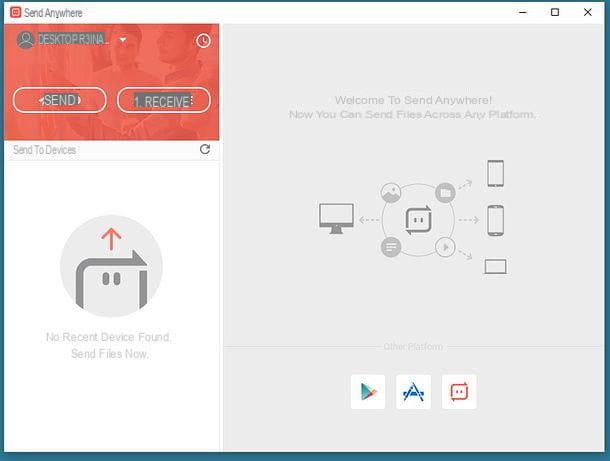
Send Anywhere is a great free application that allows you to send and receive files wirelessly between a variety of devices. It supports not only iPhones and Windows PCs, but also Macs, Linux computers and Android devices. This means you can use it to wirelessly transfer photos, videos and other types of files to tons of different devices in just a few clicks (just type a confirmation code on the target device and you're done).
To download Send Anywhere on your PC, connect to the program's website and click on the button Download found under the heading Windows. When the download is complete, open the Send Anywhere installation package (SendAnywhereSetup.exe) and click in sequence on the buttons Yes e Next. Then put the check mark next to the button I accept the agreement click her cousin Next, four consecutive times and then on install, Next e Finish, to conclude the setup. If you are using a Mac, you can download Send Anywhere directly from the Mac App Store.
You are now free to send photos from computer to iPhone. Then open Send Anywhere on your PC, click on the button Send located at the top left and drag the images you want to send to the iPhone into the program window. Next, click on the button Send and pinned the code that is displayed on your computer.
When the operation is complete, start the Send Anywhere app on the iPhone, press the button You will recive, enter the code that appeared on the PC screen and press the icon of arrow, to start transferring the photos to your phone.
Articolo realizzato in collaboration with EaseUS.
How to transfer photos from PC to iPhone


