


Would you like to copy some photos from PC to iPad to show them to your friends but you don't know how to proceed? No problem, this is one of the easiest things in this world! You probably didn't notice it, but iTunes, the famous multimedia software from Apple, includes a very useful function that allows you to copy photos from your computer to the iPad in an extremely simple way.
All you have to do is connect your tablet to your computer, turn on the image sync function in iTunes and choose the folders that contain the photos you want to transfer to iPad. In this way, all the images contained in the selected folders will be automatically copied to the iPad and can be easily browsed using the iOS Photos application (the one where there are photos and videos made with the tablet).
Also, you should know that there are cloud-based services that allow you to create a photo library on the Internet and automatically synchronize it on various devices: iPad, iPhone, Windows PC and Mac. This means that if you want, you can say goodbye to cables and keep your photos synchronized on all devices without having to "manually" select the contents to be transferred from one terminal to another. Come on, what are you waiting for to deepen the subject? Take a few minutes of free time and find out how to upload photos to iPad thanks to the information I'm about to give you!
Upload photos to iPad using iTunes
Let's start with the more "traditional" procedure, the one that allows you to synchronize a folder of photos on your computer with the iPad using iTunes.
iTunes, as you most likely already know, is included “standard” on all Macs while it is available as a free download for Windows PCs. If you have a Windows PC and haven't installed it yet, use the Windows Store to get it.
If you are using a version of Windows older than 10, connect to the Apple website instead and click on the button Download to start the download. Once the download is complete, open the file iTunes6464Setup.exe and finish the iTunes installation process by clicking on the button first NEXT and then Install, Yes twice in a row e end.

At this point, all you need to do to upload photos to iPad is to connect your tablet to your computer using the supplied Lightning / USB-C cable and launch iTunes (if it hasn't already started up by itself). If this is the first time you put the iPad in communication with the computer, authorize the connection between the two devices by pressing the button Continue that appears on the PC screen and on the button Authorize which instead appears on the tablet screen.
Next, click on theiPad icon that appears at the top left of the main iTunes window, select the item Gallery from the sidebar of the program and put the check mark next to the item Synchronizephoto. Then expand the drop-down menu Copy photos from and select the folder on your computer where the images you want to upload to the iPad are stored. On Mac, instead of a folder, you can also select the entire application library Gallery.
If there are several sub-folders in the selected folder and you want to manually choose which ones to synchronize with iPad and which not, put the check mark next to the item Selected folders and choose from the box below the folders you want to copy to your tablet by placing a check mark next to their names. When the operation is completed, first click on Apply and then Synchronize (bottom right) to sync PC photos with iPad.

If you want to get the ability to sync photos, videos, music and other content with the iPad wirelessly, select the item Riepilogo from the left sidebar and put the check mark next to the item Sync with iPad via Wi-Fi. Wireless synchronization (therefore without physically connecting the iPad to the computer) occurs only if both devices are connected to the same Wi-Fi network.
When the sync is complete, you can disconnect the tablet from the computer and go to see your images on the tablet. To view the photos transferred to iPad from your PC, all you have to do is log in to the app Gallery (the one where the photos you took with the device's camera are stored), press the button Album located in the top center and select the album that has the same name as the folder you synced from your computer.
Remember that from now on iTunes will automatically sync with your iPad all the images you save in the folder you selected earlier. And if you delete any photos from the folder, they will also be deleted from the iPad storage.
If you want to remove this automatism, you must disable the synchronization of images on iPad by connecting the tablet to the computer, selecting its icon in iTunes and removing the check mark from the item Synchronize photos present nella sezione Gallery.
Upload photos to iPad using iCloud
Does the "manual" transfer of photos from one device to another seem a bit too cumbersome to you? Then I recommend that you consider using a cloud service like the ICloud Photo Library.
The iCloud Photo Library is a free service from Apple that allows you to store your photos and videos in a single online library automatically synchronized with all devices: iPhone, iPad, Windows PC and Mac. Just associate your devices to the same Apple ID.
The only negative side of the iCloud Photo Library - if we want to consider it this way - is that to take advantage of the service to the fullest it is necessary to subscribe to a paid plan of iCloud Drive, the cloud storage service from Apple (which with its free plan reaches up to 5GB of storage, too little for photos and videos). The prices of the paid plans of iCloud Drive start at 2,99 euros / month for 200GB of space.
All clear? Well, then let's take action right away and see how to activate iCloud Photo Library on iPad. There are two steps to take: the first is to subscribe to an iCloud Drive paid plan and the second to activate the service itself.
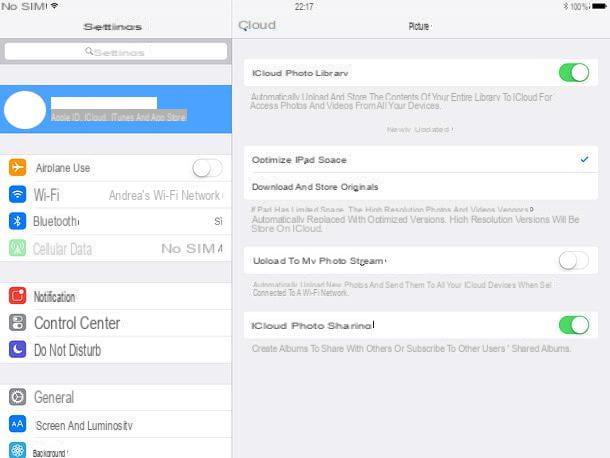
- To sign up for an iCloud paid plan, open the settings of iOS by pressing the gear icon on the home screen, select the you don't know, then the voice iCloud, available space graph on iCloud and the voice Change storage plan. If you are using an iOS version earlier than 10.3, you need to follow a slightly different procedure: access the settings of iOS by pressing the gear icon on the home screen, select the items iCloud> Storage from the screen that opens and select the item Buy more space.
- To activate iCloud Photo Library, go to settings of iOS, select the you don't know from the left sidebar, go up iCloud> Photo and activate the function ICloud Photo Library. In the same screen, I recommend that you also activate the function Optimize iPad space: in this way, all the older videos and images will be stored in high resolution only on iCloud, freeing up precious space on the iPad memory (where they can be downloaded again by simply pressing on their thumbnails). If you are using an iOS version earlier than 10.3, you need to follow a slightly different procedure: select the items iCloud> Photo from the screen that opens and activates the function ICloud Photo Library.
Mission accomplished! You have now activated your online photo library and can edit it from all devices connected to your Apple ID (i.e. the same Apple ID configured on the iPad).
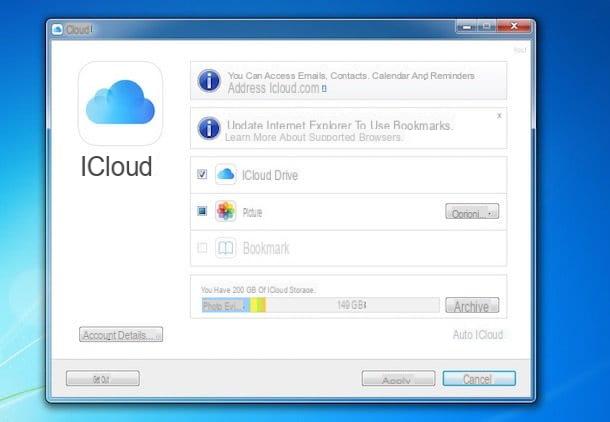
To upload a photo to iCloud Library using Windows, you need to install the free iCloud client and log in to it with your Apple ID. After that you have to click on the button options placed next to the item Gallery and you need to make sure that the ICloud Photo Library is active. When the operation is complete, copy the photos you want to transfer to iCloud in the folder indicated in the iCloud client settings (which you can also modify if you want) and that's it.
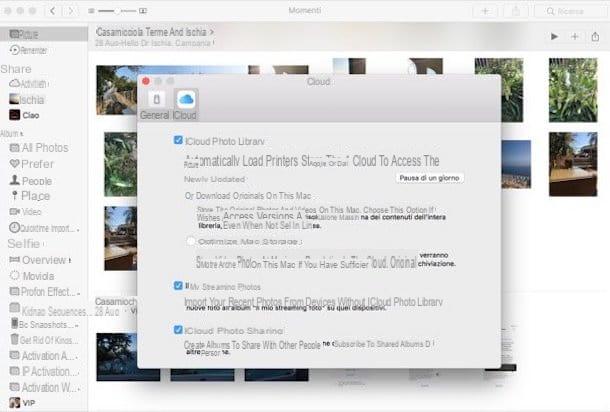
If you use a Mac, since iCloud is included "standard" within the operating system, to upload new photos to your online library, all you have to do is open the application Gallery and drag the images of your interest into it.
For this to work, macOS must be associated with the same Apple ID as the iPad (you can check this setting in System Preferences> iCloud) and in the menu Photos> Preferences in the Photos app there must be a check mark next to the item ICloud Photo Library.
If you want to know more about iCloud Photo Library and how it works, check out my tutorial on how to store iCloud photos. If, on the other hand, you want to save some money and want to avoid subscribing to a paid iCloud plan, try Google Photos which allows you to upload photos up to 16MP and videos up to 1080p resolution to an online library without space limits. It doesn't integrate perfectly into iOS like the iCloud library, but it also integrates with Android.
Other solutions to upload photos to iPad
- Cable transfer - if you have a iPad Pro 2018 or later equipped with a USB-C port, you can connect the iPhone to the iPad directly via a USB-C to Lightning cable and transfer the photos following the procedure that is proposed to you on the screen.
- Lightning-USB sticks - if you need to transfer photos from PC to iPad on a frequent basis, you may want to consider purchasing a Lightning-USB stick. If you have never heard of them, these are special USB sticks designed to be used with iPhone and iPad (by connecting to the Lightning port of iOS devices), thanks to which it is possible to copy files from computer to Apple devices and vice versa in a very simple.
- AirDrop - All the latest Apple devices, including Macs, support wireless data transfer technology that allows you to exchange any type of file (including photos) between various devices. If you want to know more, read my tutorial on how AirDrop works.
- Send Anywhere - for devices that do not support AirDrop, such as Windows PCs and older Macs, Send Anywhere is available, a free application that allows you to store files on an online space and synchronize them on all your devices in a very simple way. To find out how it works, connect to its official website.


