


Metal Gear Solid V: The Phantom Pain - Strategic Guide main missions Rango S. In this section of our comprehensive guide to MGSV: The Phantom Pain, we'll see how to get through the main missions by completing the secondary tasks and obtaining the Rango S.
BASIC ADVICES FOR THE S-RANK S - Remember that for the RANGO S you will need to reach a high amount of points at the end of the mission that corresponds to 130,000 or more. This value is always given by:
MISSION TIME
If you're a sprinter and managed to stay stealthy enough, you'll be able to take the S only takes as long as it takes to get it, which varies from mission to mission. Find the time required for the S in the "ADVICES FOR THE S" section of each mission below.
TASKS MISSION
Mission tasks are a great way to get additional points so if you can and don't take too long, try to get some of them done.
STEALTH FACTOR
The stealth is of course the basis of a saga as Metal gear, in fact by completing missions without alerts and without being discovered you'll get additional points and bonuses especially if you never trigger the reflex mode.
PRECISION FACTOR
A huge amount of points is also awarded by tactical eliminations: these can be performed by strangling an enemy stealthily or hitting him precisely on the head, always without killing them. If an enemy triggers reflex mode, try hitting them precisely on the head to recover lost points.
Our advice is to play the missions quietly following only the advice of our WHAT TO DO sections. Then, once you know all the tactical points of the missions, replay them and do it as quickly as possible, in which case you can get the S simply by hurrying to complete it and completing a couple of tasks.
IMPORTANT - Clashes with the game's bosses will be marked BATTLE BOSS.
MISSION 0 - [FLASHBACK] PROLOGUE THE AWAKENING
WHAT TO DO:
In the prologue of the game you will only have to follow step by step the man who saved your life and do what he tells you. When you arrive at the hospital lobby the blindfolded man will leave you alone to distract the guards. At this point you simply have to cross the hall and reach the entrance of the building to start a filmed interlude. Left alone with the fireman, go to the exit of the building again to start another interlude. Once outside you will end up in the ambulance with the blindfolded man and all you can do is watch the fierce chase. When you come to your senses you will be saved by Ocelot who will provide you with a rifle to hit the Fireman. Shoot as much as you can until you reach the river where you will finish the chase and the mission.
ADVICE FOR THE S RANK:
MISSION TIME FOR S: 30:00 minutes.
The important thing is to be quick and not let the guards catch you. Stick like a shadow to the blindfolded man until you separate in the lobby. Instead of going forward to the stairs, leave your shelter and go back a few steps. If you look towards the ledge you will find a point to climb down and once underneath you can crawl quietly behind the desks on the left and pass the guards without being discovered. Finally pay attention to the last guard that separates you from the exit and reach the point to activate the cut-scene. Finish the mission quickly, without dying, to get the S easily.
MISSION ASSIGNMENTS:
-YOU COMPLETED THE MISSION WITHOUT ACTIVATING REFLEX MODE--
Reflection mode is activated when you are detected by a guard. In addition to the lobby area mentioned in the previous section, there are no other places to be discovered unless you wander around on your own without following the blindfolded man's instructions.
-YOU COMPLETED THE MISSION WITHOUT ALLOWING THE FIREMAN TO ATTACK DURING THE HORSE CHASE--
This task is quite difficult especially if you don't take your time well. The burning guy will chase you on horseback and hit you with rays. However, if you manage to hit him just before the attack, he will break his blow and remain slightly stunned. Your job will be to shoot him full of shots every time the rifle sight turns red, this way you will always keep him away from your horse and he can never attack you. The only moments you have to be more careful are mainly 2, i.e. when the trees fall and you lose sight of it. In the first case it will come running through the fallen trees and ready to ignite you with a loaded attack. In the second one he will come out from a small road on the right to strike treacherously. Use every pause to reload and avoid being without bullets, a process that will block Big Boss for a few seconds. After the two critical moments just mentioned the chase is now over and you can breathe a sigh of relief.
MISSION 1 - PHANTOM LIMBS
WHAT TO DO:
After the Tutorial with Ocelot you will have to reach the indicated city to get information about where Miller is locked up. You will discover that he is being held prisoner in the fort in Ghwandai Khar, in the white hut behind the red flag on the right. Go there and infiltrate to find Kaz handcuffed to a pipe. The Russians have not been lenient with him and you'll have to transport him to the recovery zone. Unfortunately a strange fog has invaded the landing zone and you are about to meet the Skulls. You will have to escape the enemy team and proceed to the next recovery point to complete the mission.
TIPS FOR THE S-RANK:
MISSION TIME FOR S: 12:00 minutes.
As usual, you must try not to die and never get caught. After completing the mission for the first time you already know where Miller is locked up so go to the captivity area and enter the city via the right bridge. Just before you get to the houses, squat down and crawl through the grass along the right rock face to the first wall blocking your way. Then climb up the right rock face and reach the collapsed wall on the left from where you can see the hut where Miller is locked up. Wait about thirty seconds behind the collapsed wall to see a guard climb up the left stairs and pass Miller's windows. Put the guard to sleep, climb over the wall and load him on your back to hide him immediately behind the house on the right in front of Miller's windows. Go back and enter Miller's place of confinement, paying attention to the guard who occasionally peeps into this area from the door after the prisoner's door. Release Katz, load him up and go back through the house where you hid the guard. Descend along the same wall you used to climb up. When you reach the bottom, put Kazuhira on the horse and use the Idroid to call the helicopter in a recovery zone close by but different from the one you set up. Go to the area and you can load Kaz without running into the Skulls.
MISSION TASKS:
The word (EM) stands for EXTRA MISSION, it means that it is better to replay the mission to complete that particular task, instead of performing it in the main gameplay of the mission.
-YOU'VE LOCATED THE LOCATION OF KAZUHIRA MILLER-
Follow the main gameplay of the mission to complete this task.
-YOU RECOVERED KAZUHIRA MILLER-
Pass the mission.
-YOU COMPLETED THE MISSION WITHOUT BEING DISCOVERED BY THE SKULL--
Now you'll have to overcome the Skulls without being seen, to do so you can use a "trick" and block the enemies under the bridge. After the arrival of the Skulls, take Kaz on your shoulders and go under the bridge going up from the right towards the two Skulls that are heading right for the bridge. Squat down and be quiet. Try to keep an eye on the two enemies without being seen by them and go down again slowly under the bridge. Always keep some distance from them. In this way you will attract your opponents by luring them under the bridge. As soon as you see that they are well on their way down, climb up quickly from your side of the bridge, put Kaz on his horse and hurtle across the bridge without ever stopping. This way the enemies will not see you because they are blocked by the right wall of the bridge.
-YOU GOT THE ROUGH DIAMONDS HIDDEN IN THE SPONGE FORTRESS-
The Rough Diamond in question is located at the initial location of the mission, just after being left by Ocelot in the ruins. To take the Diamond you will have to climb up the rock face to the right of the ruins looking at the point where you were with the horses. Use the following photo to get your bearings.
-RECEIVE THE WAKH SIND (EM)- BARRACKS COMMANDER.
It's best to tackle this task after you get the Fulton recovery device. The barracks in question is the northernmost one on the map. Enter from the left and climb up along the rock face. The commander is under the half-rocked building and you will recognize him by a red hat. There are no completion requirements, so enter as you wish and kidnap the commander, either asleep or stun him. Once you've got him, go out in the open and retrieve him with the Fulton ball.
-YOU RECOVERED THE DRIVER OF THE TRANSPORT TRUCK (EM)-
Better tackle this task after you get the Fulton retrieval device. If you have wandered around the map properly, you will surely have noticed a truck wandering around the main camps. Our goal is the truck's driver, and to make sure you find him easily, all you need to do is go to the EASTERN COMMUNICATIONS POST camp at around 10:00pm on the first day of the mission. There are 7-8 soldiers, far enough away and you can easily get rid of them by 11:30 p.m. because at that time the truck will arrive with the driver who will come down to have a chat with his buddies and instead he will find you, ready to wrap him and tie him to the Fulton ball to shoot him at your base.
MISSION 2 - [FLASHBACK] DIAMOND DOGS
WHAT TO DO:
Complete the Ocelot tutorial on how to perform some combat techniques on the oilform known as Mother Base.
ADVICE FOR THE S RANK:
Mission without final rank.
MISSION ASSIGNMENTS:
-YOU'VE COMPLETED FULTON RECOVERY TRAINING...
Follow the main gameplay of the mission to complete this task.
-YOU'VE RECOVERED THE STAFF BY INCREASING THE LEVEL OF THE SEARCH UNIT-
Follow the main gameplay of the mission to complete this task.
-YOU GOT THE CARDBOARD BOX BY COMPLETING THE BASIC TRAINING-
Follow the main gameplay of the mission to complete this task.
-YOU'VE COMPLETED YOUR IMMOBILIZATION TRAINING-
Follow the main mission gameplay to complete this task.
-YOU'VE COMPLETED YOUR ATTACK TRAINING-
Follow the main gameplay of the mission to complete this task.
MISSION 3 - THE HERO'S PATH
WHAT TO DO:
You must infiltrate the village of Shago and kill or extract Commander Specnaz. You can also find D-Dog at the beginning of this mission.
ADVICE FOR THE S RANK:
MISSION TIME FOR S: 10:00 minutes.
The commander is located in the main house. We must first use binoculars to mark all possible guards so that they are always visible. Now you should be able to get to the central house by first passing through the fields and then through the maze of dirt to hide in. Once you see the commander from the window of the house, try to lure him out by throwing an empty magazine. Once outside you have the chance to knock out the commander with a narcotic dart and load him up to take him into the dirt maze. Once there, look for a spot away from other guards and use the Fulton to send the commander back to base. Leave the area undetected and call the helicopter to complete the mission. If it took you a reasonable amount of time, you'll easily earn the S rank.
MISSION ASSIGNMENTS:
The wording (EM) means EXTRA MISSION, it means that it is better to replay the mission to complete that particular task, rather than performing it in the main gameplay of the mission.
-YOU'VE ELIMINATED THE COMMANDER OF THE SPECNAZ-
Follow the main gameplay of the mission to complete this task. Killing or retrieving the commander makes no difference for this task.
-YOU HAVE RECOVERED THE COMMANDER OF THE SPECNAZ-
Follow the section above "Advice for Rank S" to complete this task.
-YOU PICKED UP A HAOMA IN THE DESERT BETWEEN THE VILLAGE OF SHAGO AND THE LAMAR KHAAT PALACE-
Land in the area to the north and on your way to the village look for this plant in the desert dunes.
-YOU HAVE RECOVERED THE TREATED MATERIALS HIDDEN IN THE VILLAGE OF SHAGO (EM)-.
For this task it is better to have completed the first OPTIONAL MISSION of the game which involves the recovery of a Russian interpreter. By rescuing the interpreter you can finally interrogate the guards and understand what they say. Once done, enter the village of Shago and interrogate the guards with "Spit it out" to know where are the materials that will be marked on the map.
-YOU HAVE NEUTRALIZED THE COMMANDER OF THE LONG-DISTANCE SPECNAZ (100 M) (EM)-
For this task you will need a sniper rifle with an excellent zoom. Meet the requirements to develop it in the Mother Base. Set up in a location around the village and aim for the commander's window. As soon as he walks past the window, all you need to do is pull the trigger.
MISSION 4 - C2W
WHAT TO DO:
You will have to destroy the 3 Soviet communications equipment located in the indicated outpost. Better if you first developed the C4 explosive that has remote control. You may be able to get through the mission with grenades but they are not, say, the most stealthy. At the beginning of this mission you can also find D-Dog.
TIPS FOR THE S. RANK:
MISSION TIME FOR S: 08:00 minutes.
It is highly recommended that you tackle this mission at night. As soon as you arrive, take D-Horse and rush to camp. Arriving from the right you will immediately notice the first dish to be destroyed in the lower part of the camp. You should have no problem climbing above the cabin where it is installed to place the C4. Wait until you detonate it and place more C4 on the other 2 dishes around the camp in the higher areas. Watch out for the central one because there may be a guard that may be peeping in that area at times. Once you have placed the 3 explosives, sneak out of the area and detonate them as soon as you are just outside the camp. Now all you have to do is call Pequod with the hydroid and finish the mission.
MISSION ASSIGNMENTS:
The word (EM) stands for EXTRA MISSION, meaning it's better to replay the mission to complete that task, rather than performing it in the main gameplay of the mission.
-IDENTIFIES THE COMMUNICATION EQUIPMENT AT THE EASTERN COMMUNICATION STATION-
Follow the main gameplay of the mission to complete this task. WARNING because in some cases you may miss this simple task. Even if you know what they are and see the 3 antennas, you should frame all 3 of them with binoculars until they are marked on the map.
-IDENTIFIES THE COMMUNICATION EQUIPMENT AT THE EASTERN COMMUNICATION STATION-
Follow the main gameplay of the mission to complete this task.
-GET THE ROUGH DIAMONDS HIDDEN NEAR THE EASTERN COMMUNICATION STATION (EM)-.
Behind the eastern communication station there is a raised path between the rocks that offers you excellent visibility throughout the station. You can reach the path by galloping towards the station from the south and climbing up to the mountains on the left just before reaching the station. At the end of the path, once you see the station below you, look at the rocky part on the left to notice the diamonds in a niche.
-DESTROY THE RADIO TRANSMITTER AT THE EASTERN COMMUNICATION STATION-
Follow the main gameplay of the mission to complete this task.
-RECOVER 2 PRISONERS HELD IN THE VILLAGE OF WIALO (EM)-.
The best way to recover these prisoners is to use D-Dog. If you haven't unlocked or upgraded it, read our D-Dog Unlocking Guide as a sidekick. The big puppy is smart enough to point out all the points of interest on the map, including enemies and prisoners, without you having to frame him with binoculars. Just get close to the village. The reconnaissance area changes depending on your connection to D-Dog.
-FIND THE CONTAINERS OF MATERIALS FROM THE EASTERN COMMUNICATION STATION (EM)-.
You must have developed the Load 2 enhancement for the Fulton Recovery device. The two containers are easy to find, as the station is very small and the crates to be recovered are very large. Comuqnue one is located in the station, near the left rock face. The other one is located just after crossing the road in front of the station.
MISSION 5 - BEYOND THE CURTAIN
WHAT TO DO:
You'll have to recover the engineer from the Soviet camp of Wakh Sind. It's best to take this mission at night to avoid an overflow of guards. The barracks in question is the one furthest north on the map. Enter from the left and climb up along the rock face. The prisoner is locked underneath the half ruined building behind a red door that you will have to break in. Retrieve him and escape from the base. At the beginning of this mission you may also find D-Dog.
ADVICE FOR THE S RANK:
MISSION TIME FOR S: 16:00 minutes.
Once you arrive in the dilapidated building mentioned in the previous section, go downstairs and watch out for the guards in front of the prisoner's door. Narcotize them to have time to break down the door undisturbed. Now take the prisoner and deposit him just outside his cell, near the stairs you used to go down. If you look in the air you'll notice a hole in the ceiling, the best way out to recover the engineer. Once extracted, quickly escape from the base and call the helicopter for the nearest recovery point.
MISSION TASKS:
The word (EM) stands for EXTRA MISSION, meaning that it is better to replay the mission to complete that task, rather than perform it in the main gameplay of the mission.
-YOU HAVE RECOVERED THE ENGINEER BEING HELD CAPTIVE-
Finish the main Gameplay of the mission.
-YOU RETRIEVED THE ENGINEER WITH THE FULTON SYSTEM, THROUGH THE HOLE IN THE CEILING OF THE BASEMENT-
Follow the section above "Tips for S-rank" to complete this task.
-RETRIEVE THE PRISONER WHO WAS PLANNING TO ESCAPE FROM THE BARRACKS-
It is located at the top of the base wall near the main entrance.
-RECOVER THE FOUR-WHEEL DRIVE PATROL VEHICLE BETWEEN OUTPOSTS-
You're gonna need an upgrade for the Fulton system. The vehicle patrols the outposts and passes near the initial landing zone about 30 seconds after the mission begins. Then you go to stop near the main barracks entrance.
-OBTAIN THE WAKH SIND- BARRACKS PROJECT -
Open the map. Near the warehouse where the engineer is locked up there are 6 very similar small prefabs. The project is inside the one higher up towards the engineer. If you need you can also interrogate the guards and find out where it is.
MISSION 6 - WHERE DO THE BEES "REST"?
WHAT TO DO:
You will retrieve the U.S. secret weapon, the Honey Bee, hidden in Smasei fort. The weapon is located deep within the rock-cut construction. Enter and descend downstairs, to the left, to arrive in an area with an underground pond. To easily find this area you just need to mark with binoculars the guards who will arrive in Smasei on board a jeep and follow them in the depths of the complex to reach the weapon. Once you've recovered the Honey Bee, which you'll discover to be a prototype of missile launchers, you'll have to run away but in the upper clearing you'll be attacked by the Skulls, more precisely by the Special Fog Department, the same ones already seen in mission 1. Run away and reach the recovery zone to finish the mission.
ADVICE FOR THE S-RANK:
MISSION TIME FOR S: 28:00 minutes.
It's highly recommended to tackle this mission at night, so plan your flight to get there when it's dark. The darkness will make it very easy to reach Smasei without being noticed. Once there, with a bit of attention, you'll be able to cross the main square from the right. Once at the entrance of the caves, you will find a guard in front of you, be careful, fall asleep and hide it in a dark corner. Having already completed the mission, you know where the Honey Bee is, so go down into the depths of the complex and narcotize the men to defend the weapon. Return to the surface and prepare for the arrival of the Skulls. After the film, start running on foot whistling for D-Horse. Get on your horse and run like the wind towards the exit of the gorge where Smasei is. Hurry or the Skulls will make it impossible for you to escape. As soon as you get out of the main clearing things will get easier and you will be able to gallop quietly towards the recovery point. It is important, for the achievement of the S Rango S, that you do not use the Honey Bee keeping all the ammunition.
MISSION ASSIGNMENTS:
The word (EM) stands for EXTRA MISSION, meaning that it is better to replay the mission to complete that task, rather than performing it in the main gameplay of the mission.
-YOU HAVE RECOVERED THE HONEY BEE-
Finish the main gameplay of the mission.
-YOU HAVE ELIMINATED THE SKULLS (EM)-BATTLE BOSSES
Thanks to the Honey Bee you will have the chance to eliminate the damn Skulls but be careful because you only have 8 shots and you need 2 for each of the 4 enemy members. Remaining in the square outside the Smasei fort you can face the Skulls in the open air, or you can draw them inside the caves to replace them with grenades in the narrow tunnels of Smasei. The Skulls are formidable opponents and are above all very fast. To hit them, you'll have to pass them and wait for one of them to attack you with a saber. By promptly pressing the RT/R2 trigger you will be able to counter his blow by blocking it for a few moments with his own sword. This is the only time you'll have to hit him with the Honey Bee and blow his armor off. The Skull deprived of his armor is an even more deadly opponent who will now alternate saber attacks with Uzi's smitragliate attacks. Try to avoid the latter and repeat the process with the Honey Bee to completely incinerate the Skull. To pass the task you don't need to eliminate all of them, just one, but while you're at it, make them pay dearly! Remember, however, that using the Honey Bee takes away points at the end of the mission so, if you can, bring a powerful bazooka developed at the Mother Base. Alternatively, after locking the skulls with their sword, quickly jump to the command of a machine gun turret and unload it on them.
ATTENTION TO BLUE MIST: During the fight the Skulls can evoke a blue mist in which small groups of possessed soldiers will appear. Throw a grenade in the middle of the group in order to quickly eliminate the possessed and hit the Skulls that are hiding among them.
-YOU GOT THE HONEY BEE INTACT WITH ITS AMMO-
Follow the section above "Tips for Rank S" to complete this task. Actually, all you need to do is bring the Honey Bee home with at least one bullet left of the total 8.
-YOU RECOVERED THE PRISONER WHO CAN'T TALK (EM)-
It is located just after crossing the long bridge of the Mountain Repeater Base on the right. If you can't reach it in a short time it will be moved to the last area of the mission and you'll find it near the base of the central staircase leading to the caves.
-YOU HAVE RECOVERED 2 SNIPERS AT THE MOUNTAIN REPEATING BASE (EM)-
On your way to Smasei, from the starting point of the mission, you will reach the MOUNTAIN RELAY BASE. At this base you will notice 2 snipers patrolling the highest towers. They are the targets to recover. We recommend a stealthy and nocturnal approach to overcome the fortress defenses unharmed.
-YOU HAVE ELIMINATED THE COMBAT HELICOPTER (EM)-
It's better to bring a bazooka from the base and not use the Honey Bee's ammo to get a higher mission grade. The helicopter will meet you on the way to Smasei fort.
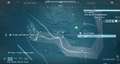
MISSION 7 - THE RED TRIO
WHAT TO DO:
You will have to eliminate or recover the 3 Soviet commanders gathered in a meeting at Wialo village. It is up to you to choose the approach, if you aim at a high rank but it will have to be stealthy. Remember that after the discussion the commanders will leave the area to return to their outposts.
ADVICE FOR THE S-RANK:
MISSION TIME FOR S: 16:00 minutes.
Better to tackle the mission at night. At the beginning, go to the stretch of road shown in the next picture and stop the Jeep with the commander and his 3 subordinates.
You can shoot out the tires, use a low-powered mine, whatever you want. Once the Jeep is stationary, stay in the shadows and narcotize everyone and then take them out with the Fulton along with the commander. Now go to the village of Wialo and wait for the other 2 to arrive. One will stay in the area below the main house while the other will go upstairs. With little effort you should be able to lure the one below behind an isolated wall, perhaps by throwing a magazine, and pick him up. To pick up the one at the top simply climb the stairs of the house and you will find it patrolling the terrace practically alone. Once you have recovered the commanders, sneak out of the area and enjoy the S rank you have just obtained. Be careful, it will take you a total of about 12 minutes to complete the mission.
MISSION TASKS:
The wording (EM) means EXTRA MISSION, it means that it is better to replay the mission to complete that particular task, rather than performing it in the main gameplay of the mission.
-YOU'VE ELIMINATED THE COMMANDER OF THE COMPANY STATIONED IN THE VILLAGE OF WIALO-
Finish the main gameplay of the mission. Killing or recovering the commander makes no difference for this task.
-YOU'VE ELIMINATED THE PLATOON COMMANDER STATIONED AT SHAG VILLAGE-
Finish the main gameplay of the mission. Killing or recovering the commander makes no difference for this task.
-YOU HAVE ELIMINATED THE PLATOON COMMANDER STATIONED AT WAKH SIND-
Finish the main gameplay of the mission. Killing or recovering the commander makes no difference for this task.
-YOU HAVE RECOVERED THE COMMANDER AND THE SOLDIERS IN HIS VEHICLE-
Follow the section above "Tips for Rank S" to complete this task.
-YOU HAVE RECOVERED THE 3 COMMANDERS
Follow the section above "Tips for S-rank" to complete this task.
-YOU LISTENED TO THE CONVERSATION BETWEEN THE 3 COMMANDERS TO THE END (EM)-
Arrive at the point where the commanders discuss, in the warehouse in the center of Wialo, before them and lurk to capture the entire conversation. You can also lurk on the roof of the large house with the flag in the centre of the town and near the warehouse with the commanders to use binoculars and listen to the conversation via microphone.
-YOU HAVE RECOVERED TWO PRISONERS HELD IN THE CITY OF GHWANDA-
The town in question is located north of the main mission area. Choose the ZA close to the city and interrogate the guards to find out that the prisoners are a two small huts to the right and left of the city.
MISSION 8 - OCCUPYING FORCES
WHAT TO DO:
MISSION TIME FOR S: 10:00 minutes.
After you have found and collected the plans for the armed deployment from the village of Sakhra Ee, you will have to destroy/recover the 2 tanks and the convoy truck. You will need the C4 and especially a rocket launcher, develop them if you don't have any.
IMPORTANT - If you don't want to wait until you have the necessary requirements to develop the rocket launcher or the Fulton's Load 2 upgrade, which are essential to overcome the mission, you can use the hidden bilndate to shoot down the 3 objectives. After reading the deployment plans, quickly leave the village of Sakhra Ee from the window and gallop right towards Smasei Laman. After a few hundred meters, you should see on the right a small outpost with 4 guards and an armored truck. Stun the guards quickly and fill the road in front of the C4 armored truck (at least 8, get supplies from Mother Base). Now hide behind your truck and wait for the convoy to arrive. Once you're above the C4s, quickly detonate all 8 of them and then jump into your tank to quickly divert the surviving vehicles.
TIPS FOR THE S-RANK:
You'll need to have the Fulton's Load 2 upgrade. Arrive at the cabin with the deployment plans by sneaking around the left rock face quickly and stealthily. After reading the plans, quickly reach the 3 targets with the D-Horse, placing the horse in the middle of the road to stop them. Now retrieve them from behind with the Fulton, one after the other with soldiers inside. Escape with your horse from the mission area to secure the S.
MISSION TASKS:
The wording (EM) means EXTRA MISSION, it means that it is better to replay the mission to complete that particular task, rather than performing it in the main gameplay of the mission.
-OBTAIN THE DEPLOYMENT PLAN-
Finish the main gameplay of the mission.
-ELIMINATE THE COLONEL-
Complete the main mission gameplay. It is located inside the central truck of the convoy, between the 3 tanks.
-RECOVER THE COLONEL (EM)-
Follow the section above "Advice for S-rank" to complete this task.
-ELIMINATE ALL TANKS-
Destroying or recovering them makes no difference. If you want to destroy them follow the section above "What to do" if you want to recover them follow the section above "Tips for S-rank" to complete this task.
-ELIMINATE THE COLONEL AND ALL THE TANKS BEFORE THEY REACH SMASEI-
Follow the section above "Tips for S-Rank" to complete this task.
-RECOVER ALL TANKS (EM)-
Follow the section above "Tips for S-rank" to complete this task.
-RETRIEVE THE PRISONER DETAINED IN THE VILLAGE OF SAKHRA EE (EM)-
The prisoner is in a large house in the northeast of the village. D-Dog (Guide to Unlock D-Dog as your sidekick) is perfect to help you locate him.
MISSION 9 - REINFORCEMENTS AND SUPPORT
WHAT TO DO:
You'll have to destroy at least one of the designated vehicles and escape from the mission area. You don't need to destroy the vehicle, you can even recover it to complete the mission but you'll need the LOAD 2 updates for the Fulton.
S-RANK TIPS:
MISSION TIME FOR S: 12:00 minutes.
Your priority is to recover ALL or most of the mission's armored targets. You will need the Fulton "Load 2" update. The vehicles will be reported to you by Miller two at a time, but you must first eliminate the previous two. Hurry because if you take too long to reach them, they may leave the mission area. Don't ask the base for supplies and if you need to shoot down some vehicles you can retrieve the CGM25 bazooka on one of the vehicles (trucks) target of the mission.
MISSION ASSIGNMENTS:
The wording (EM) stands for EXTRA MISSION, meaning that it's better to replay the mission to complete that particular task, rather than performing it in the main mission gameplay.
-ELIMINATES AN ARMORED VEHICLE-
Finish the main gameplay of the mission. You can also retrieve it.
-ELIMINATE MORE COMBAT VEHICLES OR HELICOPTERS (EM)-
You only need to eliminate at least two vehicles. Follow the section above "Tips for S-rank" to complete this task.
-ELIMINATE ALL ARMOURED VEHICLES WITHOUT RECEIVING ANY SUPPLIES OR ATTACK SUPPORT (EM)-.
Follow the section above "Advice for S Rank" to complete this task.
-SETTINGS OF A WEAPON CARRIED ON THE TRUCK (EM)-
Follow the section above "Advice for S Rank" to complete this task.
-RECOVER AN ARMORED VEHICLE-
Follow the section above "Tips for the S-rank" to complete this task.
-RETRIEVE THE 4 SOLDIERS IN SEARCH OF THE ESCAPED PRISONER (EM)-
You must find them before they find and eliminate the prisoner they are looking for and prevent you from unlocking the next mission task. For this and the next task, the help of D-DOG is essential (Help to Unlock D-Dog as a Shoulder). Go down with the helicopter into the ZA to the south in front of the junction, go immediately to the right and continue south to find the soldiers at the first junction to the left.
-RECOVER 6 PRISONERS (EM)-
For this and the previous task, the help of D-DOG is essential (Guide to Unlock D-Dog as a Shoulder). The prisoners are located at the following locations:
1- In the hut just outside Lamar Khaate's palace.
2-The hills east of Lamar Khaate.
3-In the canyon between ZA south and Lamar Khaate's palace, chased by the 4 soldiers to recover from the previous task.
4-Next to the river north of Lamar Khaate.
5-A Wakh Sind, in the basement cell. Where the engineer of the MAIN MISSION 6 was locked up.
6- Aboard a jeep moving near Wakh Sind.
-RECOVER 3 TANKS (EM)-
Follow the section above "Advice for S-rank" to complete this task.
MISSION 10 - AN ANGEL WITH BROKEN WINGS
WHAT TO DO:
You must recover Malak, the Mujaheddin imprisoned by the Soviets in Lamar Khaate's palace. In the first phase of the mission you will have to recover at least one prisoner from the ruined palace who will inform you about Malak's new position. Now proceed to the outpost designated to free Malak.
ADVICE FOR THE S RANK:
MISSION TIME FOR S: 20:00 minutes.
Once you've completed the mission a first time you already know that Malak will be transported to the distant outpost of Yakho Oboo. Use the D-Horse to quickly reach the convoy that will stop almost halfway on the way to Yakho Oboo blocked by a flock of sheep near the brick bridge. Use the Fulton to retrieve the Jeep and tank, then take Malak to the Pequod and leave the mission area to finish in a very short time and get the S.
MISSION TASKS:
The wording (EM) stands for EXTRA MISSION, meaning that it is better to replay the mission to complete that task, rather than performing it in the main gameplay of the mission.
-RECOVER THE MUJAHEDDIN HELD PRISONER NAMED MALAK-
Finish the main Gameplay of the mission.
-RECEIVE THE ESCORT'S BATTLESHIP (EM)-
Follow the section above "Tips for S-rank" to complete this task.
-RECEIVE 3 PRISONERS HELD AT THE PALACE OF LAMAR KHAATE (EM)-
A piece of cake if you tackle the mission at night and use the trusty DD (D-Dog Unlocking Guide as a sidekick) that will signal the prisoners and guards by marking them on the Idroid map. Hurry however, because otherwise they will be executed by the guards.
-RECOVER 2 PRISONERS HELD AT THE YAKHO OBOO (EM)-SUPPLY OUTPOST.
You can complete this task in pairs with the previous one. Once you have saved the 3 prisoners in Lamar Khaate, go to Yakho Oboo and save the remaining two together with Malak. It's a piece of cake if you tackle the mission at night and use the trusty DD (Unlock D-Dog Guide as a sidekick) that will signal the prisoners and guards by marking them on the Idroid map.
-HEARD THE LAST CONVERSATION BETWEEN THE DRIVER OF THE TRANSPORT TRUCK AND MALAK (EM)-
Follow the section above "Advice for S-rank" and when you reach the convoy, follow it stealthily to the outpost. Once there, follow the final conversation between Malak and the driver. Remember that you will need to see the on-screen dialogue subtitles to get through the task.
MISSION 11 - HIDDEN IN SILENCE
WHAT TO DO:
BOSS BATTLE
This mission is unlocked during one of the Optional Missions. You must defeat the deadly sniper Quiet and if you choose well you can make her your sidekick. Finishing the mission can be very difficult or really simple if you know the "trick" described in the following section which not only gets you the RANGO S immediately but also makes you complete all the tasks by eliminating the sniper in just over a couple of minutes. If you choose not to follow the trick but want a clean challenge, here are some tips that can be vital:
-MARKING: The girl must be marked with binoculars so that it is easier to locate her. Every time she moves she must be marked again.
-INDIVIDUZIONE: Quiet can be indivuduevole the use of D-Dog sniff, the glint of his sniper rifle, the laser miriono that will use occasionally and the directional microphone of binoculars. The girl will often hum a relaxing tune.
-ARMS AND DAMAGES: It takes a sniper with a lethal sniper rifle, or a bazooka, to beat a sniper with a lethal sniper rifle, if you have one of these weapons and well equip it and prepare for a position war. Try to hit the girl always on the head to take out as many life points as possible. With the night viewer you can identify the fragile points of the structures and injure the woman with environmental damage, in addition you can see the movements that the sniper makes when she disappears and that the viewer identifies as yellow trails.
Once the battle is over you reach the woman and make your choice... I would NOT pull the trigger!
ADVICE FOR THE S. RANK:
MISSION TIME FOR S: 10:00 minutes.
One of the easiest S's in the whole game. From where you start you mark Quiet so that it appears on the map. Now order a crate of supplies and have it delivered to the sniper. Wait for hidden vouchers and...Quiet will move to the right, usually. Mark it again and repeat the process. This time he'll drop it on the sniper's head by taking off half a blue bar. Repeat the procedure a third time to definitively eliminate Quiet and proceed to the final phase of the mission. Run quickly to her and DO NOT pull the trigger. You can see everything in our video just above.
MISSION TASKS:
-ELIMINATE QUIET-
Finish the main gameplay of the mission. "DELETE" means consume the blue or red bar of Quiet.
-DECIDE WHAT TO DO QUIETLY-
Complete the main gameplay of the mission and make your choice.
-NEUTRALIZES QUIETLY WITHOUT USING LETHAL WEAPONS-
Follow the section above "Tips for Rank S" to complete this task.
-NEUTRALIZE QUIET WITH HAND-TO-HAND ATTACKS-
Follow the section above "Tips for S-Rank" to complete this task. The supply box is considered hand-to-hand.
MISSION 12 - BOUND FOR HELL
WHAT TO DO:
BOSS BATTLE
This mission at the end of Optional Mission 82.You will have to escape from the Power Plant and retrieve Emmerich from the Afghanistan Central Base Camp. Finally you will have to collide with the Sahelanthropus escaping the Skulls and the research drones. It's best to tackle the recovery at night, but if you make it to the base by day, use the Phantom cigar to pass the time.
S-RANK TIPS:
MISSION TIME FOR S: 22:00 minutes.
A perfect Stealth mission where speed and stealth count. D-Dog (Help to Unlock D-Dog as a sidekick) will be your best ally to get the S because it can quickly mark all the enemies in the area. After escaping quickly from the power plant, skirting the left wall and paying attention to the helicopter, use D-Horse to gallop quickly to the camp where Emmerich is locked up, avoiding to trigger alerts in the street. Have Mother Base D-Dog send you and sneak down the camp from the right. Pass in front of the generator without entering or deactivating it, you will only generate an alert in exchange for very little time of total darkness. Once you're past the generator, crawl along the large left side of the generator and continue straight ahead until you're slightly to the left. Remain lying down and go under the right pipes again until you turn, at the end under the bridge on the left. In the meantime D.Dog will have marked all possible enemies and you can easily avoid them, especially if the big puppy is equipped with a stunner. Go under the bridge and continue north along the right side of the large half-destroyed hangar and watch out for the annoying sniper on the roof. Once past the hangar you will see a small warehouse made of metal sheets in front of you. Enter from the back and collect the poster of the MODEL from the right wall. Pass the sheet metal warehouse coming out from the north and crawl to the highest point of the base passing through the tall grass on the far right of the hangar where Emmerich is locked up. You will notice that only the door on that side opens, so wait for the guards to move away and enter. DO NOT use Emmerich's recommended Walker Gear, but exit and turn left immediately. Pass behind the hangar and follow the right wall to the exit. The only guard you need to watch out for is the one on the cabin shortly after you start skirting the rock face towards the base exit. dry Emmerich in the tall arboreal and put the guard out of action. Keep going and thanks to D-Dog you can avoid the guards because you will have them safely marked on the map. It is essential that you do not harm Emmerich in any way. When you arrive at the exit, prepare to meet the Sahelanthropus.
HOW TO ESCAPE THE SAHELANTHROPUS WITHOUT HITTING EMMERICH:
One of the most difficult tasks in the game where luck counts for a lot. Once the intermission is over, run between the legs of the Sahelanthropus and hide behind the right covers. If Metal Gear hasn't seen you, you can try to reach ZA quickly and run away with Emmerich. If the beast shoots at you, it means that your escape has failed and you will have to lose him. By hiding somewhere else. As soon as he loses sight of you, put Emmerich in the tall grass and lie down next to him holding Y/triangle when the search pods arrive (which you can destroy from afar with a silenced weapon). Miller will inform you when the Metal Gear has lost sight of you at that point, if you have previously called the helicopter, it will arrive and you can load Emmerich and leave the area.
WARNING: If the Sahelanthropus is convinced that you are hiding behind a pile of rocks it is able to crush and destroy them to reach you.
DO NOT FIND YOU: If you poprio you can not lose him because the Metal always sees you, whipped behind a pile of rocks and when the beast tries to spot you shoot the flying kid with the gas mask (the same as the Prologue) that will appear near the head of the Sahelantropus. Remember to hit him with a silenced weapon. If you can catch him, the Metal Gear will look somewhere else.
Once on the helicopter, shoot the Search Drones and, after the slow motion jump, the robot to terminate the mission. If Emmerich hasn't been hit and you've stayed in the 22 minutes required, without triggering alerts in the base, you'll definitely get an S.
MISSION TASKS:
The wording (EM) means EXTRA MISSION, means that it is better to replay the mission to complete that task, rather than perform it in the main gameplay of the mission.
-ESTABLISH CONTACT WITH DR. EMMERICH-
Finish the main gameplay of the mission.
-RETRIEVE DR. EMMERICH-
Finish the main Gameplay of the mission.
-RECOVER DR. EMMERICH ENZA WHO SUFFERS ANY DAMAGE (EM)-
Follow the section above "Tips for the S Rank" to complete this task.
-GET THE VERTICAL POSTER OF AN ATTRACTIVE MODEL (EM)-.
Follow the section above "Tips for Rank S" to complete this task.
-RECOVERS 3 WALKER GEAR FROM THE CENTRAL BASE CAMP (EM)-.
Requires Fulton Upgrade Loads 2. The 3 WGs are located at the base entrance on the left. Hard to miss them. If you have DD with you, you'll be notified immediately.
-OPTIMISE THE PROJECT FROM THE CENTRAL BASE CAMP (EM)-
It's in the right-most hangar, identical to the one in which Emmerich is locked up.
MISSION 13 - PITCH BLACK
WHAT TO DO:
Go past the village of Masa along the right wall. At the end of the village you will find a Jeep, take it and drive to the Mfinda oil plant. Here you will have to infiltrate and turn off the central generator. In addition you have to blow up the main tank and escape from the Hot Zone.
TIPS FOR THE S. RANK:
MISSION TIME FOR S: 16:00 minutes.
Take a rocket launcher or grenade launcher with you. Quickly reach the Jeep mentioned in the previous section "WHAT TO DO" while remaining stealthy. Get to the oil rig quickly, and if you haven't brought it with you, have DD (D-Dog Release Guide) sent to you from Mother Base. The big puppy will signal all the guards at the plant so you can reach the central switch to turn off undisturbed. Exit and go to the closest point to the complex exit where you can hit the tank with the rocket launcher. Blow up the tank and sneak out of the complex with the Jeep you arrived in before reinforcements arrive. In the meantime, call the helicopter so that it is ready for your return to the area.
MISSION ASSIGNMENTS:
The word (EM) stands for EXTRA MISSION, meaning it's better to replay the mission to complete that task, rather than performing it in the main mission gameplay.
-SWITCH OFF THE OIL TRANSFER PUMP-
Finish the main Gameplay of the mission.
-DESTROY THE OIL-WATER SEPARATOR TANK...
Complete the main Gameplay of the mission.
-RECOVER 4 CHILD SOLDIERS FROM THE VILLAGE OF MASA (EM)-
They are on the left towards the end of the village and just before the Jeep. Do not be fooled, they are not children they are soldiers, they will go to sleep anyway for recovery.
-ABANDON THE HOT ZONE BEFORE THE MFINDA OIL FIELD IS ISOLATED (EM)-
Follow the section above "Tips for S Rank" to complete this task. The camp is isolated when Walker Gear arrives.
-RECOVERS THE EARWIG VULTURE LURKING IN THE BURNT VILLAGE (EM)-
You will pass through the burnt-out village just before you reach the oil rig. If you have D-Dog with you, finding the vulture will be a piece of cake. Get him to sleep and get him back.
-RECOVERS 4 WALKER GEAR ISOLATING MFINDA'S OIL FIELD (EM)-
Once we blow the tanker, 4 Walker Gears will be here in about a minute. All you have to do is eliminate their carriers and retrieve the vehicles. You'll need Load 2 upgrade for the Fulton.
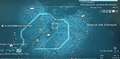
MISSION 14 - LINGUA FRANCA
WHAT TO DO:
You must identify the interpreter and follow him stealthily from interrogation to interrogation to find the target, known as the Viscount, and retrieve him.
ADVICE FOR THE S. RANK:
MISSION TIME FOR S: 08:00 minutes.
The Viscount is located under a small canopy in the northeast of the village of Kiziba, near the border of the mission map. Reach this place, quickly and stealthily during the day (otherwise at night the Viscount is moved), remove the guard and pull the prisoner out of the mission area. You will find the Viscount in POINT A of the following picture:
MISSION TASKS:
The wording (EM) stands for EXTRA MISSION, meaning that it is better to replay the mission to complete that task, rather than performing it in the main mission gameplay.
-IDENTIFIES THE AFRIKAAN INTERPRETER-
Finish the main Gameplay of the mission. Remember to frame it with binoculars.
OPTIONAL COUNCIL: If you retrieve the interpreter at the end of the mission you will have a valuable help in interrogating the guards who speak Afrikaans.
-IDENTIFY THE VISCOUNT-
Finish the main Gameplay of the mission. Remember to frame it with the binoculars.
-RETRIEVE THE VISCOUNT-
Finish the main gameplay of the mission.
-LOCALIZES THE POSITION OF THE 4 PRISONERS THANKS TO A CONFIDENTIAL FILE (EM)-.
The file is located inside the large raised wooden house in the center of the kiziba field.
-RECEIVES 3 PRISONERS HELD AT THE KIZIBA CAMP (EM)-
Simply follow the Interpreter or collect the previous task file to find out where to find them. DD (Help to Unlock D-Dog as a Shoulder) is also great for this kind of task.
-RECEIVES A CONTAINER OF MATERIALS IN THE KIZIBA FIELD (EM)-
In the area to the left of the camp, near the house where the Viscount is being interrogated. You will need Fulton's Load 2 Upgrade.
-LISTEN TO THE INTERROGATION OF THE 4 PRISONERS (EM)-
Begin the mission at night and follow through to the end without being discovered by the Interpreter. Do not create confusion by trying to rescue the prisoners. Once you hear the Viscount's interrogation, save him from execution.
MISSION 15 - GHOST FOOTPRINTS
WHAT TO DO:
Simply infiltrate the abandoned Fingers village and destroy/recover the designated 4 Walker Gears.
TIPS FOR RANK S:
MISSION TIME FOR S: 12:00 minutes.
A decisive assault with the helicopter is perfect to eliminate the targets in a very short time. However, if you want to use a more stealthy solution use the C4 or a rocket launcher from a well defended area and then quickly escape from the hot zone.
MISSION TASKS:
The wording (EM) means EXTRA MISSION, it means that it is better to replay the mission to complete that particular task, rather than performing it in the main gameplay of the mission.
-ELIMINATE ALL WALKER GEAR-
Finish the main Gameplay of the mission.
-PICK UP A FINGERPRINT (YELLOW) AT THE ABANDONED VILLAGE OF DITADI (EM)-
The village is situated on a rocky peak. If you climb over the peak behind the village you will easily find the plant, especially if you have DD (D-Dog Release Guide) with you.
-RECOVER ALL WALKER GEAR (EM)-
Finish the main gameplay of the mission by retrieving the Walker Gear, you'll need Fulton's Load 2 Upgrade.
-FIND A TRUCK AT THE ABANDONED VILLAGE OF DITADI (EM)-
At the entrance to the Village, which is hard to miss, you'll need Fulton's Loads 2 Upgrade.
-RECEIVE 2 PRISONERS HELD AT THE ABANDONED VILLAGE OF DITADI (EM)-
Simply take DD (Unlock D-Dog as a sidekick) with you or question the guards to find them easily. Ditadi's village is very small, so they are almost impossible not to find.
MISSION 16 - THE GROUP OF TRAITORS
WHAT TO DO:
BOSS BATTLE
Pick up the classified file from the tent in the Initial Mission Zone. Once you have discovered the location of the convoy, go to the airport and enter from the back to find yourself right in front of the truck and the two wagons that accompany it. Prepare to defeat the new Skull team.
NOTE: If you have not developed Load 2 for Fulton you will need to drive the truck out of the mission area.
ADVICE FOR THE S-RANK:
MISSION TIME FOR S: 16:00 minutes.
All you have to do is run quickly to the airfield, enter through the back and eliminate the Skulls. If Quiet is with you the process will be much easier (Help to unlock Quiet as a shoulder). Once eliminated get into the truck and run quickly to the mission border.
ALTERNATIVE STRATEGY: If you don't want to face anyone, use Fulton Load 2 to quickly recover your truck. Then call D-Horse and make a fast getaway to the mission border.
HOW TO DEFEAT THE SKULLS AT NOVA BRAGA AIRPORT:
As soon as you approach the truck the 4 opponents will come out. Highlight them immediately with binoculars so that you can always control their life energy. Stay and fight in the clearing in front of the truck, staying far enough away not to damage it. The Skulls will attack you mainly like those of MAIN MISSION 6 but they will be able to plant explosive rocks and even throw them at you. Quiet will position itself in a tower next to them to hit the Skulls as long as you stay in the open in front of the truck. The best tactic is to counterattack them with their sword and shoot them with a good bazookata. Fortunately, there are two tanks in front of the target truck. Mentra Quiet riddles the Skulls with his sniper rifle, you get in the tank and fire as many shots as you can at them. You only need 2 well-placed shots to take one down and you can hit more than one of them with a single blast (but watch out for the truck that must not be damaged). Tired of your trick, the Skulls will throw you off the wagon and leave you with little vital energy. Luckily Quiet will cover you while you hide to regain energy. There may be possessed soldiers to support the Skulls but they are not a real problem. Once the Skulls are gone, take the truck and run for the mission border. The elimination of the 4 enemies will earn you 50,000 extra points with which you will reach the S without problems.
OPTIONAL TIP: Defeated Skulls can be recovered with the Fulton shortly after being killed. To unlock this opportunity, however, you'll need to continue with the main story.
MISSION TASKS:
The wording (EM) stands for EXTRA MISSION, meaning that it is better to replay the mission to complete that task, rather than performing it in the main gameplay of the mission.
-IDENTIFIES THE ESCORT'S BATTLESHIP-
Use binoculars on the tank near the mission target truck.
-IDENTIFY THE TRANSPORT TRUCK-
Use binoculars on the mission target truck.
-RETRIEVE THE TRANSPORT TRUCK-
Finish the main gameplay of the mission. If you don't have Load 2 for the Fulton you will need to drive the truck out of the mission area.
-ELIMINATE THE SKULLS-
Follow the section above "Advice for Rank S" to complete this task.
-DISCOVER THE INTENDED ROUTE OF THE ESCORT UNIT BY RETRIEVING A CONFIDENTIAL FILE--
Finish the main gameplay of the mission by reading the file in the initial tent.
-RECEIVES THE DRIVER OF THE TRANSPORT TRUCK (EM)-
Enter from the back of the airport, the starting point of the truck, and lure the driver away from the truck by staying away from the truck too. Stun him and recover him. If you get too close, the Skulls will start fighting.
-RECOVER 3 SOLDIERS OF ZERO RISK SECURITY-
Follow the previous task and lure the other Zero Risk soldiers away from the truck to recover them.
-HEARD ALL THE CONVERSATIONS OF THE TRANSPORT TRUCK DRIVER AND THE SOLDIERS AT THE GUARD POST-
After discovering the truck's route thanks to the file, follow it with binoculars to eavesdrop on conversations without the Skulls arriving. The first conversation will take place on departure at the back of the Nova Braga eareport, the second halfway to Camp Kiziba and the third right at Camp Kiziba.
MISSION 17 - SAVE THE AGENTS
WHAT TO DO:
You will have to rescue the 2 agents held prisoner in Kiziba camp. For the mission and related tasks it is very useful to be accompanied by DD (Guide to Unlock D-Dog as a Shoulder) who will detect enemy tracks and locations where the prisoners are hidden without effort. REMEMEMBER that if you take too long to rescue the agents, they will be executed.
ADVICE FOR THE RANK S:
MISSION TIME FOR S: 10:00 minutes.
Choose the D-Horse as your shoulder and gallop to the nearest Agent, the one that can't be retrieved with the Fulton. Load it onto the horse and quickly go to the second member to be extracted. Retrieve it with the Fulton and then call the helicopter to the ZA with the horse and the first agent.
MISSION ASSIGNMENTS:
The wording (EM) means EXTRA MISSION, it means that it is better to replay the mission to complete that particular task, rather than performing it in the main gameplay of the mission.
-RETRIEVE THE ESCAPED ESPIONAGE UNIT MEMBER WHO ESCAPED THROUGH THE NORTH FOREST OF THE CAMP-
Finish the main gameplay of the mission.
-RETRIEVE THE MEMBER OF THE ESPIONAGE UNIT HELD PRISONER AT THE KIZIBA CAMP-
Finish the main Gameplay of the mission.
-RECOVER 2 FAC (EM)-OFFICERS.
They can be recognized with Binoculars. They are located near a Jeep reaching the road in front of the ZA as soon as the mission starts. If you hurry you can retrieve them together with the Jeep. These 2 soldiers are in charge of killing the second member of the espionage unit to be recovered then, after a few minutes from the start of the mission, they will be killed.


