


In the past few days you have found some photos that you had no memory of in a folder on your computer. Being really beautiful, you immediately thought of posting them on social networks in such a way as to show them to everyone but your friend, present in many shots, does not seem to agree. How to solve? Well, simple: you could crop the images in such a way as to exclude those in charge and share them anyway.
How do you say? It would interest you as well but you don't have the slightest idea how to do it? Well, simple, indeed more: using gods programs to crop photos, to be precise those that I have reported below, in this guide of mine dedicated to the topic in question. There is something for all tastes, both free and paid, for Windows and Mac. “Traditional” software aside, there are also solutions that can be used directly from the browser and tools that work on smartphones and tablets. In short, whatever device you have and whatever your preferences are, in the end, you will see, you will be able to find something that will satisfy you.
Then? May I know what are you still doing standing there? Get comfortable and immediately start focusing on reading everything below. I am sure that you can then tell yourself happy and satisfied with what you have learned and, of course, with the final result obtained with your images. Are you ready? Yup? Great. Ban the chatter and proceed.
XnView MP (Windows / Mac / Linux)
The first among the programs I want to tell you about is XnView MP. It is one of the most popular free image viewers available for Windows and Mac (as well as Linux). It is known for supporting over 400 different graphic file formats (including EXIF data and other advanced properties) and for including a number of advanced features that allow you to edit images. Among these there is the possibility to crop photos.
To use it, connected to the program's website, then scroll down the page and click on the button Zip Win 32bit o Zip Win 64bit if you are using Windows 32 or 64 bit or on that Mac DMG 64bit if you are using a Mac.
When the download is complete, if you are using Windows, open the ZIP archive obtained and extract the contents to any folder and then api the file xnviewmp.exe present in it. If you are using a Mac instead, run the resulting .dmg file and drag the XNView MP icon to the folder Applications the finestra of the Finder appeared on the Desk. Then go to the folder Applications say macOS, fai clic destro sull'icona del programma e scegli apri per due volte di row.
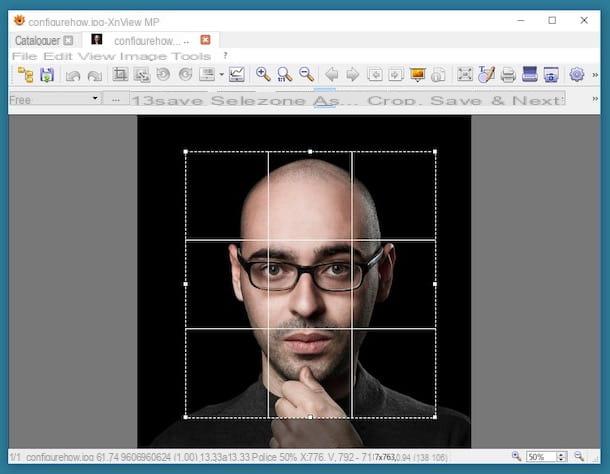
Now, regardless of the operating system used, once the software window is displayed, to use it for your purpose, click on OK and then select, from the menu on the left, the position on your computer where the photo you want to work on is located. Then select the image from the right side of the program window by double clicking on its preview and pressing the button Cut out, in the toolbar at the top.
Then select one of the presets available for cropping from the drop-down menu at the top left, drag the selection rectangle learned on the image to the correct point so that it covers the part you want to extrapolate from the photo and press the button Cut out, top right. This will replace the original image.
If you want to have the cutout saved as a separate image, click on the button Save selection as ... and indicates, from the further window that will open, the destination position, the file name and the format, then presses the button Save.
You don't want to use presets but you want to define the area to be cropped? You can do this too, don't worry. To do this, select Free from the drop-down menu at the top left and adjust the size of the selection rectangle that appears on the photo as you see fit. You can also set the exact size of the selection rectangle via the appropriate fields in the top center.
If you then want the selection rectangle to keep a fixed aspect ratio, choose, again from the drop-down menu just mentioned, the option Fixed proportions and proceed as I have just indicated.
PictureCutter (Windows)
Do you have a computer with Windows installed and are you looking for an alternative resource to the one I pointed out to you in the previous lines? Then take a look at immediately PictureCutter. It is one of the few programs made exclusively for cropping photos. It is a small free and no-install utility through which it is in fact possible to crop the most important parts of the photos in an easy and fast way. If you are looking for something simple but effective at the same time, this is the right tool for you.
You ask me how to use it? I'll point it out to you right away. First, go to the download page of the program and click on the link 2007-08-14 Picturecutter v0.3.0.244.zip to download the software to your PC. At the end of the download, extract the ZIP archive obtained in any position on your computer and start the .exe file inside it.
Then select the folder where the images you want to crop are located through the window that appeared on the desktop and then click on OK. Wait a few moments for the program to locate all the photos in the folder and always click on OK.
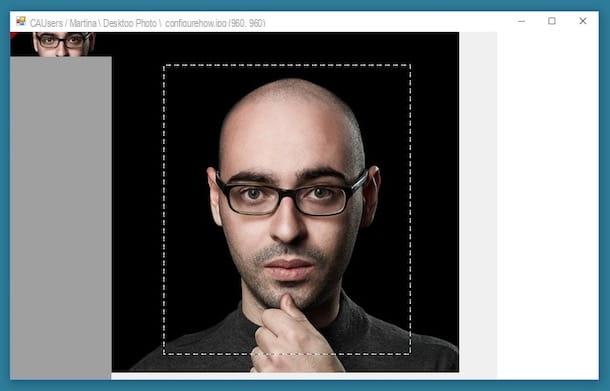
Now, select the reference photo from the sidebar of the PictureCutter window by double clicking on it, then drag and adjust the size of the selection rectangle so that it only includes the area you want to extrapolate from the crop.
To conclude and therefore to proceed with the cropping of the photo, double-click on the selection made and press the button Si in response to the question you see appearing. Done! The cropped photo will replace the original and you can therefore find it in the same position as the original.
IrfanView (Windows)

Another resource worthy of attention is IrfanView. This is one of the best free programs for viewing images on Windows. It supports all major graphic file formats (as well as video, audio and text files) and allows you to perform some basic photo editing operations. Among these there is also the possibility to crop. It has an essential interface and is very light. Furthermore, thanks to external plug-ins it is possible to extend its functionality. In short, try it now and you will see that you will not regret it.
To use it, first connect to its website, click on the button Download placed on the left in correspondence with the correct version of Windows you are using and press the button Download Now on the new page displayed to download the software. When the download is complete, open the .exe file obtained, click on Si and then NEXT four times in a row then click on Done to complete the setup.
Now, go back to the IrfanView website, select the item Languages at the top and click on the link Installer che trovi in corrispondenza della dicitura city. Then start the file relating to the localization in British obtained, click on install and OK.
At this point, in the IrfanView window that appeared on the desktop (if the program has not started automatically, call it yourself from the Start menu), click on your voice Options which is at the top, select Change Language…click your ITALIAN.DLL from the box on the right and then on the button OK. By doing so, you will translate the program interface into British.
With that done, I'd say you're finally ready to take the real action. Then select the image you want to crop by clicking on the icon gialla poster in the upper left part of the IrfanView window and indicates the reference position.
Select the area of the photo to crop by left clicking anywhere on the photo and, continuing to hold down, drag the rectangle that appears. When the selection is complete, release the "grip". If you want, you can subsequently adjust the size of the selection rectangle by dragging the edges and / or corners.
Finally, make the cropping of the photo by clicking on the item Modification present on the menu bar and choosing the wording Crop the selection to, in fact, crop the area of the photo inside the selection rectangle. If, on the other hand, you want to cut out the part outside the area, click on the button with the scissors that you find in the toolbar of the program.
To save the final result, click on the button with the floppy disk which you can always find on the toolbar, subsequently indicating the name and final format as well as the destination position.
FastStone Image Viewer (Windows)
As its name suggests quite easily, FastStone Image Viewer is a free program for Windows operating systems to open and view images in various formats (BMP, JPEG, JPEG 2000, GIF, PNG, PCX, PSD, EPS, TIFF, WMF, ICO, TGA and RAW formats of digital cameras). It integrates some editing functions, such as cropping, in fact, and also allows you to modify the images by also acting on the EXIF data of the same. It is very popular and very easy to use.
To use it, connect to the program's website and press the button download for free that you find in correspondence with the name of the program and then on the one under the heading exe on the new page that appears, in order to download the software to your computer. Then open the resulting .exe file and click on Si. So press on NEXT, its Accept, its Install and finish the setup by pressing on end.
Now, start the program by calling it from Start menu, wait a few moments for the software database to be updated then select, from the sidebar on the left, the reference position where the photo you want to crop is present and left click on it from the right side of the FastStone Image Viewer window .
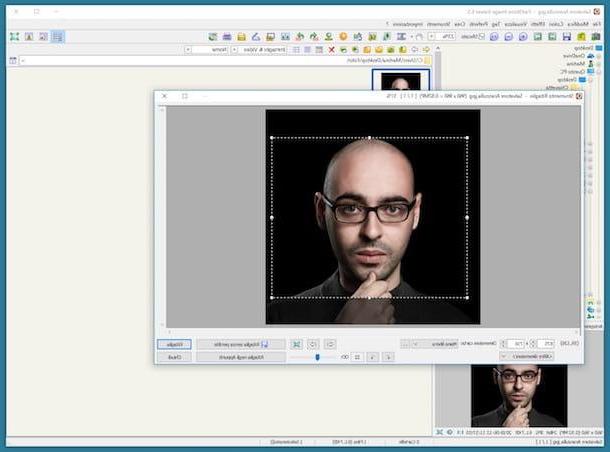
Now, press the menu Modification which is at the top left and selects the item Crop tool. Using the additional window that you see appear on the desktop, draw the selection rectangle by left clicking in a square point of the photo and, continuing to hold down, dragging the pointer and then release. You can further adjust the drawn rectangle by clicking and dragging its edges and / or corners.
If you want, you can also specify the exact dimensions by typing them in the appropriate fields at the bottom left. If, on the other hand, you want to select the area to be cropped using the available presets, select the one you prefer from the drop-down menu next to the item Paper size: down.
Then complete the procedure by pressing the button Cut out, bottom right. Doing so will replace the original image. If, on the other hand, you want to create a new file leaving the original photo unchanged, click on the button Crop without losses and indicates the name, position and format of the new cropped image that is about to be created.
I also point out that you can also copy the cutout to the Windows clipboard, in order to paste it where you think it is more appropriate. To do this, click on the button Clip to clipboard that you always find in the same window as above.
PicResize (Online)
Do you find the programs for cropping photos described in this guide very interesting but would you prefer to use an online tool without having to download anything to your computer (if not the final result)? I'll settle you immediately! USA PicResize. In fact, it is a free Web service that works from any browser and operating system that allows you to crop digital photos and perform various other image editing operations, including the ability to apply a wide range of special effects. It supports various output formats, such as JPG, PNG, GIF and BMP, and also allows you to set the quality and size of the images to be obtained.
To use it, connected to the home page of the service, click on the button KATEGORIEN and select the photo saved on your computer on which you want to act. If the photo you want to crop is online, move the pointer to the menu From Computer that stands at the top and choose From URL then indicate the reference link in the appropriate field.
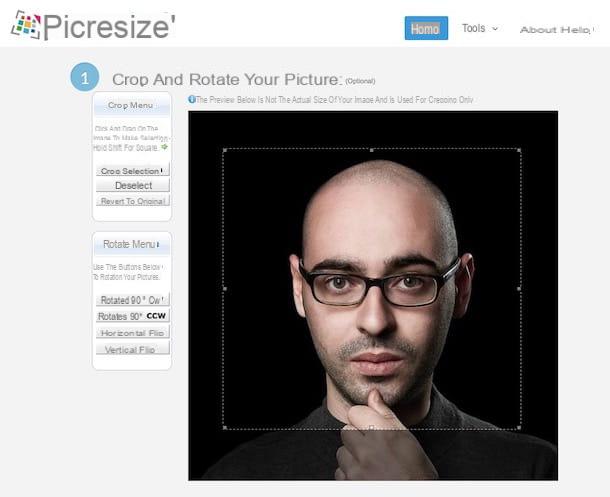
Now, press the button Continue which is at the bottom and in the editor you see appear draw the rectangle for selecting the area to be cropped by left clicking and continuing to hold down while selecting. If necessary, adjust its size by dragging sides / edges.
Then press the button Cross Selection which is on the left. After cropping, indicate the format in which you intend to save the file from the drop-down menu Image Format: which is at the bottom. Then press the button I’m Done, Resize My Picture!, always placed at the bottom.
Through the new page that will open you can download the cropped photo on your computer by pressing the button Save to disk. If you want to share it on the net, click on Save to Web.
Autodesk Pixlr (Android/iOS/Windows Mobile)

Do you own a smartphone or tablet and would you like to know if I can recommend some programs (or rather apps) to crop photos even in this case? Yes, of course. There are many resources of this type. Among other things, I suggest that you consider using Autodesk Pixlr, an excellent application for image editing full of ad hoc tools, completely free and usable on Android, iOS and Windows Mobile.
To use it for your purpose, download (via the links I gave you a moment ago), install and start the application on your device. Then press on the item Gallery to upload a photo from your device's media library, or press on Camera to take a photo on the spot.
You can then use the editor displayed to crop your photo as you see fit. Then press the button with the suitcase on the bar at the bottom of the screen, tap on the item clipping, select one of the predefined cropping formats or press the button Free to manually make the selection. Confirm the application of the changes by pressing the button with the check bottom right.
Once you have completed all the changes, you can save the final result by pressing the button done that you find located at the top right. Based on your needs and preferences, you can then choose to save the cropped photo in the memory of your device or share it online on the main social networks, simply by pressing the respective buttons on the screen.
Programs to crop photos


