Every time you transfer photos taken with your smartphone or digital camera to your computer it's always the same story: they end up being stored in that folder you've kept on your desktop for months, waiting to be organized as they should. ... and then you never deal with it! I know, tidying up on the PC can be difficult, very difficult, but don't you think that by arranging your shots you could set up a beautiful photographic collection ready to be pleasantly browsed at the most opportune moment? Yes, indeed.
Given the circumstances, if you allow me, I would then like to give you some advice: try using one of the programs to organize photos of which I decided to talk to you with this tutorial of mine focused precisely on the subject. There are both for Windows and for Mac, both free and paid. They are all quite simple to use and in some cases not only allow you to manage images but also allow you to perform simple editing operations.
Then? May I know what are you still doing standing there? Position yourself comfortably in front of your trusted computer and immediately begin to focus on reading everything listed below. I am sure that in the end you will be able to tell yourself very happy and satisfied with what you have learned and that your friends will not hesitate to ask you for useful tips about it. Are you ready?
XnView MP (Windows / Mac / Linux)
The first among the photo organizing programs I want to tell you about is XnView MP, a software for Windows, Mac and Linux operating systems, totally free (for personal use, otherwise you have to buy a license) and very easy to use.
It is used for viewing and managing digital photos, supports about 500 read file formats (including RAW files from digital cameras) and more than 70 output file formats. Note the fact that it also integrates some simple tools for image editing through which you can, for example, cut photos, rotate them etc.
To use it, first connect to the program's website, scroll down the page and click on the button Zip Win 32bit o Zip Win 64bit (if you are using Windows 32 or 64 bit respectively) or on that OSX DMG 64bit (if you are using a Mac), in order to download the software to your computer.
When the download is complete, if you are using Windows, extract the ZIP archive obtained in any location and then open the file xnviewmp.exe in it and click on Run. If in doing so you see an error message appear, start the program with administrative privileges by right clicking on its icon and choosing the option Run as administrator give the menu that appears.
If you are using a Mac instead, run the resulting .dmg file and drag the XNView MP icon to the folder Applications the finestra of the Finder appeared on the desk. Then go to the folder Applications say macOS, fai clic destro sull'icona del programma e scegli apri twice in a row, in order to circumvent Apple's restrictions on unauthorized developers.
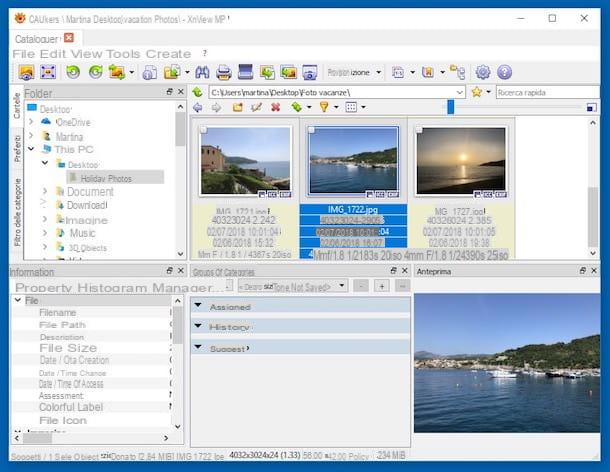
Now, regardless of the operating system, click on OK in order to display the main program window on the screen. On the left side of the same you will find the section through which you can access the various image folders, while on the right there is the viewer through which you can view the photos in miniature.
At the bottom left, however, you will find indicating the EXIF data, the histogram and the properties of the selected file. In the center there are the categories, while on the right there is the preview of the selected image that you can also view in an enlarged way by simply double clicking on them.
Each photo can also be added to favorites, to a specific category or classified by quality using the icons you see appear by pressing on them. To manage and carry out various editing operations you must instead select them and then use the appropriate buttons that you find on the toolbar at the top and the items attached to the menu bar, always at the top.
FastStone Image Viewer (Windows)
FastStone Image Viewer is one of the best programs to organize photos available for free for Windows, through which you can view, retouch and manage quickly and easily all major graphic file formats.
It is characterized by a very well designed and user-friendly user interface, which can be customized via skins, and includes multiple options for photo editing, such as those that allow you to correct the red eye effect and other parameters of the images (eg colors. , brightness, etc.).
To use it, connected to the FastStone Image Viewer website, click on the button download for free that you find in correspondence with the name of the program and then on the one under the heading portable on the new page that appears, in order to download the software to your computer.
Once the download is complete, extract the ZIP file obtained in any Windows location, start the file FSViewer.exe inside it and click on Run.
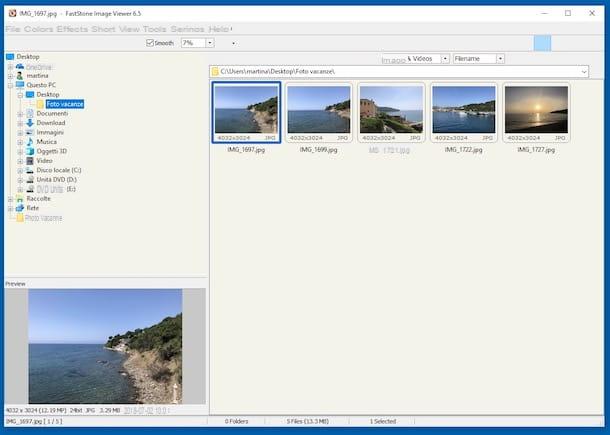
Now that you see the program window on your desktop, you can start organizing your photos as you see fit using the on-screen commands and tools. To be precise, in the left part of the FastStone Image Viewer window you will find all the various reference paths of the images, on the right there are instead the thumbnails of the photos part of the selected folder that you can possibly filter using the appropriate drop-down menus, while in below is the preview.
At the top of the program there is then the menu bar through which you can, by selecting the appropriate items and functions, add tags to the photos, choose the viewing mode, make simple editing operations and so on.
If you then want to enlarge one or more photos, double-click on their thumbnail, while if you want to view the properties of the chosen file, right-click on them and choose File Properties from the menu that appears. Finally, I would like to point out that from the same menu you can also access other useful functions for managing images.
Namexif (Windows)
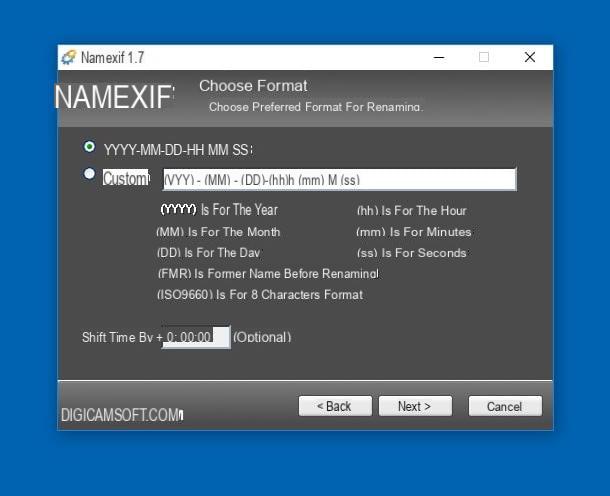
Namexif is a very useful software that allows you to organize photos by renaming them taking into account the EXIF data, that is the information automatically entered by digital cameras and smartphones in the photos taken, based on which it is possible to trace the date on which the photos were taken images, shooting locations and much more.
Using it, it is therefore possible to rename the photos in sequence by replacing their names with the dates and times of the shot. It supports various combinations of filenames and is easily usable by anyone.
To download it to your computer, connect to the download page of the program and click on the button Download Now that you will find by scrolling the latter, corresponding to the section Download.
When the download is complete, open the .exe file obtained and click on Si, Then I Agree, its Next, its install and Close, but will finish the setup.
Now that you see the main program window on your desktop, click on Next, presses the button add Files to add the single images on which you want to act or on that Add Dir to select an entire folder and click again on Next.
Then choose whether to use the default system to rename images based on EXIF data (YYYY-MM-DD-HHhMMmSS) or whether to use the customized one by specifying the various parameters "by hand" (Custom), decide whether to include information about the time (Shift Time by) and click your Next. At the end of the process, click on Finish.
IrfanView (Windows)
Although it is not really a program for organizing photos, IrfanView however, it is a resource that deserves to be mentioned in an article on the subject. It is in fact a file viewer, totally free and specific for Windows, thanks to which it is possible to open all the main image formats (but not only).
It also includes simple image editing commands, has an essential interface and is very light. Its potential can also be extended thanks to external plug-ins. In short, what more do you want?
You ask me how to make use of it? I'll point it out to you right away. First of all, first of all connected to the program's website, click on the button Download located on the left, corresponding to the correct version of Windows you are using, and press the button Download Now in the new page displayed, in order to download the software.
When the download is complete, open the .exe file obtained, click on Si and then NEXT four times in a row. Then press on Done but I will complete the setup.
Now, go back to the IrfanView website, select the item Languages which is at the top and click on the link Installer, in correspondence with the wording city. Then start the file relating to the localization in British obtained, click on install and OK.
At this point, in the IrfanView window that appeared on the desktop click on the item Options which is at the top, select Change Language…click your ITALIAN.DLL from the box on the right and then on the button OK. In this way, you are going to translate the program interface into British.
Now you can finally use IrfanView for your purpose. Then click on the icon of the gialla poster which is at the top left to open the image you want to view or, alternatively, drag the reference photo directly into the program window so that it can be displayed in the center of the same.
Once the chosen photo is displayed, you can scroll through the images part of the same folder by clicking on the directional arrows at the top of the toolbar. Also on the toolbar you will find the buttons to increase or decrease the zoom (the magnifying glasses), the one to view all the various info about the chosen file (the "I"), the one for printing (the printer) and to export the image in a different format (the floppy disk).
The button with the negative, which is always in the upper part of the program window, instead allows you to create photographic presentations by intervening on all the parameters of the case.
As for the possibility of carrying out simple editing operations on the photos displayed, you just need to use the ad hoc items that you find in the menu bar. From there, you can for example choose to rotate images, insert text, change colors and so on.
Photo (Mac)
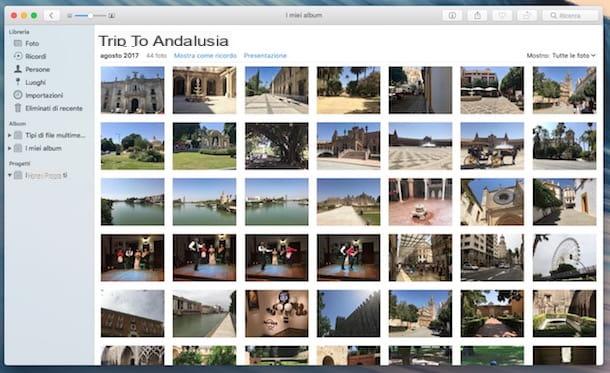
Are you using a Mac and are you looking for an alternative program to organize photos to the one I told you about at the beginning of the guide? Then I am happy to inform you that you can avail yourself of Gallery, the application already included in macOS for managing photos, in fact. It is in fact an Apple product that allows you to view, edit and catalog digital photos by importing them from your computer, iPhone and iPad and digital cameras.
It is totally free, very simple to use and can be used in conjunction with the function Photo library di iCloud, which synchronizes the entire photo library on all devices belonging to the same Apple account on which the feature is enabled. In this regard, it seems only right to point out that iCloud storage space is limited in a way free. The space offered at no cost is in fact 5 GB, to make the most of it you must therefore subscribe to one of the plans a payment (99 cents / month for 50 GB, 2,99 euros / month for 200 GB and 9,99 euros / month for 2 TB)
To use it from your Mac, start the app by clicking on its icon on the Launchpad (the one with the multicolor flower on white background) after which you will find yourself in front of the main application window. In the center there are all the thumbnail photos that you can choose to view, according to your preferences and needs, in order of import, by moments, collections or by years by clicking on the appropriate items at the top of the window.
On the left, however, there are the library (and the sections related to it), albums and projects. In the menu bar you will then find additional commands and functions useful for importing images, creating new albums, sharing your shots and so on.
By double clicking on a photo you can view it in an enlarged way and you can apply various types of changes by clicking on the button Modification top right. Through the editor that you will see appear you can therefore intervene on the light, on the colors, you can apply filters, crop the image and make various other corrections.
Other useful resources

None of the programs to organize the photos I told you about in this tutorial of mine convinced you in a particular way and are you looking for some alternative? I'm sorry but… don't throw in the towel just yet! Instead, try to take a look at my post dedicated to photo album programs and my guide on how to archive photos, maybe you can find something that can really help you.
Further interesting tools can then be found in my tutorial on programs to view photos, in my piece dedicated to programs to archive photos and in my article on programs to open photos.
Programs to organize photos