


Browsing through some photos on your PC, you have noticed that some of them are patently crooked, while others have perspective defects that give them an unnatural look. For this reason, you would like to know if there is a way to remedy the situation and correct these shots without being expert in photo editing. Of course there is! Just use gods programs to straighten photos and everything can be solved.
In the next paragraphs I will therefore list some solutions that will undoubtedly be useful for straightening the photos you have taken with your smartphone, with your camera and, why not, even those you have downloaded from the Internet. In the last part of the guide, then, I will not fail to list also the solutions to be used in the mobile environment, if the thing interests you.
So, what are you doing still standing there? Courage: make yourself comfortable, take all the time you need to concentrate on reading this guide and you will see that, by following my instructions step-by-step, you will be able to straighten your photos in no time! Happy reading and, above all, have fun!
- GIMP (Windows / macOS / Linux)
- Photoshop (Windows / macOS)
Programs to straighten photos
As I told you in the introduction of the tutorial, if your intent is simply to straighten photos because during the shooting phase you incorrectly tilted your smartphone or camera, you can do it using some applications included "standard" on Windows e MacOS. Of course, the programs I will talk about in later chapters of the tutorial are also suitable for this purpose, but you can avoid "bothering" them if the corrections you need to make are not particularly complex.
Photo (Windows 10)
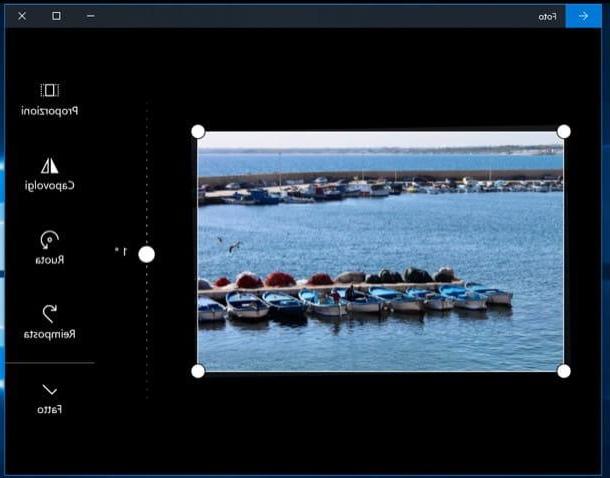
If your PC is upgraded to Windows 10, know that the application Gallery included “standard” in this version of the Microsoft operating system is perfect for straightening crooked photos. How can you use it for this purpose? To begin with, open the photo you want to retouch by double-clicking its preview (if Photo is not the default player because you have changed some Windows settings, right click on the photo preview and then click on the items Open with> Photos in the context menu).
Once the image has been imported into Photo, press the button Edit and create (l'icona della pencil and brush at the top right), select the item Modification and then presses the button Cut and rotate at the top right. At this point, drag the white dot placed at the top or bottom to straighten the photo: as you can see, by doing this a grid appears that helps you to be more precise.
When you have completed the image straightening procedure and you are satisfied with the result, press the button (✓) Done located in the lower right corner of the window and then click on the button Save (if you want to make changes to the original photo) or Save a copy (if you want to save an edited copy of the image). It wasn't difficult at all, was it?
Photo (macOS)
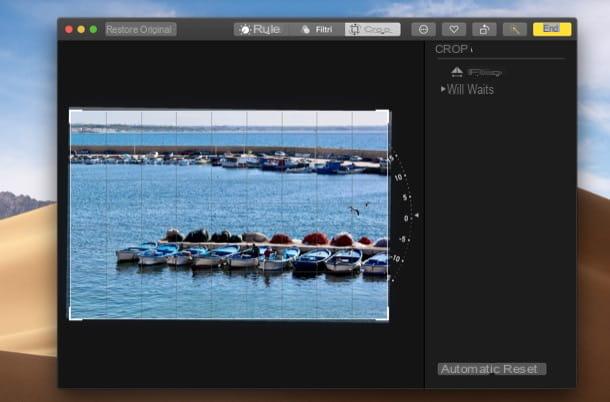
You use a Mac? If so, know that MacOS includes an application that allows you to easily straighten digital images: it is Gallery, which collects all the photos and videos placed in the user's library (and which syncs with iCloud, if you activate the iCloud Photo Library).
To straighten your images with Gallery, open the application by clicking on its icon on the bar Dock (the one representing a stylized flower), locate the image you want to retouch and double-click its preview to open it. If it is a photo imported to your computer that is not present in Photos, right-click on its preview and select the items Open with> Photos give the menu check if you press.
Now, press the button Modification at the top right, click on the tab Cut out and move the ◀ ︎ indicator that appears on the right side of the image to adjust the degree of skew to use to straighten it. If you want, you can also use the automatic correction tool integrated into the application by pressing the button Automatic located at the bottom right (although it is not always accurate). When finished, press the yellow button end which is at the top right and that's it.
Programs to straighten perspective photos
Did you come to this guide with the aim of correcting the perspective of a photo? In that case, I recommend that you use one of the following programs to straighten the perspective of photos. Of course, these solutions also integrate useful tools to straighten crooked images, as I already told you in the opening chapter.
GIMP (Window/macOS/Linux)
GIMP is a free and open source photo editing program that, thanks to its many features, has quickly earned itself the nickname of the best free alternative to Photoshop (which we will talk about later). It has a very easy to use user interface (fully translated into British) and includes many tools for drawing.
To this must be added the many filters that allow you to work on photos in an original and professional way, just like you do in Photoshop. Among its functions, of course, there is the one to straighten photos. It is available for Windows, macOS and Linux.
To download GIMP to your PC, connect to its website and press the buttons Download x.xx.x e Download GIMP x.xx.x directly. Once the download is complete, if you are using a PC Windows, open the file .exe you got and presses on the buttons Yes, OK, Install e end to complete the program installation.
A Macinstead, drag GIMP in the folder Applications say macOS, click on destroy the program icon and select the voice apri from the menu that opens twice in a row (this is necessary only at the first start of the program to “bypass” the macOS restrictions on software from non-certified developers).
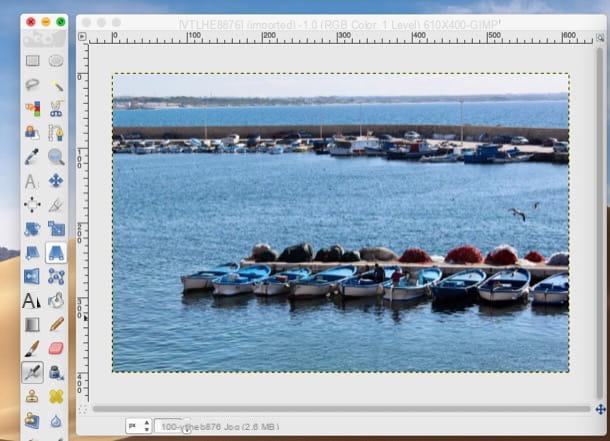
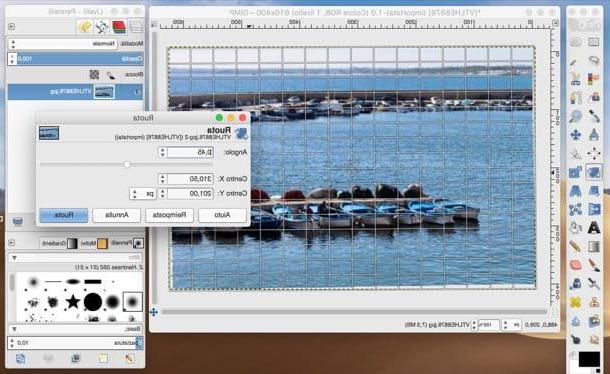
After installing and starting GIMP, open the menu Fillet (top left), select the item Apri ... from the latter and import the image you are interested in retouching into the program. To straighten the perspective, he then calls it back Perspective tool, by clicking on the icon parallelepiped with arrows located in the left instrument panel.
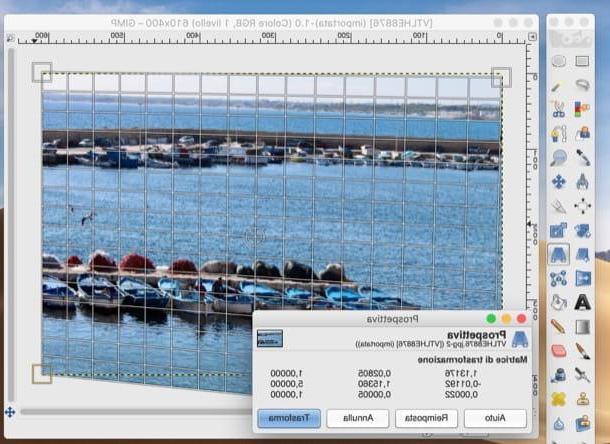
At this point, a grid will appear on the image in the central window of GIMP: move i square located at the four corners of the image and the hoops placed in the center to change the perspective and, when you have obtained the desired result, press the button Transform. In case of second thoughts, press the button Reset to redo the procedure from the beginning.
If, on the other hand, you just want to straighten a crooked photo, call up the tool Wheel from the tool panel on the left by clicking on the icon square with two arrows, click on the image placed in the central window of GIMP (if necessary) and move the cursor under the item Angle to make the necessary adjustments. At the end of the operation, press the button Wheel per salvare I modified it.
If after the rotation there are some “empty” portions of the image, recall it Crop tool, select the image taking care to exclude the empty spaces and give Submit on the keyboard.
When finished, open the menu Fillet and save the changes made to the image by selecting the item Export as and choosing the location and format in which to export the output file. For more information about the general use of GIMP, take a look at the guide I linked to you.
Photoshop (Windows / macOS)
Who does not know Photosop? It is the photo editing software par excellence used by all the greatest photographers, advertisers and graphic designers in the world to create high-profile graphic works. However it is easy to use even by newbies and can also be used for “basic” photo editing operations, such as those concerning straightening the perspective of photos.
The software is paid (the subscription starts from 12,19 euro / month), but you can test all its features for free for 7 days (as I have already explained to you in the guide on how to download Photoshop for free). Now I'll explain how to use it.
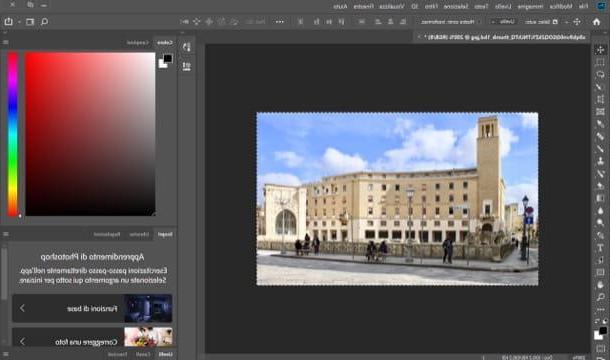
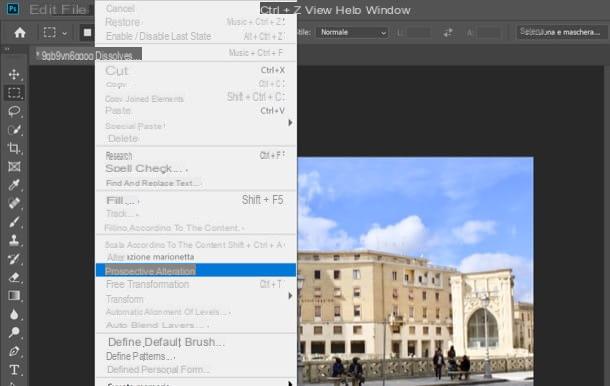
After starting Photoshop on your computer, import the photo in which you want to correct the perspective by going to the menu File> Open… (top left) and selecting the photo of your interest. At this point, if you are interested in correcting the perspective, open the menu Modification (top) and select the item Perspective alteration. Then follow the suggestion that appears on the screen by drawing quadrilaterals along the planes of the object in the photo, trying to keep the sides parallel to the lines of the object.
Once this is done, manipulate the perspective by moving the quadrilaterals you drew on the image, press on the board Altera located at the top left and straightens the subject, in such a way as to obtain the desired perspective. At the end of the operation, save the changes made by pressing the button (✓) placed at the top.
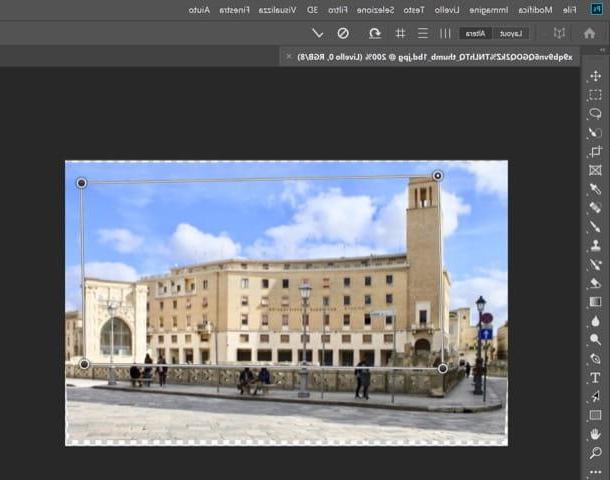
To remove the "gaps" created by the perspective alteration tool, select the image taking care to exclude the portions of the image that contain them using the tool Cut out e pulsing sul pulsating (✓) at the top right to save the crop.
Do you just want to straighten the photo because it's a little crooked? No problem: after importing it into Photoshop, select it by pressing the keys at the same time Ctrl + A (your Windows) or cmd + a (on macOS) and then go to the menu Edit> Transform> Wheel.
Position yourself, then, with the mouse pointer on one of the corners of the photo and, when you see the two arrows, hold down the left mouse button and move up or down to rotate it to your liking. If you are satisfied with the result, press the button (✓) at the top right to save the changes. At this point, all you have to do is delete the "empty" spaces that were created as a result of the clipping following the instructions I gave you a few lines above.
When you are ready to do so, save the output image by selecting the item Save with name from the menu Fillet Photoshop and that's it. If you want to deepen the subject and get more information on how to straighten photos with Photoshop, consult the guide I linked to you.
Programs to straighten photos online
want straighten photos online, without downloading any program to your computer? Know that there are web applications useful for this purpose that are really simple to use. One of the best on the square is Photopea, which works well with all major browsers, without installing any additional plugins.
Before explaining its use, I would like to tell you that Photopea is free, even if there are advertising banners on the page (not at all invasive) that can be removed by subscribing to its Premium version, which starts at 9 dollars / month.
To straighten a photo with Photopea, linked to its main page, press on (X) that appears at the top right to remove the welcome message and, if necessary, translate its interface into British by selecting the item cityno from the menu More > Language (in alto to destra).
At this point, import the photo you want to retouch by selecting the item Apri ... from the menu Fillet (top left) and, to refine the perspective of the image, open the menu Modification e seleciona le voci Transform> Perspective. Then serve yourself gods squares placed at the ends of the image to change the perspective and save the changes by pressing the button (✓) placed at the top.
If, on the other hand, you simply want to straighten the photo because it is crooked, press the button Cut out placed on the toolbar, position the cursor on one of the squares on the sides of the image and, when you see the arrows symbol appear, rotate the image until it seems straightened. At the end of the operation, select the image again and press the button (✓) at the top right to crop the photo and eliminate the blank areas that were created by the rotation. Simple, right?
When finished, select the item Export as from the menu Fillet (located at the top left), choose the output format in which you want to export the image and, finally, press the button Save.
App to straighten photos
Would you like to correct your shots by acting directly from smartphone or tablet? Know that you can do this by using photo straightening app such as those listed below.
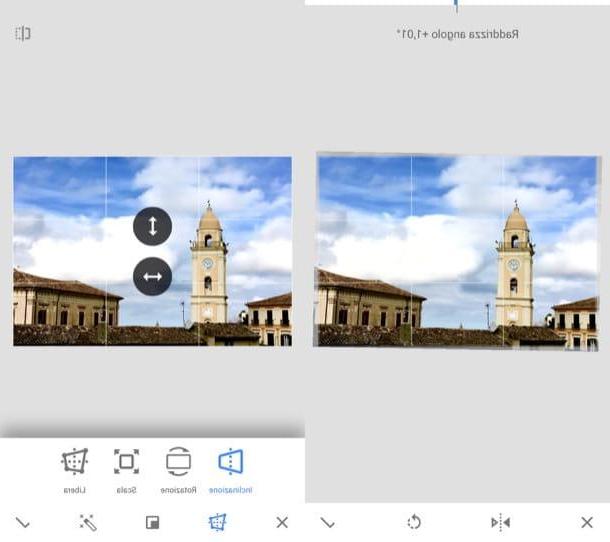
- Snapseed (Android / iOS) - this is an app developed by Google that integrates many useful tools for mobile photo editing, including some useful tools for straightening photos and correcting their perspective. I recommend it because it is 100% free and very simple to use.
- Pixelmator (iOS / macOS) - this is one of the best photo editing apps for Apple devices. It allows you to have full control over your shots and is available for both iOS (costs € 5,99) and macOS (costs € 32,99).
For more information about using these and other photo editing apps, see the guide I linked to you. It will surely be useful to you.
Programs to straighten photos


