


Are you looking for a way to store all your photos oniPhone but, at the same time, don't you want to consume all the memory available on your phone? Would you like to divide the photos you took with your “iPhone by” into albums but you don't know how to do it? Would you like to transfer some shots from computer to iPhone but can't find the right option to do it? Don't worry, you've come to the right place at the right time!
In the following lines, in fact, you will find explained how to store photos on iPhone taking advantage of the cloud services offered by Apple (which allow you to have your photo library saved on the Internet without taking up too much space on the phone's memory), how to organize them in albums through the iOS Photos app and how to copy entire folders of images from the computer to the "iPhone by" keeping them synchronized on both devices.
All you have to do is take five minutes of free time and try to follow the instructions I am about to give you: in this way you will be able to dispel all your doubts about managing photos on iPhone and keep photos and videos optimally on your phone. Apple house. Happy reading and have fun!
Store photos on iPhone with iCloud Photo Library
You would like it store photos on iPhone without consuming all the available space on the phone memory? In this case, you can't find a better solution than ICloud Photo Library.
The iCloud Photo Library is a service offered by Apple that, as the name suggests, allows you to create a cloud-based photo and video library. Put simply, this means that all photos and videos in the iOS Photos app are saved on a private online space and automatically synced across all devices associated with the same Apple ID.
How can such a feature save iPhone memory space? Simple. ICloud Photo Library includes a feature forautomatic space optimization which keeps on the phone an optimized version - therefore “lighter” - of the contents present in the Photos app and recalls their original versions (in high quality) only when needed, that is only when the user selects them to view them.
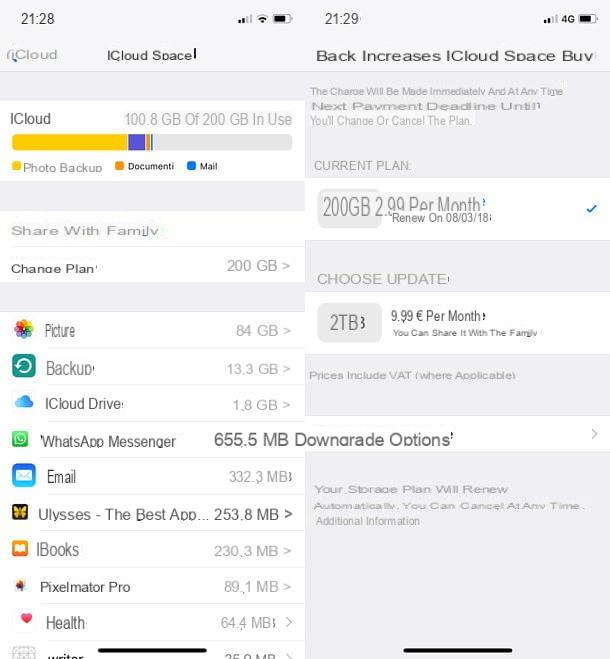
ICloud Photo Library is free, but sadly it erodes the available storage space on iCloud Drive. Now, considering that the basic plan of Apple's cloud storage service (the free one) offers just 5GB of storage, it is practically impossible to use the Photo Library without subscribing to one of the paid iCloud plans (99 cents / month for 50GB, 2,99 , 200 euros / month for 9,99GB and 2 euros / month for XNUMXTB).
In light of the above, before explaining in detail how to activate the iCloud Photo Library and how to enable automatic space optimization on the iPhone, let me show you how to subscribe to one of the paid iCloud plans: go to the menu Settings iOS (the gear icon located on the home screen), tap the you don't knowi went his iCloud> Manage Space> Change Plan and choose the plan you want to subscribe.
If in the menu Settings iOS can't find your name, it means you haven't paired your iPhone with an Apple ID yet. To fix it, tap on the item Log in to iPhone and log in to your account. Alternatively, if you don't have an iCloud account yet, press the item first You don't have an Apple ID or you have forgotten it and then Create Apple ID to create a new one. For more detailed instructions on the whole procedure, read my tutorial on how to activate iCloud on iPhone.
Once you have activated a paid plan of iCloud Drive, you can move on to activating the iCloud Photo Library and the function to optimize the storage space on the iPhone. Then go to the menu Settings iOS device (the gear icon located on the home screen) and first select the you don't know and then the voices iCloud e Gallery.
Then move up ON the function lever ICloud Photo Library, put the check mark next to the item Optimize iPhone space and that's it: from now on all the photos and videos in the Photos app will be uploaded to the cloud and automatically synchronized on all your devices. At the same time, iPhone storage space will be preserved thanks to the automatic feature that keeps only the optimized versions of photos and older videos on the phone.
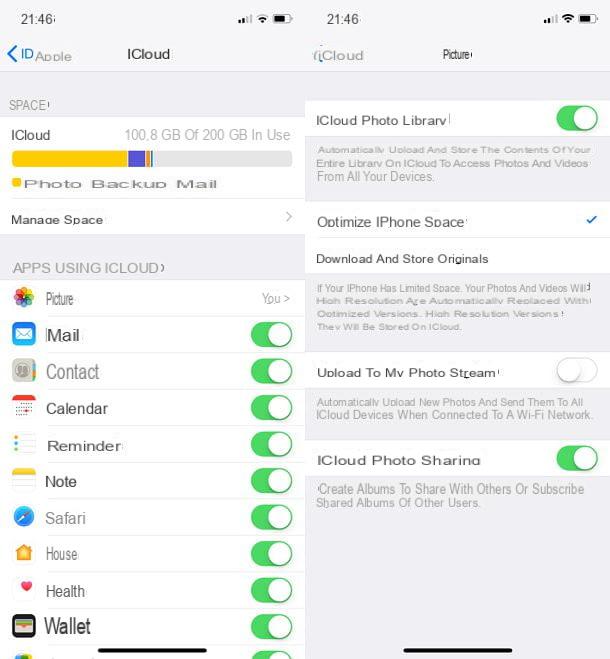
Please note: in the iCloud settings there is also an option related to Photo stream. This is another service offered by Apple, which allows you to save your photos on the Internet and synchronize them on all devices. It does not erode the storage space on iCloud Drive but, unlike the Photo Library, it cannot be used for content storage, as it only keeps the most recent 1.000 photos (up to a maximum of 30 days) and does not even include the videos.
Archive photos on iPhone with Google Photos
If you don't feel like spending money on one of iCloud's paid plans, you can store your photos on iPhone and save phone storage space using Google Photos.
Google Photos is the official app of the homonymous Google service, which allows you to store photos and videos on the cloud (on Google Drive, to be precise) totally free (limited to the 15GB available on the account). If there is not enough space available, you can purchase a subscription plan on Google One.
Another limitation of Google Photos, at least for what concerns the iPhone and iPad, is its ability to perform an automatic backup of the contents of the Camera Roll. Due to the restrictions imposed on iOS, in fact, Google Photos cannot act in the background continuously: after it has been started, the app, if it does not remain in the foreground, is automatically closed by the operating system (to save battery and not have system slowdowns) and then the backup of photos and videos stops.
To make a full backup of photos and videos with Google Photos, you need to open the app, keep it in the foreground and, if possible, connect the phone to a power supply (as running the app continuously can consume a lot of battery ). All clear? Well, if you agree, I'll tell you how to take advantage of this very useful service offered by Google.
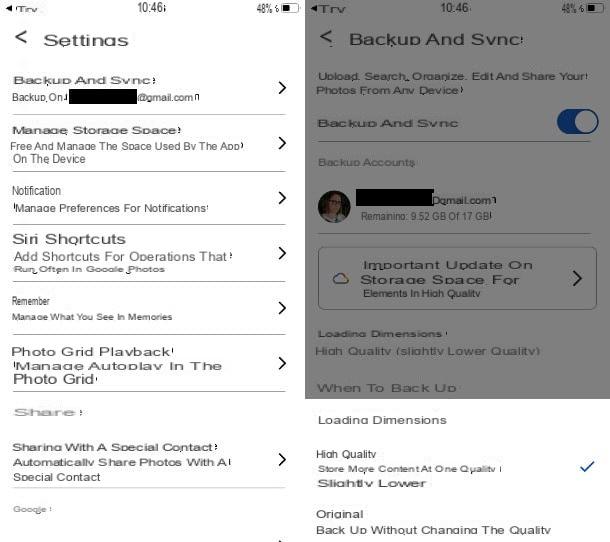
After downloading the Google Photos app from the App Store, launch it, log in to yours Google account (if you don't have one, you can create it directly from the application) and activate the photo and video backup via the on-screen procedure. If you skipped this step, tap yours miniature at the top and select the item Google Photos settings.
At this point, go on Backup and synchronizationsposta su ON the function lever Backup and synchronization and set the quality of multimedia files by voice Dimensioni cartoon. Then, to free up the space on the iPhone memory, go back to the Google Photos settings menu, tap on Manage storage space e pulsing sul pulsating Free up space: the photos and videos already uploaded online (and which can still be recalled from the app) will thus be removed from the device.
Manage photos stored on iPhone
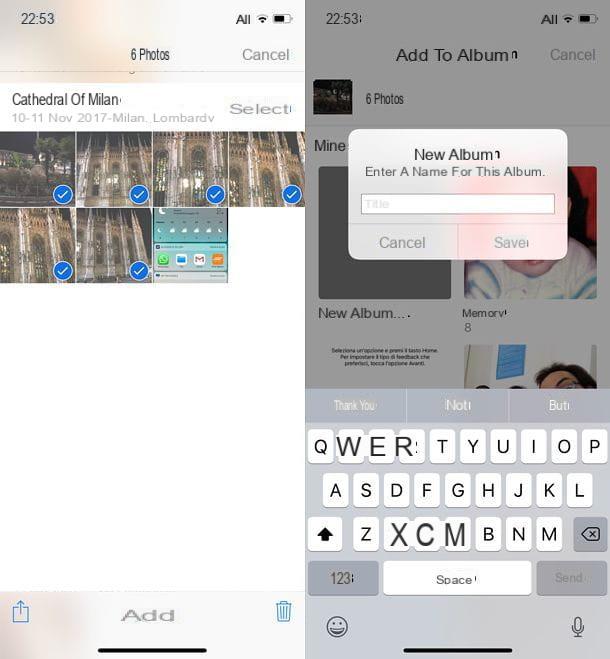
Would you like to organize the photos stored on your iPhone into albums but you don't know how to do it? Don't worry, this is child's play. All you have to do is open the app Gallery, go to the tab Gallery (bottom left) and select the images to include in the album.
To do this, tap the button Select located at the top right, select the thumbnails of the photos (and / or videos) to include in your album and first press the button Add (located in the lower center) and then on the name of thealbum in which to insert them. If you want to create a new album, press the box New album, type il title you want to assign to the latter and tap the button Save but I will complete the operation.
Once created, albums can be browsed via the tab Album Photos app (bottom right). Through the same menu, they can also be shared with other users, using the function ICloud Photo Sharing (to be activated in the menu Settings> [your name]> iCloud> Photos). To use iCloud Photo Sharing, open the album you want to share and tap on the item first Select (in alto a destra) and poi su Select all (top left). Then click on the icon of sharing (the square with the arrow inside) and select the option ICloud Photo Sharing give the menu to compare.
Next, choose theshared album in which to insert the selected photos (or create a new one), choose the identification with which to share it (by typing their email addresses or selecting them from the address book) and that's it.
Another way to easily find photos stored on iPhone is to create a list of favorite photos and videos. To add photos or videos to your favorites, you simply have to view them in the Photos app and press the icon of heart which is located at the bottom. After that, you will be able to find all your favorite content in the album Add to Wishlist of iOS.
Finally, I would like to point out that, thanks to the artificial intelligence technology included in the Photos app, you can also browse images based on the people or objects portrayed in them. You can find the lists of people portrayed in photos in the album People or you can search for photos based on the objects they immortalize (eg birthday cake) using the magnifying glass located at the top right.
Save photos from PC to iPhone
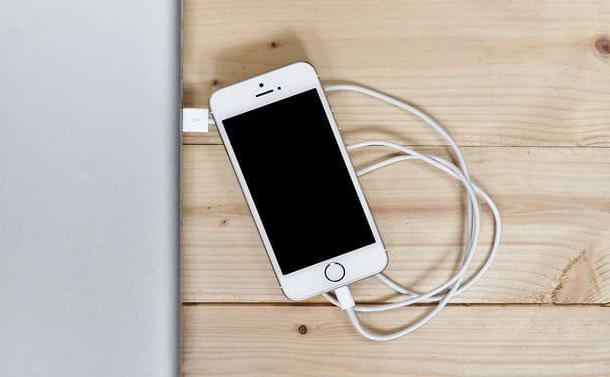
Now let's see how to store the photos in a folder on the computer on the iPhone (then keeping the contents synchronized on both devices). If you want to transfer the photos you have saved in a PC folder to the iPhone, the first step you need to take is to connect the smartphone to the computer using the supplied Dock / Lightning cable and wait for it to start iTunes: Apple's multimedia software, which is available free for Windows and is included “standard” on all Macs.
If iTunes is not yet installed on your PC, get it by connecting to the Apple website and clicking on the button Download 64 bit, or on the button Download 32 bit (depending on whether you are using a 64 or 32-bit operating system). Once the download is complete, open the iTunes installation package (eg. iTunes64Setup.exe) and, in the window that opens, click the button first NEXT, Then Install, Yes for two consecutive times e end, in order to conclude the setup.

The first time you connect the iPhone to the computer, you will have to authorize the communication between the two devices by clicking on the button Continue that appears on the computer desktop, by tapping the button Authorize that appears on the iPhone screen and typing the unlock code on the latter.
Once the connection between iTunes and phone has been established, click on theiPhone located at the top left of the main program window, select the item Gallery from the left sidebar and put the check mark next to the item Synchronize photos.
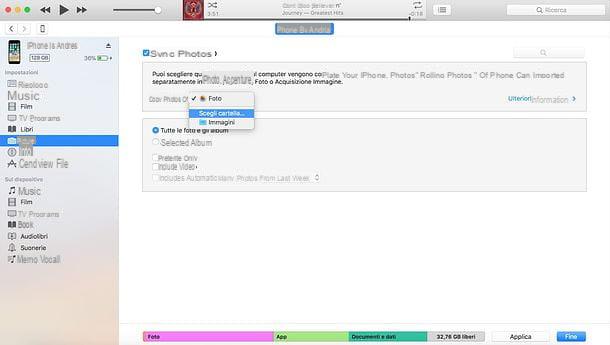
At this point, set the option Choose folder from the drop-down menu below and choose the folder on the computer with the images you want to synchronize with the iPhone. If you are using a Mac, you can also select the item Gallery to sync your entire Photos library with iPhone.
If, on the other hand, you do not want to copy the entire contents of a folder or the entire library of Photos to the "iPhone by" but only some albums / folders contained in them, put the check mark on the item Selected albums, select the contents to copy to your phone and click on the button Apply located at the bottom right to start image synchronization. Easier than that ?!
How to archive photos on iPhone


