


The photos you take with yours iPhone, as well as those taken with the vast majority of smartphones and cameras currently on the market, contain information called data Exif. This information, invisible to the naked eye but perfectly legible with programs suitable for the purpose, allows you to know with which device the image was made, the place where it was obtained (geotag), who is its author, the date on which was taken and much more.
Speaking of dates, did you know that it is possible to change the date of the photos taken with the iPhone by setting a day and a time of your choice and that, in the event that this information is missing, it is possible to add it later? If the answer is no and you are interested in the topic, you should read my tutorial dedicated to this topic. In the following lines, in fact, you will find illustrated some apps thanks to which it is possible date photos on iPhone modifying both the Exif data and stamping the date directly on the images. Great, right?
Ah, I almost forgot: if you have a Mac and use the Photos application, you can succeed in your intent even from there, taking advantage of the special features that Apple itself has chosen to make available to its users. The same thing can also be done with Windows, but resorting to the use of third-party programs. But now just chat and let's take action. Make yourself comfortable, take your "iPhone by" and immediately start focusing on the information you find below. I am sure that in the end you will be able to feel very happy and satisfied with what you have learned.
- Using Photo (macOS)
- Using Geosetter (Windows)
App for dating photos on iPhone
As I told you at the beginning of the tutorial, it is possible to insert and / or modify the date of the photos taken with the iPhone using specific applications. You ask me what are these apps? Well, the ones that in my opinion represent the best in the category are indicated (and explained) right here below. Therefore, identify the one that you think will do the most for you and download it now!
Metapho
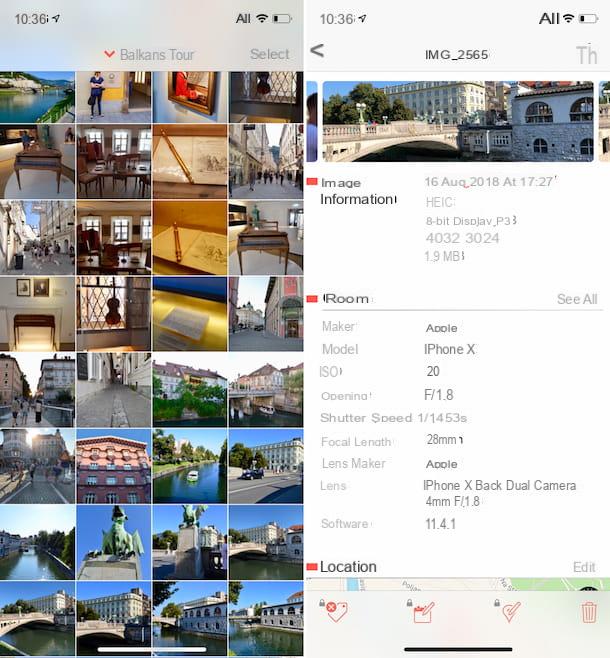
The first of the useful resources that I invite you to consider is Metapho. It is a small app that allows you to easily view and edit all the Exif data of photos taken with the iPhone, acquisition date included. Note that the app is basically free but only allows you to view the metadata: to edit them, you need to unlock the appropriate functionality through in-app purchases.
To use the application for your purpose, the first fundamental step you need to take is to download it to your device. Connect, therefore, from your iPhone to the relevant section of the App Store, press the button Ottieni / Installa and, if necessary, authorize the download with Face ID, Touch ID or by entering your Apple ID password (depending on the iPhone model you are using).
When the download is complete, open the app by pressing the button apri appeared on the screen and tap the button Allow Access and on that OK to allow the application to access the images in the device gallery. Then presses on the voice Meh, skip that appears at the bottom and select the photo on which you are interested in going to act.
In the new screen that appears, you will be shown all the details related to the chosen image. At this point, you must necessarily proceed with the in-app purchase to be able to change or add the date. Then press the button with the calendar and the pencil which is at the bottom and authorizes the transition to the Pro version.
Then use the menus below the item Date to select the day, month and year the photo was taken. If you want, you can also change the shooting time and time zone, using the menus respectively Time e time Zone. To confirm the changes made, tap on the item Done top right. Mission accomplished!
Exif Manager
If you are looking for a totally free alternative to the aforementioned app, but it includes fewer functions (although able to intervene on the date of the photos), the best suggestion I can give you is without a doubt to try Exif Manager. This is a no-cost app thanks to which, as can be understood from the name itself, you can manage and edit the Exif data of photos taken with the iPhone, including the date.
To be able to use it on your device, first of all download it by connecting to the appropriate section of theApp Store and pressing the button Ottieni / Installa. If necessary, confirm the download using Face ID, Touch ID or by entering your Apple ID password (depending on the iPhone model you are using).
Once the download and installation procedure is complete, start the app by pressing the button apri, then grant Exif Manager the necessary permissions to access your photos by pressing the button OK and select the image you want to edit.
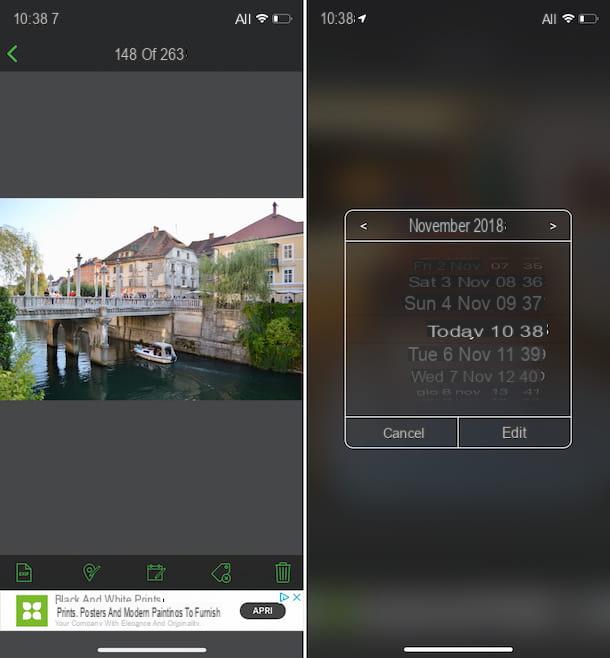
In the new screen displayed, press the button with the pencil and the calendar at the bottom, use the on-screen menus to adjust the month, year, day and time of the shot and press the button Edit to apply the changes. Then press on Modification to grant the app the necessary permissions to actually proceed with the changes.
Have you had second thoughts and want to restore the original date of one or more photos? To do this, select the reference image from the main Exif Manager screen, press the button with the red arrowa which is at the top right and press the button Restore.
Datestamper
Are you interested in finding out how date photos on your iPhone in the sense that you would like to be able to stamp the shooting date directly on the images, know that yes, it can be done, and to do so you can use the free app Datestamper (which features in-app purchases to access some extra features). The latter essentially acts by “printing” the date of their shooting on the photos starting from the related Exif data.
You ask me what to do to be able to use it? I'll tell you right away. First, visit the App Store page dedicated to the application from your iPhone and tap the button Ottieni / Installa. If necessary, authorize the download via your Apple ID Face ID, Touch ID or password (depending on the iPhone model you are using).
When the download is complete, start DateStamper by pressing the button apri appeared on the screen, presses on the voice Skip at the bottom right to skip the intro and press the button OK to grant the application the necessary permissions to be able to access your photos.
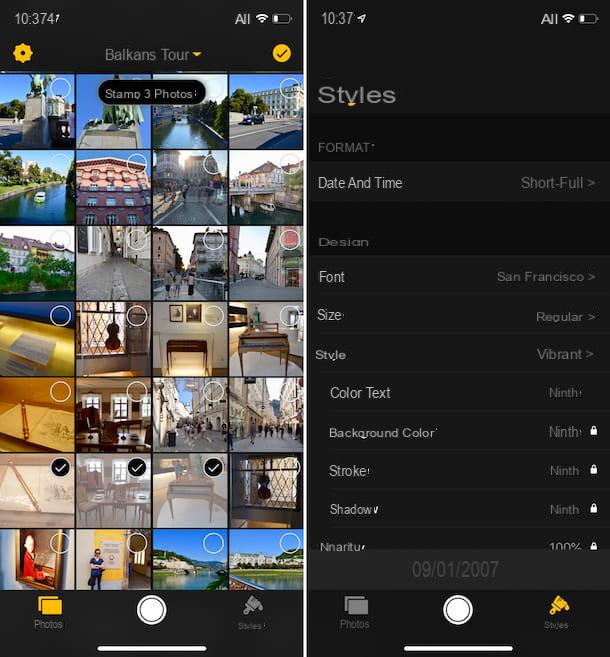
At this point, select, adding the checkmark, the images you want to act on, then press the button Stamp [n] Photo which appears at the top (in place of [n] you will find the total number of selected images), tap on Modification and wait a few moments for the procedure to be started and completed. When the process is complete, click on OK.
If you deem it necessary, before proceeding with adding the date on the image, you can also edit it. To do this, press the photo of your interest on the main screen of the app, press the button with theclock which is at the top and set the date via the on-screen menus, then press on the item Change Date which is below. You can also do the same with the timetable, after selecting the card Time.
Please note that you can also change the font, size, style and color of the text to be printed on the photos as well as the format used. To do this, press the button Styles which is in the lower right part of the main DateStamper screen and used on-screen menus to adjust everything. At the bottom of the display you will be shown a preview of the changes made.
As I told you a few lines above, I finally point out that it is possible to change other characteristics of the text to be inserted on the photos, but this is a function accessible only through in-app purchase (1,09 euro).
Dating photos on iPhone from computer
I told you at the beginning of the article: you can date the photos you took with your iPhone also by acting as a computer, using some third-party software on Windows or the image management application available “standard” on MacOS.
In both cases, keep in mind that the images must first be transferred to the PC or Mac (later you will find the links to some of my guides to find out how to proceed, if you do not know how to do it).
Geosetter (Windows)
If you own a PC Windows, in order to date the photos you have taken with your iPhone you need to resort to the use of third-party developer tools, as in the case of the excellent Geosetter, a free software thanks to which it is possible to manage the Exif data of any photo in a complete way.
To use it, first connect to the program download page and click on the link Installation file: geosetter_setup.exe (24 MB), in order to start the software download procedure.
When the download is complete, open the .exe file just downloaded to your computer, double-clicking on it, and presses the button Si in the window that appears on the screen. Next, hit the button OK to confirm the use of the British language, select the item I accept the terms of the license agreement and click on the button NEXT five times in a row on that one Install and, finally, on the button end.
Now you have to worry about importing the photos you took with the iPhone and on which you are interested in going to act on your PC. If you don't know how to do it, you can follow the instructions on what to do that I have provided you in my tutorial dedicated to the topic.
Once the transfer is complete, press the buttons OK in the three Geosetter windows that in the meantime have opened on the screen, then use the File Explorer (on the left) to select the image you want to date.
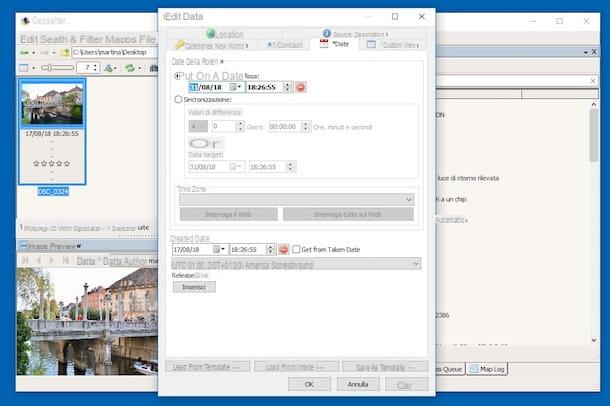
At this point, click on the menu Modification, scegli l'opzione Edit Data, select the scheda Date in the new window that appears on the screen and modify or enter the date and time the photo was taken using the fields below the wording Set on a fixed date. Then check the box next to the item Get from Taken Date which is at the bottom to set as the creation date the one just entered.
To adjust the time zone instead, use the drop-down menu under the heading time Zone. To confirm and apply the changes, remember to click on the button OK which is below.
Finally, close the program window by clicking on "X" at the top right and press the button OK twice consecutively in response to the warnings you see appear on the screen to ensure that the changes applied with the program are saved.
Photo (macOS)
If you own a Mac, I am happy to inform you that using the application Gallery, the one that Apple has chosen to include "standard" in macOS (as well as on iOS, but with more limited functionality), you can go to add or change the shooting date of the photos quickly and easily. Let's see how to do it right away, it's a real breeze!
First, launch Photos by clicking on its icon (the one with the multicolored flower and the white background) that you find on Dock bar, then import into the application the images on your iPhone on which you want to go to act by following the instructions on what to do that I gave you in my guide dedicated to the topic. Next, select the first photo of your interest by clicking on it.
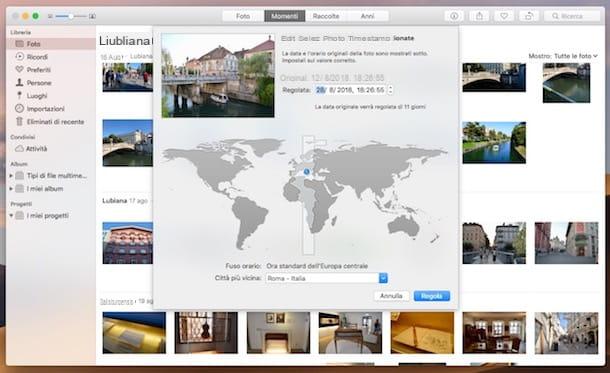
At this point, fai clic sulla voce Image attached to the menu bar, select the option Regola dates and prays and fill in the field next to the entry Regulated in the new window that opens by typing the date and time you want to assign to the photo. Then confirm the changes made by clicking on the button Rule placed at the bottom. That's all!
How to date photos on iPhone


