


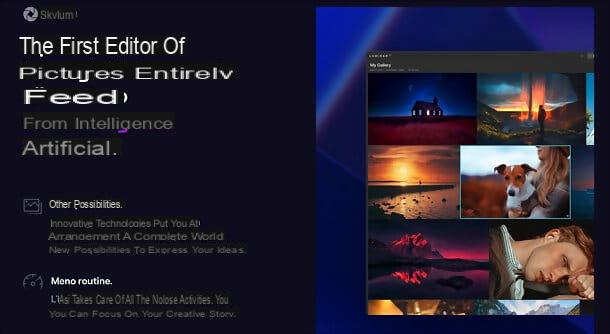
Are you a professional photographer and are you looking for a program that can perfect your shots with cutting-edge effects? Are you a photography enthusiast and are you looking for a solution to retouch your photos without wasting too much time or having to "tinker" with difficult to use tools? Then I guess you'd do well to take a look at Luminar AI and its many photo editing features based onartificial intelligence.
Luminar AI is an easy-to-use photo editing program that uses artificial intelligence to bring professional-quality photos to life; all in an easy way and in a few seconds. Suitable for professional photographers as well as amateurs and amateurs - as it has a user interface extremely easy to use and translated completely in British -, is able to automatically identify the content of a shot (understanding whether it is a landscape, a portrait, a macro or other) and to propose the best filters and modifications to be applied to the latter. It allows, for example, to change the sky in landscapes, to add rainbows, mountains, mists and light effects in city or natural scenarios and to redefine, in a few clicks, physical characteristics such as eyes, lips or body in the photos they portray. people.
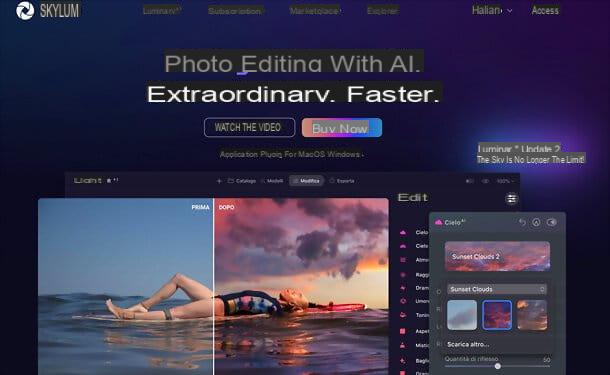
It also includes tons of filters and denoise tools, perfect for sharpening photos, and tons of adjustment tools for colors, brightness, contrast, highlights, shadows, etc. It is compatible with both Windows and macOS and can also be used as a plugin for Photoshop, Lightroom Classic, and Photoshop Elements. As proof of its effectiveness, know that it is a solution used by thousands of influencers around the world. On the other hand, it supports without problems the photos taken with any smartphone or tablet and the RAW formats of the main types of cameras. Would you like to know more? Then read on: I'm about to tell you how to download, install and use it to breathe new life into your photos!Buy Luminar AI! 10 € discount with the “fotoklan” code!
Minimum requirements and prices
Before getting to the heart of the guide and explaining yourself how to edit photos with Luminar AI, my sembo doveroso illustrarti i prices and minimum requirements necessary for the program to work.
Well, Luminar AI costs 63 euros for a computer e 79 euros for two computers; the license is for life, at no additional cost and with a 30-day refund if you are not satisfied. It also includes plugins for Photoshop, Lightroom Classic, and Photoshop Elements. It is then possible to purchase additional models from the internal marketplace, but it is something optional.
Moving on to hardware and software requirements, For Windows required: an Intel Core i5 or higher processor, or AMD Ryzen 5 or higher processor; a graphics card compatible with Open GL 3.3 or later; 8GB of RAM (16GB or more recommended); Windows 10 64-bit (Windows 7 and Windows 8.1 are not supported); 10GB of disk space (SSD recommended for maximum performance) and a display with a resolution of at least 1280 x 768 pixels.
Within Mac, on the other hand, the requirements are these: MacBook, MacBook Air, MacBook Pro, iMac, iMac Pro, Mac Pro or Mac mini from early 2010 or newer; Intel Core i5 processor or higher (also works on Apple Silicon); 8GB of RAM (16GB or more recommended); macOS 10.13.6 or later operating system (macOS 10.12 and earlier are not supported); 10GB of disk space (SSD recommended for maximum performance) and a display with a resolution of at least 1280 x 768 pixels.
How to download and install Luminar AI
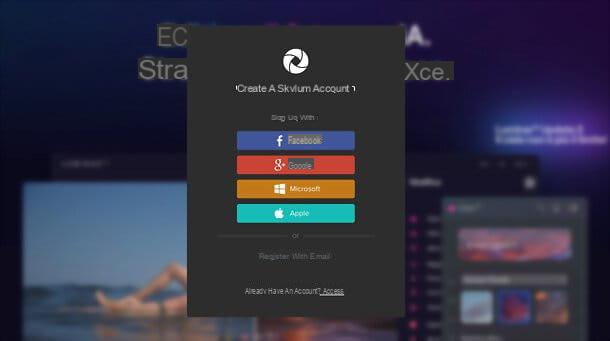
To download Luminar AI, you have to connect to the official website of the program and create a account: to do this, click on the option Log in placed at the top right and then on the items Sign up e Register with email at the bottom of the box that appears on the screen.
Now, fill out the form that is proposed to you with email address e Password you want to use. Then choose whether to receive or not information on product updates (through the appropriate box below) and click on the button SUBSCRIBE, to confirm.
You will receive a validation link by email: click on it, to verify your account, and log in to Luminar AI using the data you have chosen. Alternatively, if you prefer, you can also register via Google, Facebook, Apple or Microsoft account, by clicking on the relevant logos at the bottom.
Once registered, access to the Luminar AI website (by clicking on the appropriate item at the top right) and proceed topurchase the version of the program you prefer. You can pay with PayPal, card or Amazon Pay. Use the code "fotoklan" when ordering to get 10 € discount!
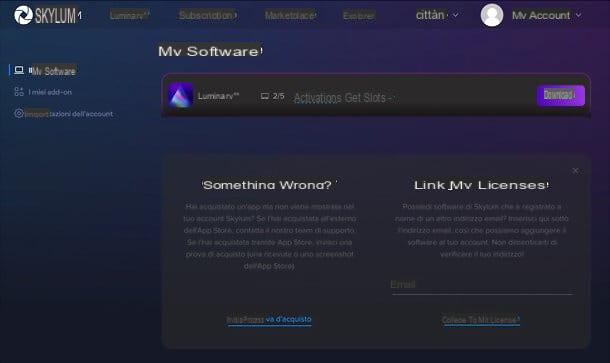
Once the purchase is complete, move the mouse cursor over the item My Account (top right) and select the option My software from the menu that appears. On the next page, find the box for Luminar AI and click on the corresponding button Download. This will give you the Luminar AI installation file that best suits your operating system.
A download complete, avvia il Luminar AI installation file you have just downloaded and, regardless of the operating system you use (the steps to take are the same on Windows and macOS), click on the buttons apri, Accept e Installer (check the boxes related to Photoshop and / or Lightroom Classic, if you want to install the Luminar AI plugin for these programs).
Then wait for the end of the setup and press the button Run, to complete the procedure. If you do not want to send data for statistical purposes, remove the check from the appropriate option in the last screen of the installer.
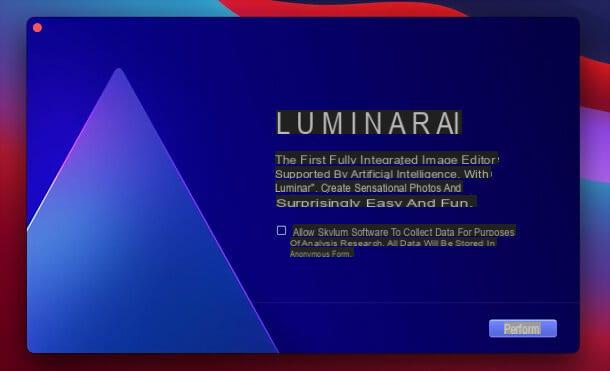
Once the installation is complete, launch Luminar AI and log in with your account details. Once logged in, one will automatically activate Luminar AI 7-day free trial: to activate your full copy of the program, click on the item activate Luminar and enter yours license code in the window that opens.Buy Luminar AI! 10 € discount with the “fotoklan” code!
How to edit photos with Luminar AI
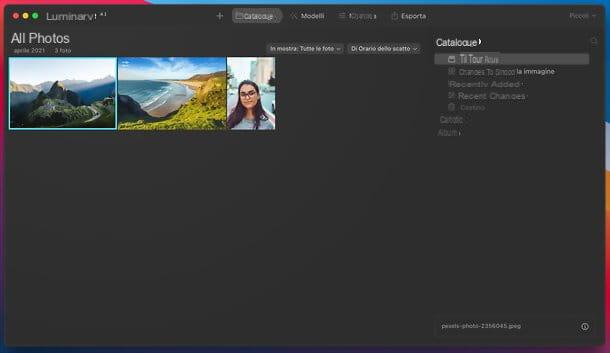
Now you can start editing your photos with Luminar AI. First, then, click on the button + located at the top left and choose whether to import one into the program folder or delle images single, by clicking on one of the two options that are proposed to you.
Once the import is complete, go to the tab Catalog, optionally choose the criteria by which to view your shots (using the two drop-down menus at the top, or by selecting a filter or an album from the right sidebar) and double-click on the miniature of the photo you want to retouch: you will have access to the powerful Luminar AI editor.
The Luminar AI editor is powerful but extremely intuitive, and is divided into two main sections: models e Modification. The first contains a series of predefined templates through which you can refine and / or make your artistic shots with the press of a single button. In the section Modificationinstead, all the image adjustment tools are available, including the fantastic tools based onartificial intelligence of Luminar AI, which allow, among other things, to change the facial and body features in people and to add skies in landscapes. For all the details, read on: you will find everything explained in the next chapters.
models
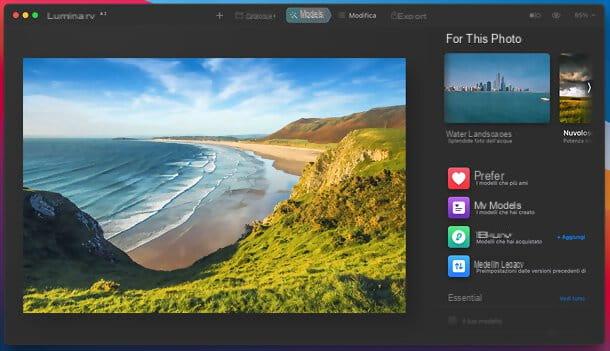
The board models Luminar AI includes a number of pre-built templates that allow you to edit your photos with a single click. Furthermore, Luminar AI analyzes the selected photos and, thanks to its artificial intelligence algorithm, automatically proposes some filters suitable for the latter, proposing them in correspondence with the item For this photo.
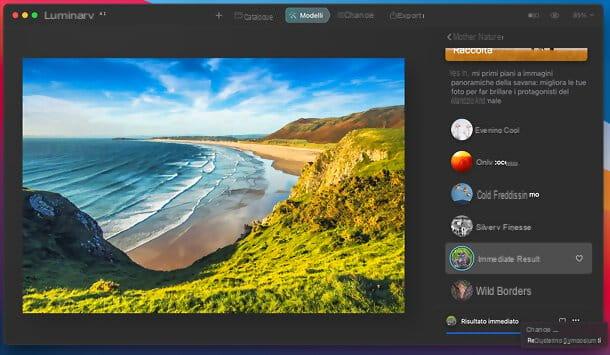
Scrolling down instead, there is the complete list of available models, divided into categories: Essential (with models suitable for both landscapes and portraits), Landscape (with models dedicated to metropolis lights, sunsets, cloudy landscapes and simple landscapes), Mother Nature (with models dedicated to savannah, aquatic landscapes and animals), HD Portrait (with models dedicated to experimental portraits, simple portraits, the essence of each portrait and monochromatic ones), Macro (with models dedicated to both objects and nature), Footage (with Hollywood-style models), Lifestyle (with lifestyle models dedicated to influencers, old-fashioned films and urban style), Aerial (with models for artistic aerial views and natural skies) and so on.
To view all the models belonging to a certain category, click on the corresponding item See more. By pressing the button instead Get more templates you will be able to access a marketplace from which to purchase other models designed by digital photography professionals.
As already pointed out, to apply a template to your shot, just select the corresponding one miniature present in the right sidebar. Done this, using the adjustment bar placed at the bottom right, you can choose the degree of intensity of the applied model.
I also point out the possibility of adding a model to favorite (by clicking on the corresponding icon of the heart). In case of second thoughts, however, you can remove the template selected from your photo by simply clicking the button ... (located at the bottom right) and selecting the appropriate item from the menu that opens.
In this regard, it should be noted that Luminar AI creates backup copies of photos and it is possible to remove the changes made to the latter at any time, even after possibly closing and reopening the program. You can also easily navigate the chronology changes made and restore a photo to a previous condition: just go to the tab Modification and click on theclock present in the right sidebar. Convenient, right?
AI-based modifications
Le AI-based modifications they are definitely the flagship of Luminar AI, which allows you to modify both landscapes and portraits in an amazing - almost magical - way in just a few clicks. A few examples? With Luminar AI you can change the sky in landscapes and automatically enhance portraits in two clicks, achieving extremely realistic and accurate results. The ideal, for example for make beautiful photos for Instagram, but also to achieve professional photos to be printed or included in an online portfolio.
To access the list of all available functions, select the photo to retouch and then go to the card Modification of the program. A menu will open automatically, on the right, with the list of all the tools present: those animated by artificial intelligence are those marked by the initials AI.
The tools are divided into four categories. In the category Essential, for example, find essential photo editing tools, such as Enhance with (to improve accent and sky); Composition (to improve aspect ratio, perspective and apply a 3D transformation to the image) e Structure (to improve the level of detail of the shot). Then there are the tools that do not use AI but are still very precise and comfortable to use, for example those for delete unwanted elements from photos; adjust parameters such as temperature / tint / exposure / contrast / highlights / shadows; adjust the colore; apply the effect black and white; adjust the level of details; remove the grain; change the landscapes by correcting the Mist, adding the effect golden hour and improving the travel del foliage; and finally the one to adjust the vignetting.
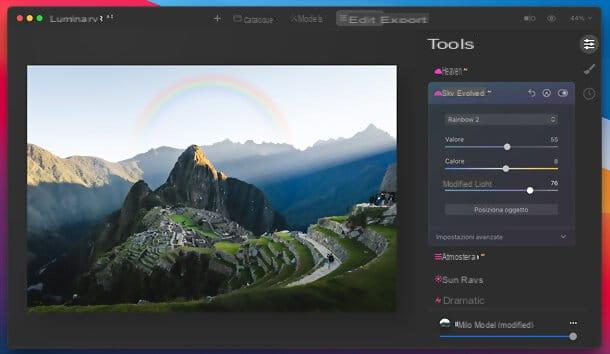
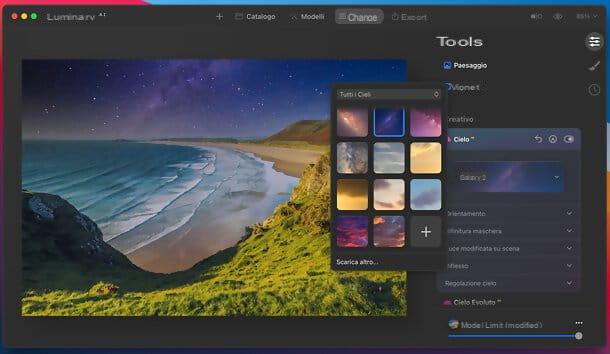
in the category Creative, on the other hand, there are the most creative tools, first of all those to change the sky present in a photo (Heaven e Evolved sky, which allows you to add elements such as rainbows, clouds or mountains to the landscape of the original photo) which, together with that to modify theatmosphere of a shot (e.g. by adding fog or haze), they make use of AI to make the shots treated unique. Then there are other tools that do not make use of artificial intelligence but which are still surprising in their final result: the one to add sunrays, those to apply an effect dramatic, of mood o mystical to the photo; the one to adjust the toning and those to add glows ed film grain effect.
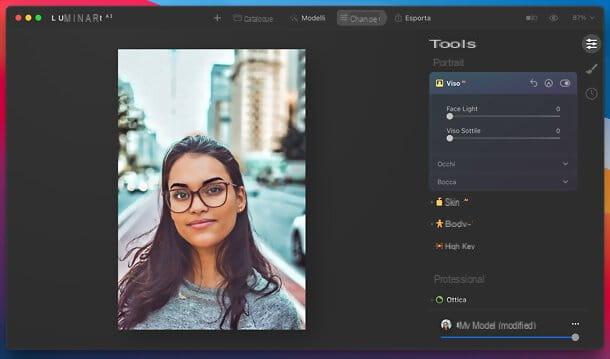
In the HD Portrait the AI-based tools for face, skin e body: the first allows you to adjust the brightness and thickness of the face, along with various eye characteristics (size, red eyes and dark circles, white level, iris glow, eyebrows and more) and mouth (e.g. lip color and whitening of the danti). The second allows you to adjust the brightness of the skin and remove any "defects" (eg skin spots), finally the tool dedicated to the body allows you to act on the size of the figure.
The presence of the instrument should also be emphasized High Key which, although it does not make use of artificial intelligence, allows you to perfect your photos in a very professional way by adjusting the high key and black levels.
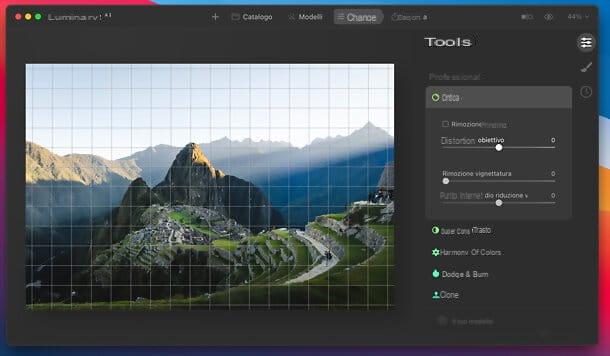
Finally, there are the tools that belong to the category Professional: optics (to artificially change the type of optics used in the photo and remove vignetting), Supercontrasto (to adjust highlight contrast, midtone contrast and shadow contrast), Harmony of colors (to adjust brightness, warmth, contrast and color balance), Dodge & Burn (to lighten or "burn" parts of photos) e Clone (to clone parts of the shot, for example to cover unwanted writings or elements).
To use any of the tools just mentioned and easily create amazing photos with Luminar AI, just select the relative voice and adjust the various parameters that appear on the screen in the form of buttons and / or adjustment bars. As mentioned, it really does it all in a few clicks!
Copy and synchronization of adjustments
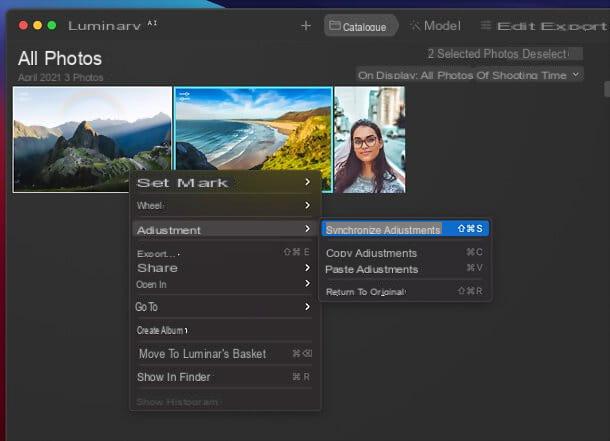
Would you like to be able to edit multiple photos at the same time? You can do this too! Luminar AI, in fact, provides both the ability to copy the adjustments made on one shot and paste them on another, and to synchronize the changes applied to two or more photos.
In the first case, if you have edited a photo and want to apply the same adjustments to another shot in the Luminar AI Catalog, all you have to do is access the tab Catalog, select using click destroy the image already edited and choose the items Adjustments> Copy Adjustments give the menu answer.
Then do it click destroy on the image you want to apply the same changes to and select the items Adjustments> Paste Adjustments give the menu answer.
If, on the other hand, you want to synchronize the changes made to two or more photos, select them all in the Catalog (using the combination Ctrl + click your PC the cmd + click on Mac), do click destroy on any of them and choose the items Adjustments> Synchronize Adjustments from the context menu. Easier than that ?!
Export photos
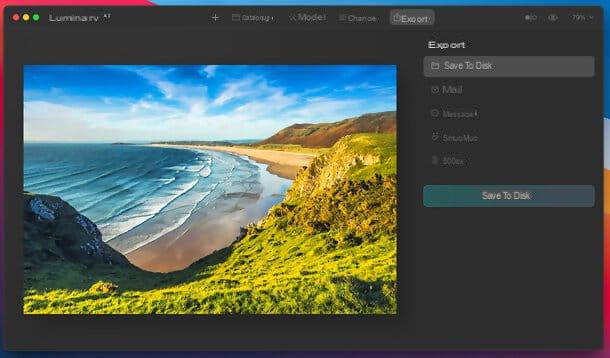
When you are satisfied with the result, you can export the photos you have edited with Luminar AI by selecting the tab Export (above) and choosing one of the available options.
To save the image on your computer, for example, just click on the item Save to disk and then on the button of the same name. You can then choose focus, dimensions e file format for the output photo. All common formats are supported, such as JPG, PNG, TIFF, JPEG-2000, Photoshop e PDF.
Alternatively, you can send the file via mail o message or you can upload it to SmugMug e 500px: just click on the relevant item and follow the instructions on the screen.
Plugin per Photoshop e Lightroom Classic
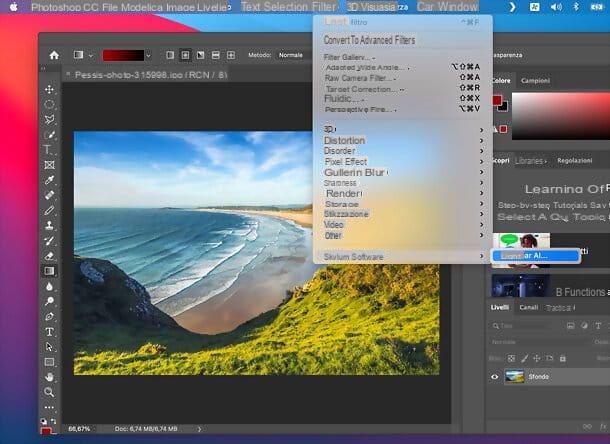
As already pointed out above, Luminar AI it also offers some comforts Plugin to exploit the potential of the software in Photoshop, Lightroom Classic e Photoshop Elements. If you have not chosen to install the plugins during the initial setup of Luminar AI, you can easily fix it by opening the program and selecting the item Install plugins from its menu.
In the window that opens, then click on installation button corresponding to Photoshop and / or Lightroom Classic And that's it. Later, you will find Luminar AI in the plugins menu of popular Adobe software. For example, in Photoshop you will find it in the menu Filter> Skylum Software.
to know more
At this point you should have quite clear ideas on how to edit photos with Luminar AI, but if you want to know more you can consult the official program manual (currently not available in British, but equally very simple to follow), in which they are illustrated in detail all the main features and functions of the same.Buy Luminar AI! 10 € discount with the “fotoklan” code!
Article created in collaboration with Skylum.
How to edit photos with Luminar AI


