


Are you trying to transfer some photos from iPhone to computer, but your PC doesn't seem to recognize the phone? Have you just activated the iCloud Photo Library service and would like help syncing photos to your computer? Don't worry, I guarantee you have come to the right place at the right time. With today's guide, in fact, we will discover together how to import photos from iPhone in so many different ways.
We will see how to copy photos from iPhone to computer by connecting the two devices to each other (via USB cable), we will learn how to take advantage of cloud services to synchronize photos on PC in cloud mode and more. Whether you have a Windows PC or a Mac, I assure you that in no time you will be able to unravel all your doubts regarding the transfer of photos (or videos) from the Apple mobile phone to your computer.
Come on, take five minutes of free time and take a look at the directions I'm about to give you. Find all the instructions you need right below. The procedure to follow is valid for all iPhone models and iOS versions, so you shouldn't have any problems whatsoever. Enjoy your reading and have fun!
Import photos from iPhone to Windows
If you are using a Windows PC, the first step you need to take is to connect to the Apple website and download iTunes. Without Apple's multimedia software, in fact, Windows cannot "see" the iPhone and therefore you cannot import the photos present on the phone memory.
To download iTunes on your PC, connect to the Apple website using the link I just provided and click on the button Download present on the page that opens. When the operation is complete, open the file iTunes64Setup.exe you downloaded on your PC and click on the button first NEXT and then Install, Yes e end to complete the software installation process.
At this point, connect the iPhone to the computer using the Lightning / Dock cable supplied with the phone, wait for iTunes to be launched automatically and authorize communication between the two devices by first clicking on the button Authorize on the smartphone screen and then on the button Continue on the computer screen.
Now close iTunes, disconnect the iPhone from the computer, connect it again and follow the procedure best suited to the operating system installed on the PC.
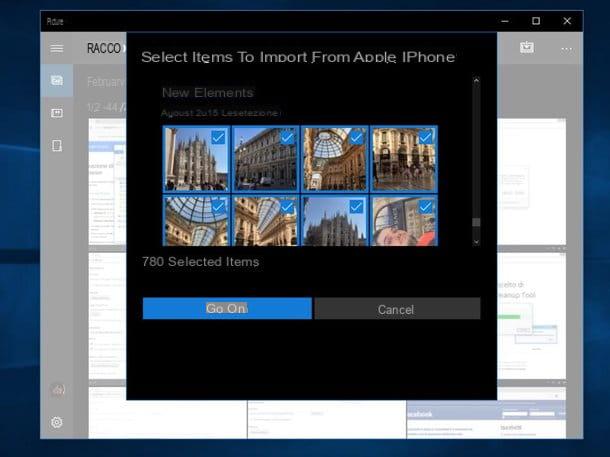
- Windows 10 - click on the notification that appears at the bottom right of the Windows desktop and select the item Import photos and videos from the menu that opens. If no notification appears on the Windows desktop, click on pennant located at the bottom left, look for the application Gallery in the Start menu and click on the app icon in the search results. In the window that opens, click on theimport icon (the rectangle with the arrow inside) located at the top right, put the check mark next to the thumbnails of the photos and videos you want to import to the PC and click on the button Continue. So choose the import location (i.e. the folder in which to save the photos) by clicking on the appropriate item and pressing the button Import to start transferring data to your computer.
- Windows 7 - wait for the AutoPlay menu to appear and choose the option for import images and videos from the iPhone. If the AutoPlay menu does not appear, open theExplore Resources (the yellow folder icon located on the taskbar, bottom left) and select the icon computer from the right sidebar. Then right click on the iPhone icon and select the item Import images and videos from the menu that appears. In the window that opens, type the tags you want to associate with the photos to be imported to the PC and click on the button Import to start their transfer to your computer. All new photos (and new videos) on the iPhone will be automatically transferred to the PC. If you want to change the folder in which to import the images or the name to assign to the files, click on the item Import settings which is at the bottom left.
If you want, you can use the photo import mode included in Windows 7 also in Windows 10. Just right-click on the phone icon in What PC I will select the voice Import images and videos give the menu check if you press.
Import photos from iPhone to Mac

If you're using a Mac, since iTunes is included "standard" with OS X, you can import photos from iPhone simply by connecting the phone to the computer via Lightning / Dock cable and opening the application Gallery, which should actually start by itself. If you can't find the Photos app, it's the one with the colorful flower icon.
In the window that opens, then select the tab Import located at the top right, click on the button Import all new items And that's it. If you don't want to import all the photos and videos on the iPhone but only some of them, select their thumbnails by doing cmd + click on them and presses the button Import selected xx located at the top right.
The images and movies will be automatically stored in the Photos database, which is a single file usually located in the folder Images of OS X. If you want to export photos outside the Photos app, just select their thumbnails by doing cmd + click on them and drag them to a folder of your choice.
Alternatively you can open the utility Image capture (located in the Other of the Launchpad) and import the photos from the "iPhone by" using the latter. Unlike Photos, Image Capture saves photos in a folder chosen by the user (via the drop-down menu Import into) and not in a single archive.
If you have a fairly recent iPhone and Mac, you can also transfer your photos to your computer via AirDrop, a wireless data transfer system included "standard" in iOS and OS X. I told you about it in more detail in my tutorial on how AirDrop works, only use it for small amounts of photos or videos.
Import photos from iPhone via cloud services
Have you ever heard of the Streaming Photo and ICloud Photo Library? These are two services offered directly by Apple that allow you to store on the Internet, temporarily or permanently, photos taken with the iPhone.
Streaming Photo keeps the last 1.000 photos taken with the iPhone. It is completely free and does not erode the available space on iCloud. ICloud Photo Library it is more complete, it also stores videos and has no storage limits, however it erodes the available space on iCloud and therefore requires you to subscribe to a paid plan for iCloud Drive. If you want to know more, check out my tutorial on how to store photos on iCloud where I have explained both services to you in more detail.
There are several ways to download photos from Photo Stream and iCloud Photo Library. Let's find out together.
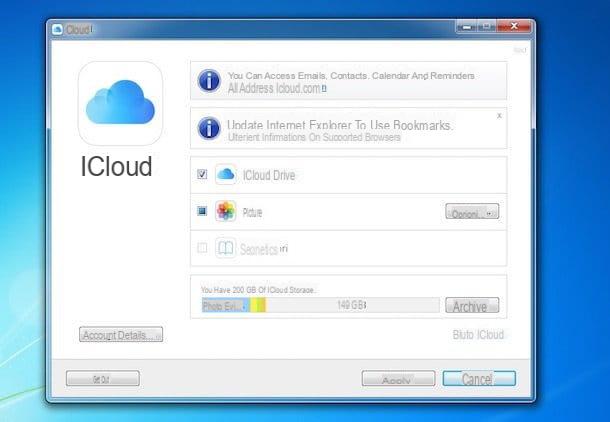
- Windows - if you use Windows, you can sync iCloud photos to your PC by downloading the official iCloud client. It is a free program that allows you to download photos, videos, bookmarks and iCloud Drive files directly to your computer. To download it to your PC, connect to the Apple website and click on the button Download. Then open the file icloudsetup.exe that you just downloaded to your computer, put the check mark next to the item I accept the terms of the license agreement and click the buttons Install, Yes, end e Yes to restart the PC. When Windows starts up again, log in to the iCloud client using your Apple ID data (obviously it must be the same ID used on the iPhone) and click on the button options located next to the icon Gallery to choose which contents to synchronize on the PC and in which folder.
- Mac - if you use a Mac you just have to make sure that in the menu System Preferences> iCloud there is set the same iCloud account set on the iPhone and that there is a check mark next to the item Gallery. The iPhone photos will automatically appear in the application Gallery in OS X.
- Browser - don't want to sync all iPhone photos with computer? Do you just want to download some of your interest? Then connect to the iCloud website, log in with your Apple ID and click on the icon Gallery. So wait for your photo library to appear (it may take a few minutes if this is the first time you use this service), select the images to download (using the combination Ctrl + click on Windows or cmd + click on Mac) and presses the icon of cloud with arrow going down (top right) to start the download. This procedure is only valid for those who have activated the service ICloud Photo Library.
There are also some great solutions alternative a iCloud which allow you to store iPhone photos on the cloud. Among the most valid ones, I point out Google Photos (connected to Google Drive) which offers unlimited storage, Dropbox which guarantees 2GB of free space (with the possibility of obtaining free bonus space) and OneDrive which offers 5GB of online space at no cost. To use them, all you have to do is install them on your "iPhone by" and activate the option automatic upload inside them. The photos synchronized on the cloud will become accessible from the browser or can be synchronized with the computer (on Windows and Mac) by installing the official clients of the aforementioned services.
How to import photos from iPhone


