


How to create a table in Word

Though make a table in Word it is a far from complicated operation, first of all I advise you to define and organize the data with which you intend to fill it: for example, establish a priori how the rows and columns will be organized, evaluate the need or not to introduce colors and so on .
Finally, try to keep the number of rows and columns you intend to add relatively low, in order to avoid subsequent problems if you have to send your document to print: it would be unsightly, as well as impractical, to divide a table over several pages!
Before going further, I would like to warn you that in this guide I will refer to Word 2016 for Windows computers; nevertheless, you can also use the same instructions for previous / later versions of the program and for its counterpart available for Mac.
Create a table from scratch
Have you completed organizing your data? Perfect, now it's time to take the real action: to begin with, open the document to which you want to add the table in Microsoft Word or, if you want to create a new document, start the program and press the icon Blank document.
If you are starting from an empty document, you can use two different approaches: the first is to create the table immediately, and then add the simple text, while the second is to report the necessary data in your document, and then build the table real. Evaluate what to do based on your needs.
For a document with text already present, identify the point where you want to add the table, press the key Submit on the keyboard to create a new paragraph (an empty line, without contents), place the cursor at the beginning of it, then go to the tab Inserisci located at the top and click on the button Table present in it.

At this point, using the grid shown on the screen, choose the number of initial rows and columns of the table by scrolling with the mouse on the squares of the grid itself, and paying attention to the preview that is displayed in the document in the background: once the desired result is achieved, confirm the creation of the table by clicking on the last one lower right square.
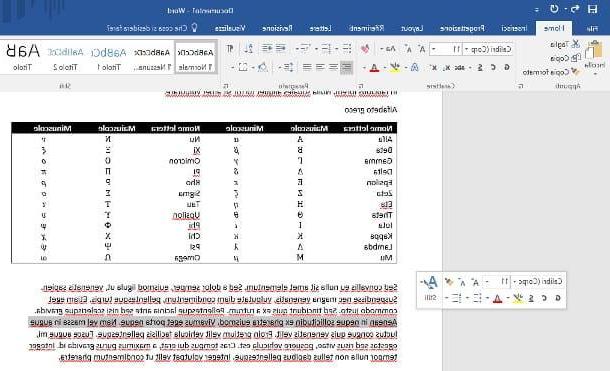
If you wish, you can quickly add a "pre-packaged" table to your document, containing for example a calendar or the letters of the Greek alphabet, using the presets already included in Word: to do this, once you have positioned the cursor at the point where you want to insert the table, click on the tab Inserisci, by pressing the button Table and move the mouse cursor over the option Quick tables.
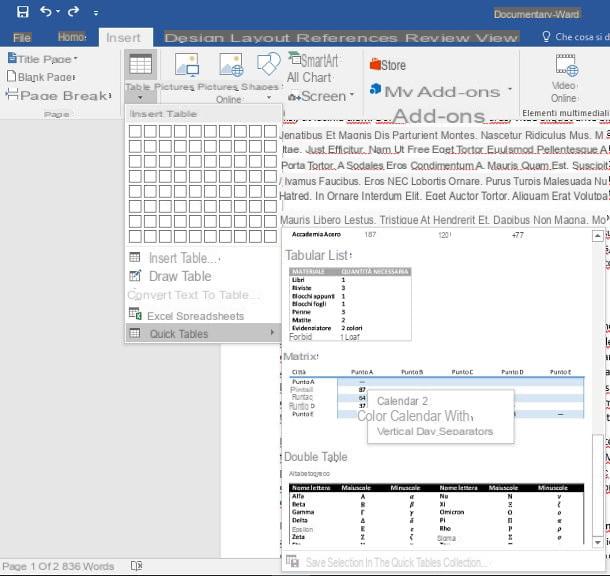
At this point, you just have to select the format of the table you want to add from the menu that opens immediately afterwards and confirm the insertion with a click of the mouse. Keep in mind that, although some data is added during the creation phase, it is possible to proceed with the modification of the tables thus created exactly as you would do with the empty ones.
Last but not least, know that it is also possible to incorporate an Excel worksheet in Word documents, so as to obtain further options on sorting data: to do this, go once again to the section Insert> Table and select the item Excel worksheet from the proposed menu. To understand how to manipulate data on a sheet of this type, I suggest you refer to my guide on how to make a table in Excel.
Starting with a predefined template
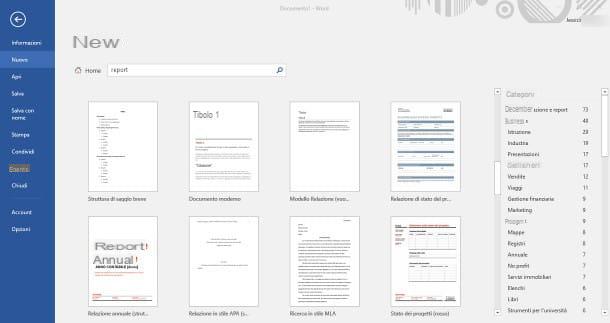
Do you have the idea of the document you need in mind, yet are you looking for something ready to use as a template?
In that case, I recommend that you contact one of the predefined templates Word: in fact, these are thematic documents (suitable for example for reports, reports, work plans and so on) already packaged for use, available both on the computer and online, containing tables and other components already set up, ready to be filled with the data you already have. Once the document is created, you will have the possibility to customize everything to suit your needs.
So, to create a new Word document starting from a predefined template, click on the item Fillet, then presses on the voice New and choose one of the models proposed in the list below; alternatively, you can do one online search, using the appropriate bar available in the creation panel: simply type the keyword of the model you are interested in (e.g. report or table) and press the button Submit.
The results received are divided into several categories, which can be viewed through the appropriate navigation bar located on the right: once you have identified the model that best suits your needs, do Double-click on its preview to create a new document based on it, ready to customize.
If you wish, Word also offers the possibility to create a custom template starting from a blank document, and then save it and use it later as a starting point: I have given you all the instructions to proceed in this sense in my tutorial on how to create a new one. Word template.
How to customize a table

The new Word tables, by default, have very basic graphics: the cells are all the same, the borders are defined, and the background color is uniform and agrees with that of the document. If you need something more complex, Word offers the ability to change the style and formatting of the table to suit your needs, all in a few simple steps.
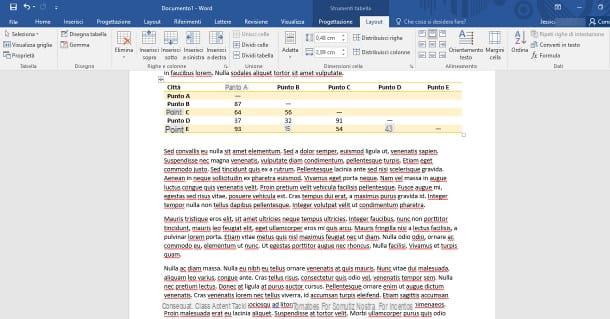
To proceed, click the mouse in one any cell of the table, then presses on the item Planning located in the bar at the top, just below the box Table tools. Using the buttons and commands in this section, you can define and customize the graphic style of the table in the document: below I illustrate the most important.
- Header row / total row - allows you to automatically create pre-set rows to contain the headings (ie the "titles" of the columns) or the total value of an entire column, in the case of numerical values.
- Alternating rows / columns highlighted - even or odd rows / columns are highlighted with a darker shade than that defined by the stule.
- First / last column - automatically bolds the values contained in the first and / or last column.
- Table styles pane - allows you to quickly choose a ready-made style for the table, acting in particular on the arrangement and format of the borders, as well as on the combination of colors: once you have identified the style you want to apply to your table, just click on its preview to make it effective editing. If you wish, you can create a custom style by pressing the button Other attached to the aforementioned box (the down arrow surmounted by a dash) and clicking on the button New table style ....
- Background - allows you to apply a background color to the selected cell. To apply the same color to the entire table or to a specific area, select - with the help of the mouse - all the cells that make up the chosen table or area.
- Border styles - allows you to choose a style to apply to the edges of the table.
- Pen color - from here, you can customize the color of the borders to be applied to the table.
- Bordi- this button allows you to hide or display one or more edges of the table, based on precise subdivisions (eg only right, left, central edges, separators and so on).
- Edge formatting - this button allows you to selectively act on the individual edges of the cells, applying the style defined through the buttons Border Styles / Pen Color. To proceed, once this button is selected, selectively click on each edge to apply the chosen style (the cursor changes to a kind of "pen").
The data contained in the table, as usual, can be formatted (aligned to the right, left, bold, italic, underlined, strikethrough, etc.) and customized through the tools located in the section Home of the program; to format the additional data at the same time lines, column o celle, you can select them with the help of the keys Shift o Ctrl / cmd of the keyboard.
To proceed with the insertion of new ones rows and / or columns in the table, to merge or divide cells, to define the formatting of the elements within them (e.g. horizontal and vertical alignment), the spacing between the various cells, the default dimensions of each of them, the margins, the borders and so on, you can use the tools in the section layout Word, located just below the box Table tools.
How to delete a table
The table you created doesn't match your expectations, so do you want to get rid of it completely so you can start over? No problem, Word makes this operation extremely simple as well.
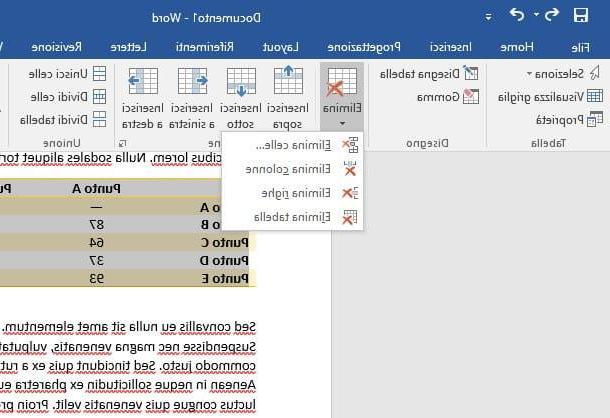
Actually, you can proceed in two different ways: the first is to select with the mouse thewhole table and, once the selection is complete, press the key backspace (delete character) on the keyboard. The second method, on the other hand, is even simpler: place the mouse in one of the table cells, click on the item layout placed in the box Table tools, then on the buttons Delete ed Delete table.
Now that you have perfectly understood the basic ways to manage a table in Word, thus testing the power of this program, I bet that curiosity has taken over and you can't wait to find out how to take full advantage of the application included in Microsoft Office : just to give you some examples, you can use Word to create labels, distribute elements in alphabetical order, create leaflets and folding manuals, create brochures, create a curriculum vitae, create questionnaires, layout a book and much, much more! In short, knowing how to best use Word can really help you in a large number of scenarios.
As I already told you at the beginning, I based this guide entirely on Microsoft Word 2016 for computers: in this regard, I want to remind you that you can edit Word files and create tables, albeit with some limitations, even through the appropriate apps for Android, iPhone and iPad (free for devices up to 10.1 ″), and through Word Online, usable from the browser installed on your computer.
How to make a table in Word


