


Really beautiful photos you took with your new iPhone. Tell me, have you already saved them on your PC? How would you say no? So you run the risk of losing all your precious shots at any moment! You know, just a “tap” is enough to accidentally delete an important photo, not to mention the breakdowns and thefts that can affect a device like the iPhone at any time… in short, you have to be foresight!
I don't want to hear excuses. I know that you don't have time, that you are not very good at using computers etc. but it does not matter. It takes a few seconds to find out how to move photos from iPhone to PCFurthermore, it is such a simple procedure that even those who have never had to deal with a computer could complete it.
Come on, take five minutes of free time and follow the directions I am about to give you. We will first see how to pass photos from the iPhone to the computer in a "traditional" way, ie by connecting the phone to the computer via USB cable, and then we will deal with iCloud which allows you to synchronize photos of the iPhone with the computer via the Internet. Whether you have a Windows PC or a Mac you will surely be able to achieve your goal in a very simple way!
Move photos from iPhone to computer
Let's start with the more traditional solution, that is, from how to move photos from iPhone to PC connecting the phone and computer via cable. Here are in detail all the steps you need to take on Windows and macOS.
Windows
In order for a Windows PC to correctly recognize an iPhone or iPad, it must be installed iTunes, the multimedia software from Apple. If you have not already done so, then connect to the Apple website and click on the button Download located on the left to download iTunes to your computer.
When the download is complete, double-click on it to open the file you just downloaded (eg. iTunes64Setup.exe) and first click on NEXT and then Install, Yes, Yes e end to finish the setup. If you don't want to set iTunes as the default player for audio files, remember to deselect the appropriate item during the installation process.

Now, launch iTunes and connect the iPhone to the computer using the Lightning / Dock cable that came with the phone. If you have just installed iTunes and / or it is the first time that you connect your "iPhone by" to the PC you will have to accept the conditions of use of the software and you will have to authorize the communication between the two devices by first clicking on the button Authorize that appears on the iPhone screen and then on the button Continue which instead appears on the computer desktop.
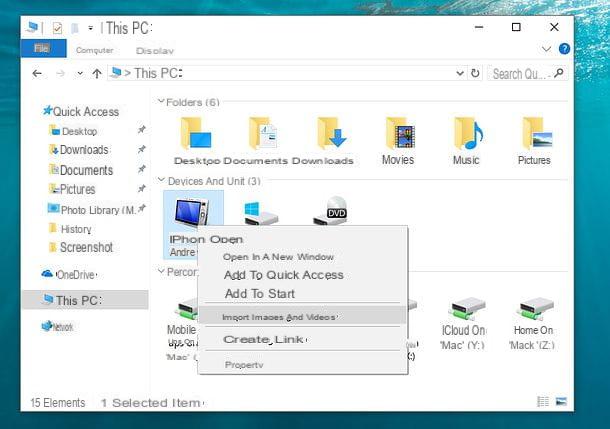
Now you can close iTunes and start transferring your photos to your PC. Then open theFile Explorer Windows (the yellow folder icon located at the bottom left, on the taskbar), select the item computer o What PC from the left sidebar, right click on theiPhone and select the item Import images and videos give the menu to compare.
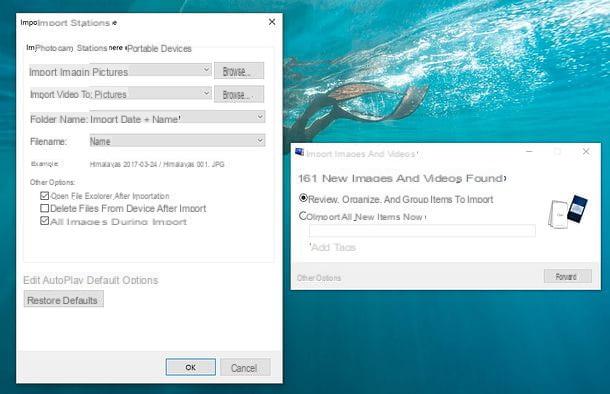
In the window that opens, click on the item Other options located at the bottom left and adjust your preferences for importing photos.
- To choose the folders in which to save photos and videos use the button Shop by Department placed next to the items Import images into e Import video to.
- Expand the menu Folder name to choose how to rename the destination folders of the photos (eg tag, tag + date of import, tag + date of acquisition and so on).
- Expand the menu File name to choose how to rename the photos (tag or original file name).
- If after importing the photos to your PC you want to delete from the iPhone, put the check mark next to the item Always wipe from device after import.
Once you have set all your preferences, make sure there is a check mark next to the item Review, organize and group the items to import and click on the button Import. At this point, you have to divide the photos and videos to be imported on the PC based on groups based on the date of creation: the Windows import utility automatically groups them, but if you want you can change the time frame in which to divide groups of photos and videos using the adjustment bar located at the bottom right. Also, if you want, you can set gods custom names for groups of photos and videos and you can set tag. When the operation is completed, click on the button Import and wait for the data transfer to complete.
If you have not disabled the autoplay function for removable devices, the next time you connect the iPhone to the computer you will be automatically asked if you want import images and videos from the phone.
Mac
Do you have a Mac? Then know that you can download the photos taken with your iPhone simply by connecting the phone to the computer and starting the application Gallery: the icon with the colored flower in the Dock bar.
In the window that opens, select the tab Import located at the top right, click on the button Import new photos And that's it. If you don't want to import all the photos at once, but only some of them, use the combination cmd + click to select the images you want to transfer to the Mac and click the button Import selected (located at the top right) to complete the operation.

Images transferred to your computer with the Photos application are stored in the program's library (a single file that contains all the images). If you want to extract a photo from this library, open the Photos application, select its thumbnail and drag it to a folder of your preference.
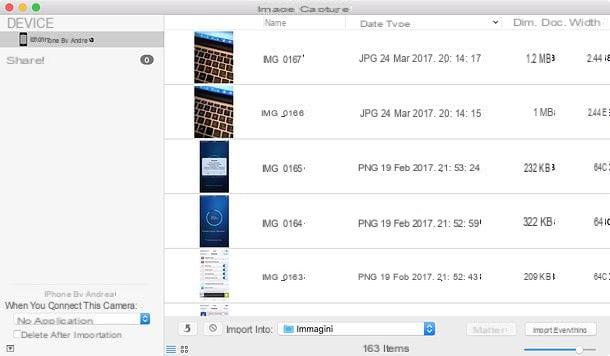
Alternatively you can use the software Image capture, which is located in the folder Other of Launchpad and allows you to import photos from the iPhone into any folder on the Mac (to be selected via the drop-down menu Import into located at the bottom left).
Sync iPhone photos via iCloud
By uploading our photos to the cloud (i.e. on the Internet), we can make sure that they are automatically synchronized on all our devices: smartphones, tablets, computers, etc. Apple's cloud platform is called iCloud and allows you to keep synchronized not only photos, but also videos, documents and app data on all devices connected to the same Apple account.
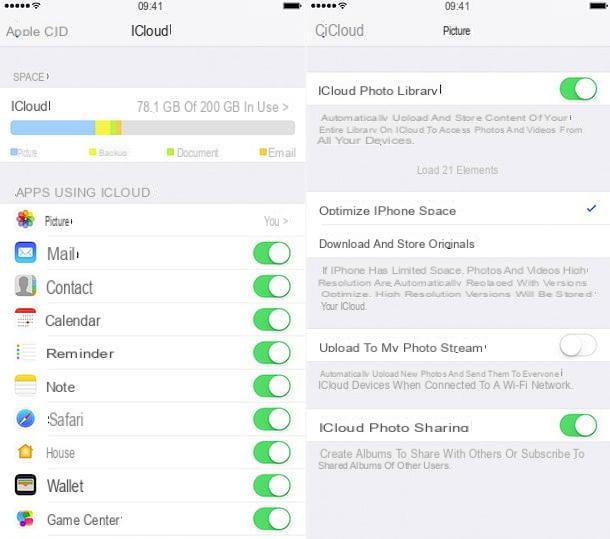
Going into more detail, there are two services that the Cupertino company offers for the synchronization of photos and videos: one is called Photo stream it's one ICloud Photo Library. With Photo Stream, which is active by default on all iPhones, photos and videos are temporarily stored in the cloud and remain there for a period of 30 days, ready to be downloaded to any device. With the iCloud Photo Library, on the other hand, you can build a permanent library of photos and videos that are downloaded automatically (or in any case are accessible) on all your devices: iPhone, iPad, Mac, Windows PC and so on. Both functions are accessible from the menu Settings> [Username]> iCloud> Photos iOS and can be activated with a simple "tap".
As easily understood, Photo Stream is completely free, while iCloud Photo Library is not. Or rather, the service itself is free but unlike Photo Streaming erodes the storage space on iCloud Drive (which for the free plans is just 5GB) and therefore requires the subscription of a paid iCloud plan. ICloud subscriptions start at 99 cents / month for 50GB of space. If you want to know more, read my tutorial on how to use iCloud and, above all, learn more about how iCloud Photo Stream and Photo Library works by reading my guide on how to store photos on iCloud. Now let's see how to download the photos synchronized via iCloud to the PC.
Windows
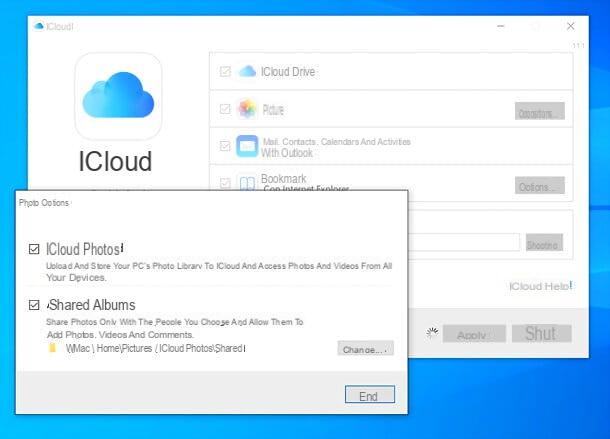
If you've turned on photo sync with iCloud via Photo Stream or iCloud Photo Library, you can move photos from iPhone to PC without connecting the two devices together. How? Through the Internet, by installing the official iCloud client for Windows. The official iCloud client allows you to automatically synchronize photos, videos, bookmarks (with Internet Explorer) and iCloud Drive documents with your computer. It is completely free and requires no special configuration. Just install it and log in with your Apple ID data, that's all.
A PC equipped with Windows 10, you can download the iCloud client from the Microsoft Store. If, on the other hand, you are using an older version of Windows, you can download the software installation package by connecting to the Apple website and clicking on the link On Windows 7 and Windows 8, you can download iCloud for Windows from Apple's website.
When installation is complete, enter your Apple ID data in the iCloud client, click on Log in and choose whether to send usage statistics to Apple. At this point, check the box Gallery and the synchronization of the photos (in optimized version) should start completely automatically (in the folder of iCloud contained in the path Images). Of course, if there are a lot of images to download, this will take quite a long time.
Mac
The application Gallery macOS also supports iCloud. This means that if you have enabled Photo Stream or iCloud Photo Library on your iPhone, the photos will be automatically downloaded to the program.
To verify that photo syncing is on, open System preference (the gear icon in the Dock bar), click on the icon Apple ID / iCloud present in the window that opens and check that there is a check mark next to the item Gallery (otherwise put it).
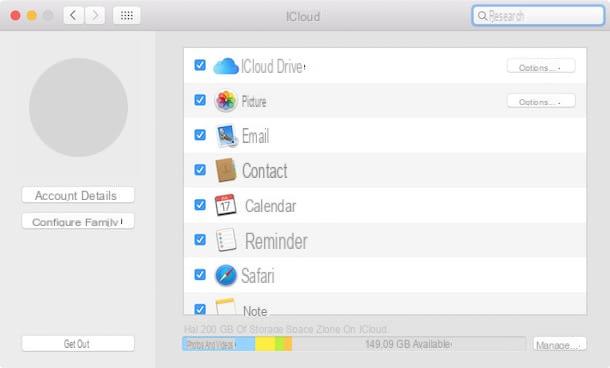
When the operation is complete, open the app Gallery macOS, go to the menu Photos> Preferences (top left), select the tab iCloud of the window that opens and, if there is not, put the check mark next to the option ICloud Photos or next to the option My Photo Stream (depending on the service you are syncing your photo library with).
Download the photos from the browser
If you have iCloud Photo Library or Photo Stream enabled on your iPhone, you can go to iCloud.com and download photos from it.
The service works with all browsers and operating systems, just log in with your Apple ID and click on the icon Gallery. At the first access it will be necessary to wait a few minutes for all the images in the stream or in the iCloud library to be processed.
When upload is complete, to download photos from iCloud.com, select the photos using the combination Ctrl + click (o cmd + click on Mac) or Ctrl+A/cmd+a to select them all, and press the icon of cloud with arrow going down which is located at the top right.

Other solutions to move photos from iPhone to PC
Finally, let me point out some alternative methods for move photos from iPhone to PC which perhaps not everyone knows but which can prove to be extremely useful.
- Google Photos - it is a Google service that allows you to upload photos and videos to the cloud (on Google Drive) and find them synchronized on all your devices. It is completely free and offers unlimited space for all videos up to 1080p resolution and all photos up to 16MP. To download the photos and videos uploaded to Google Photos to your PC, just install the Google Drive client for Windows or macOS.
- AirDrop - if you only need to transfer a limited amount of photos or videos to your computer, and the computer in question is a Mac, you can take advantage of AirDrop: a wireless data transfer system designed specifically for Apple devices. I told you more about it in my tutorial on how AirDrop works.
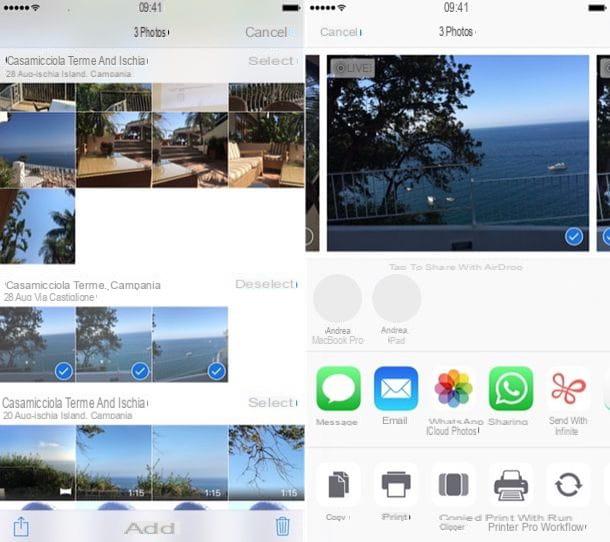
- Send Anywhere - another great way to transfer limited quantities of photos and videos from iPhone to computer (or other portable devices). It works very simply: you install the app on your iPhone, select the photos and videos to share and choose to use Send Anywhere from the iOS share menu. At that point you get a code that, if typed on the Send Anywhere client on the PC or on the official website of the service, allows you to download the selected photos and videos on your computer.
In addition to your PC, would you like to transfer the photos you keep on your iPhone to your iPad as well? No problem. Read my guide on how to transfer photos from iPhone to iPad and find out how.
How to move photos from iPhone to PC


