


You recently bought your first smartphone and immediately started experimenting with all its features. Eager to test its camera as well, you started taking pictures left and right and quickly filled the device's internal memory.
Now, therefore, you would like to understand if there is a system to cope with the situation and recover some space, possibly without deleting your shots. Well, if your smartphone has expandable memory, move photos to SD card could be of great help. How do you say? Have you already thought about it but don't have the faintest idea how to achieve this?
Well, in that case you don't have to worry ... I can explain to you, step by step, how to do it. Do not worry, I know that you are not a great expert in telephony and new technologies, which is why I want to specify right away that you will not have to do anything too complicated. For more details, read on: everything is explained below.
Preliminary information
Before getting to the heart of this guide and explaining, in practice, how to move photos to sd card, let me give you some guidance on how to format your memory card properly.
To get started, if it is your intention to view the data stored on the SD card from multiple devices, I recommend that you formattarla in FAT32: by doing so, you will be able to store the images in complete safety and also view them from other devices, without affecting the operation of the smartphone or tablet in question.
Some versions of Android also allow you to format the microSD also as extension of the internal memory of the device, so that the two memories are virtually merged and identified as a single space by the operating system.
After performing a format of this type, you can let Android choose the data to move to the card, or do it manually; in any case, in order to avoid slowdowns caused by access times, one should ideally have one available Class 10 memory card, UHS-I U1 oppure UHS-I U3: to learn more, I refer you to reading my tutorial dedicated to the purchase of a new microSD.
However, this approach has two major drawbacks: first, using microSD as an extension of Android's memory, all data already on it will be deleted. Second, the photos - and all other data - subsequently stored on the card they will not be accessible from other devices.
In light of what has been said so far, if it is your intention to move only the photos to the microSD, I recommend you use it as it is (if possible) or, if it is a new drive, of formattarla in NFTS (file system recognized by the latest editions of Android, but not by iOS and iPadOS) or exFAT.
If the card was not already formatted following one of the two file systems just mentioned, you can easily remedy the thing by following the instructions I gave you in my guide on how to format a microSD, in which I have treated the subject in great detail.
How to move photos to SD card on Android
Having made the necessary clarifications, the time has come to take action and to explain, in practice, how to transfer the photos present in the memory of Android directly to the SD card.
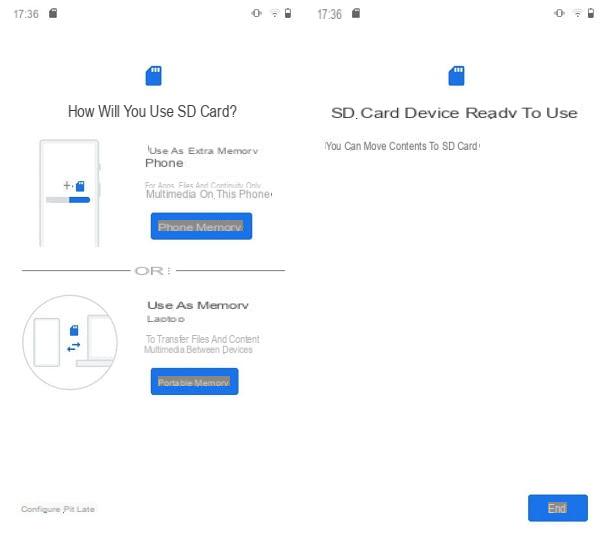
So, to begin with, insert the microSD into the device following the most suitable procedure (in most cases you must, using the hook included in the sales package, remove the side door and insert the microSD into the appropriate slot) and wait for Android to recognize it. If necessary, tap the notifies for inserting a new SD card and choose you want to use the newly inserted memory as portable memory.
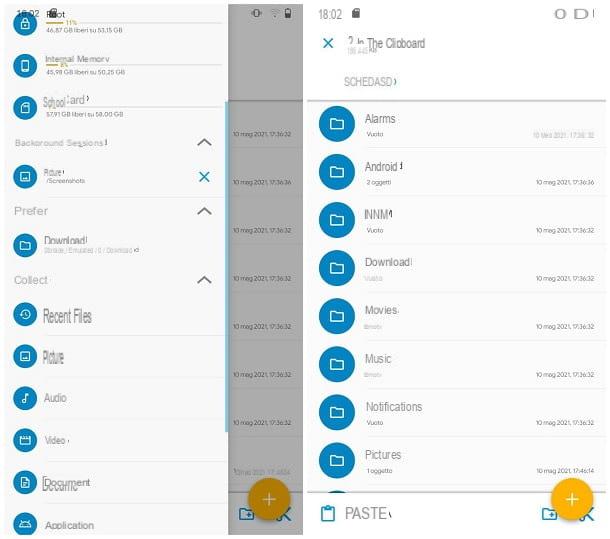
At this point, all you have to do is move the photos already present on the device inside the microSD: to do this, open the app Google files (if it is not already present on the device, you can download it freely from the Play Store), granted access to the files stored on the device, if requested, then tap on the item Images e poi sull'opzione All, located at the top.
Now, if it is your intention to move all the photos, tap the button (⋮) located at the top right and choose the item Select all, from the menu that appears; otherwise make a long tap on any photo, to enter selection mode, and put the check mark in correspondence of the files to be moved, simply by tapping on the respective previews.
Having made your choice, tap the button (⋮) collocato in alto a destra, selects the voice Move to visible in the menu that appears and press the button Continue, to transfer the file to the microSD. If this is your first time doing this, tap the buttons Continue, Allow access to SD card e Allow, to finalize the move.
If your device does not have Google services, you can achieve the same result by using a third-party file manager, such as Solid Explorer: after downloading it from the reference store of your smartphone or tablet, open it, press on the item Salta and, after accepting the license agreement, play the voice Done e granted to the app to access the device memory, responding affirmatively to the warning that appears.
Next, tap the ☰ button located at the top left, tap on the item Gallery which resides in the main menu of the app and selects the images to be moved, by making a long tap on the first and, later, on all the others.
At this point, tap on the symbol of scissors shown below, swipe from left to right to show the Solid Explorer main menu again and select, this time, the item SD card. Finally, go to the folder in which to move the photos (you can also create new ones by tapping on the icon folder with "+" symbol visible at the bottom right) and press on the item Paste, to move the previously selected images.
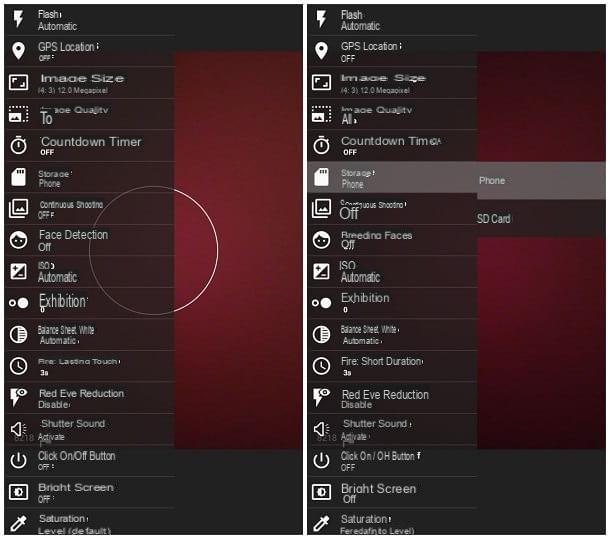
Furthermore, if you prefer, you can ensure that the new images acquired with the camera are stored directly on the SD card: to do this, open the application dedicated to the camera on your device, recall the settings, tap on the option dedicated to saving / archiving / storage of photos and choose you want to save the photos to the microSD.
For example, if you use the app Camera Android default, you have to press the ☰ button located at the top left, then on the item storage placed in the panel that appears on the screen and, finally, on the option microSD / SD Card / SD Card.
Please note that depending on the exact Android edition in use on your device, the appearance and name of the buttons and menu items you see on the screen may change slightly. Below I will explain, in detail, how to proceed on the phones produced by some important brands.
Note: The Google Camera app, the one included with Pixel devices, does not allow you to directly save photos to the SD card.
How to move photos to SD card: Xiaomi
If yours is a smartphone Xiaomi equipped with MIUI operating system, you will be pleased to know that the app File Manager, installed “standard” on the device, allows you to transfer photos from the internal memory to the SD card in a simple and quick way.
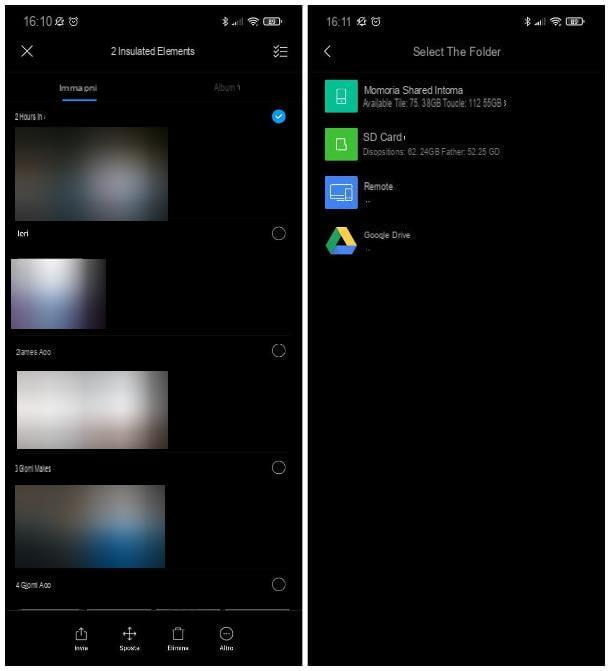
So, to start, open the aforementioned app by recalling it from the Home screen of the phone, or from the drawer (it is marked by the icon of the white folder on blue background), tap the button Images located at the top and put the check mark next to the thumbnails of the photos you want to transfer, or next to a specific date, to move all the photos taken in the time period in question.
Now, tap the button Move, select the voice SD card from the panel that appears later, tap on name of the folder in which to transfer the images and press the button Paste, located at the bottom, to move them. If you wish, you can create a new folder “on the fly” by clicking on the button (…) Other and then on the voice New folder, located in the menu that appears.
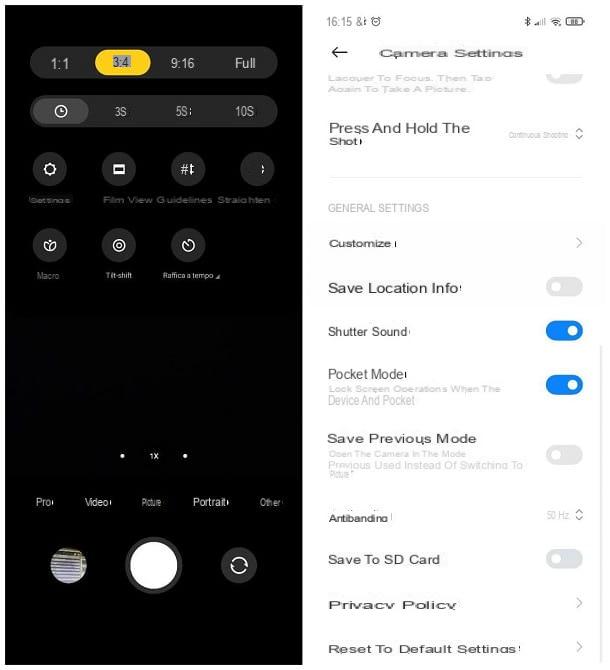
As an additional option, you can have all photos taken in the future via the camera automatically stored on the microSD: to do this, launch the app Camera of the device, touch the button located at the top right and then the icon of Settings (the one in the form of a gear), located in the panel that appears later.
Finally, locate the entry Save to SD card, move from OFF a ON the switch corresponding to it and that's it: from now on, all images captured via the System Camera app will automatically be stored on the memory card.
How to move photos to SD card: Samsung
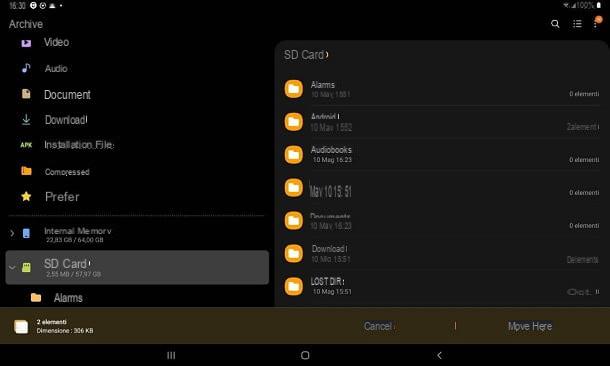
Even the smartphones and tablets of Samsung have a "standard" app dedicated to file management, called archive, which allows you to transfer the images in the internal memory directly to the microSD inserted in the device.
To do this, open the app in question, using the appropriate icon on the Home screen or in the drawer of the device (and depicting a white folder on orange background), tap on the button dedicated to Images and access thealbum (With art. Camera) which contains the images of your interest.
Now, make a long tap on the first of the photos to move, in order to enter selection mode, and put the check mark in correspondence of each of the images on which you intend to act, by tapping on the respective previews. Then press the button Move, to indicate your willingness to transfer files.
Fatto ciò, first prize Shop by Department which, in the meantime, appeared at the bottom of the screen, tap on the wording SD card and go to the folder in which you want to copy the photos (you can create new ones "on the fly" by tapping the button (⋮) located at the top right and then on the item Create folder located in the menu that appears). To finalize the transfer of the photo, or photos, click on the item Move here located at the bottom.
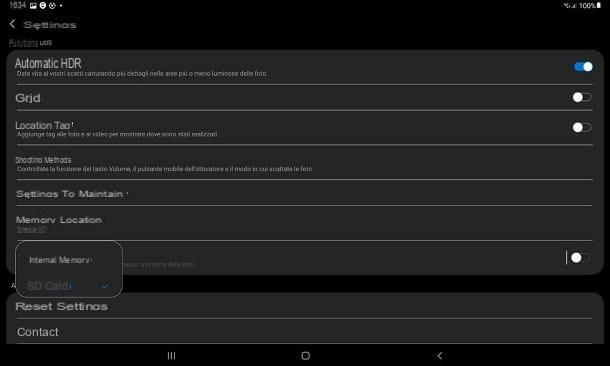
Finally, if you see fit, you can have photos taken using the app Camera of Samsung are stored directly on the microSD, without going through the internal memory (except for the quick shots in sequence, which will continue to be saved in the device memory): to do this, open this last application and, if you see a relative message appear at the Change memory location, tap on the item OK to have the new images saved on the external memory card.
If you don't see any message, after opening the camera, tap thegear which resides at the top, tap on the voice Memory location resident in the panel that appears later and choose the option SD card from the small menu displayed later.
How to Move Photos to SD Card - iPhone and iPad
iPhone e iPad, things are a little different: as you certainly know, Apple devices they do not support direct insertion of SD cards: to remedy this inconvenient problem, if you have a device updated to iOS 13 / iPadOS or later (and therefore equipped with support for external USB memories), you can "transform" the microSD / SD card into a USB key, using a special adapter, preferably compatible with USB 3.0 technology.
See offer on Amazon See offer on AmazonOnce you have purchased the SD card to USB adapter, in the case of iPhone or some non-Pro iPad models you will need a second device, capable of transform the “standard” USB connector (or USB-A) into a Lightning connector. In this regard, I advise you to opt, also in this case, for an adapter with a USB 3.0 input and a second Lightning input, through which to connect it to the electricity.
In this way, you will avoid any problems during the reading phase, due to the lack of power supply: for an iPhone to correctly read the contents of a USB stick, in fact, it is essential that the latter absorb a quantity of current less than 100 mA.
Vedi offers your AmazonIf, on the other hand, you have a iPad Pro equipped with a USB-C connector, I recommend that you only buy one microSD to USB-C adapter, by which to adapt the memory card to the input on the iPad.
Vedi offers your AmazonAfter getting everything you need, insert the microSD into the adapter, connect the latter to theadapter (if necessary) and, thereafter, connect the iPhone / iPad to the adapter. If applicable, also connect the latter to an external power source, using the charging cable dell’iPhone.
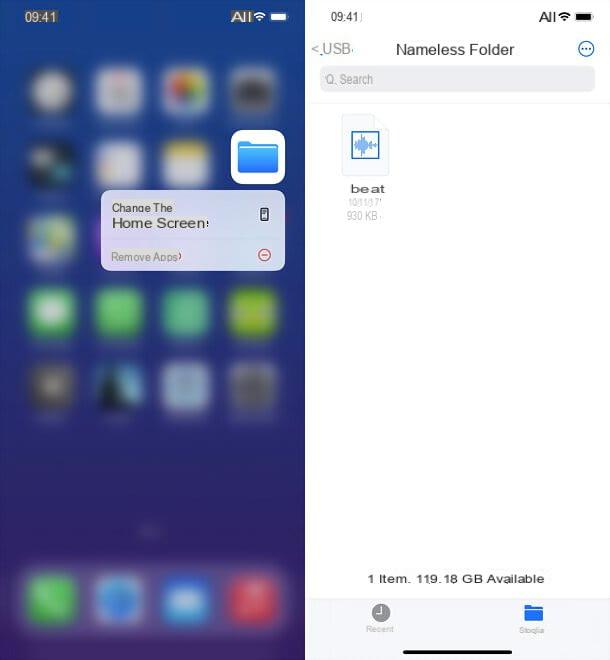
Within a few seconds, the iPhone or iPad should notify you of a new storage device, inviting you to open it with the app Fillet. At this point, you just have to open the image of your interest, touch the icon of sharing of iOS / iPadOS, choose to save the photo to File and select the external USB device as the path.
Alternatively, you can archive images from iPhone / iPad to one as well key equipped with Lightning connector, specially designed for devices with this latter port. To avoid compatibility problems, choose devices with MFI certification (o made for iPhone).
Once you have this last device, download thededicated app from the App Store (usually free), start it and follow the instructions given to you to move the photos to the external memory.
Unfortunately, it is not possible for me to provide you with precise instructions regarding the exact procedure to perform, since each device has an app that is different from the others: usually, however, a welcome tutorial is shown at the first start of the application, containing all the necessary instructions to achieve the desired result, within a few minutes. More info here.
How to move photos to SD card on PC
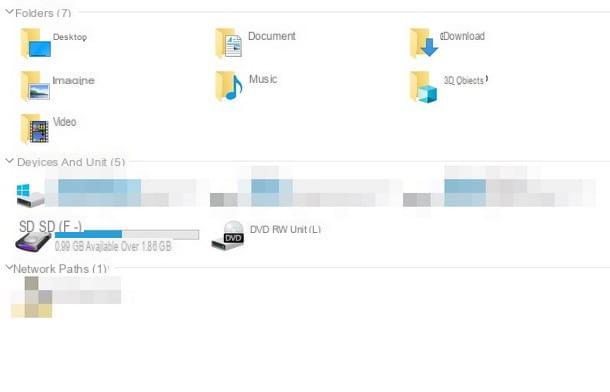
How do you say? You would need to move photos to SD card from PC or viceversa? If so, you can do this with a USB card reader and your computer's default file manager (ex. File Explorer on Windows): for all the details, I invite you to read my tutorial on how to transfer photos from SD card to PC, also valid for the reverse procedure.
How to move photos to SD card


