


Here we go again! You've lost your smartphone's USB cable for the umpteenth time and now you're afraid you won't be able to transfer the photos you took last weekend to your PC. Don't worry: I'm here today to explain to you how to transfer photos from mobile to PC without cable, so as to bypass the problem, at least until you are able to find the cable necessary to transfer the data to the PC.
Whether you have an Android smartphone or an iPhone, it doesn't matter. In both cases you have various "paths" that you can take to transfer photos (and other files) from your mobile to your PC without going through any hardware device. Are you wondering what these solutions are? Mainly two: the cloud services and the Wi-Fi and Bluetooth connections that your mobile phone is equipped with.
Did I intrigue you and you can't wait to deepen the subject? Well, then let's not waste any more precious time in small talk and let's get right into the heart of this tutorial. Make yourself comfortable, take the time to concentrate on reading the next paragraphs and implement the "tips" that I will give you. I'm sure you won't have any problem transferring photos from mobile to PC wirelessly. Happy reading and have fun!
Transfer photos from Android mobile to PC without cable
want transfer photos from mobile to PC without cable using a terminal Android? In the next paragraphs I will show you some solutions, such as Google Photos and AirDroid, which will allow you to achieve your goal without problems.
Google Photos

One of the easiest ways to transfer photos from Android smartphone to PC is to resort to Google Photos, the cloud photo storage service made available by the Mountain View giant.
To use it, all you have to do is download the official app of the service on your smartphone (if you have not already done so, immediately download and configure Google Photos, perhaps with the help of the tutorial in which I explain in detail how Google Photos works. ) and, once you have completed these preliminary operations, you will be able to freely access the photos from your PC browser (as well as from the Google Drive applications) and download them directly from there.
To access Google Photos from the browser, click here so as to immediately connect to the official page of the service, enter the login credentials of your Google account in the appropriate fields and click on the button Log in. Then select all the photos you want to transfer to your PC (just click on the symbol ✓ located in the upper left corner of their thumbnail), click the button (⋮) situato in alto a destra e seleciona la voce Download from the menu that opens or, if you are a lover of keyboard shortcuts, press the keys at the same time SHIFT+D.
Now you just have to wait for the download of the photos in the form of a zip archive to be completed (if you don't know how to open zip archives, read the in-depth analysis I dedicated to the topic). Of course, if you download only one photo, no zip archive will be created.
Google backup and sync

If you don't want to use the browser to transfer the photos to your PC, you can turn to Backup and synchronization by Google, the official Google Drive client available for both Windows that for macOS, which allows you to browse and view the files saved on Google Drive and synchronize them with the devices connected to your account.
To download Backup and synchronization, linked to its download page, click on the blue button Download and by clicking on the button Accept and download. Then open the program installation package and complete the installation procedure by following the instructions on the screen: on Windows just click on the button Yes and wait for the procedure to be completed, while on MacOS you have to drag the program icon into the folder Applications.
After installing and starting Backup and synchronization, click on the blue button Start, enter yours email or yours telephone number e Password in the appropriate text fields and log in by clicking on the button Log in. Wait a few seconds for the file synchronization process to complete, click on the blue button OK, select the folders to synchronize with Google Drive and check the quality of the media files to be backed up.
Next, click on the buttons NEXT, OK e starts and, within a few minutes, you will be able to easily access all the photos you have saved on Google Drive by clicking on the service icon in the sidebar located on the left of File Explorer (su Windows) about del Finder (on macOS). If you need more detailed information on how to use Google Photos, please consult the tutorial I dedicated to the service.
AirDroid
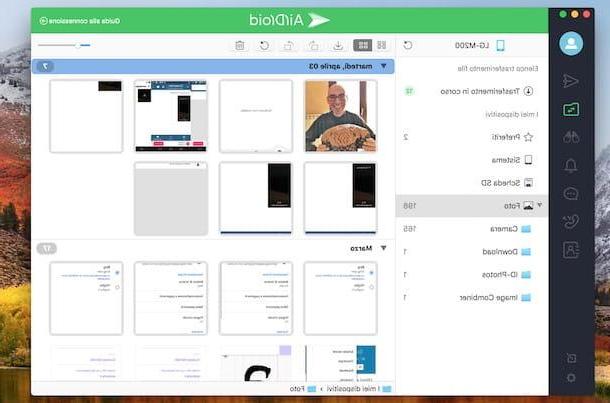
Another solution you can take to wirelessly transfer photos from Android smartphone to PC is AirDroid, a service that allows not only the transfer of files, but also the reception and sending of SMS from the PC, the display of Android notifications on the computer and even the remote control of devices subjected to the root procedure. You can access the service both from the browser (by connecting to this page) and by downloading the official client compatible with both Windows and macOS.
Before explaining how AirDroid works, I would like to tell you that, although you can download the application for free, you must comply with the limit of 200MB of data transmitted per month. To break down this limit, you have to subscribe to the service which, at the time of writing, costs 1,99 dollars a month.
If everything is clear to you so far, immediately download and start the official AirDroid app on your Android smartphone, scroll through the information sheets that illustrate the features of the service and create your free account by pressing the green button Log in or register and then filling out the form that is proposed to you. Alternatively, log in with your account Google, Facebook o Twitter pressing one of the corresponding buttons.
After creating your AirDroid account, download the service client on your computer: then connect to the download page on the AirDroid website and then click on the icon depicting the logo of the operating system in use (eg. flag icon to download the version for Windows or the Finder icon to download the version for MacOS).
Now all you have to do is complete the installation procedure: up Windows, start the file .exe downloaded and click on the buttons Run, Yes, OK, NEXT, Accept, Install e end. If, on the other hand, you use a Mac, open the file .dmg just downloaded, drag the AirDroid icon to the folder Applications macOS and start the program by right clicking on its icon and then selecting the item apri from the menu that appears (this operation must be done only at the first start of AirDroid to "override" the restrictions applied by Apple to non-certified developers).
After installing and starting the AirDroid client, access the service: enter your login data in the fields Email e Password and click on the green button Log in. Once logged in, you will receive a notification on the smartphone in which you have installed the AirDroid app in which you will be informed that you are connected to the computer on which you have just installed the client.
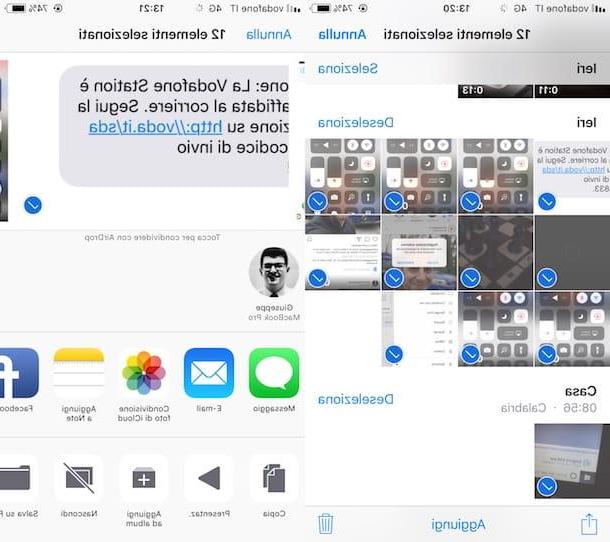
Now all you have to do is proceed with the transfer of the photos: click on the icon of folder with arrows located on the left sidebar, click on the item Gallery, select the images you want to transfer to your computer, click on the symbol of arrow pointing down and wait for the process to finish. If you want to have more details on how to transfer photos from Android to PC, please read the in-depth article I have published about it.
A similar procedure can also be implemented on the iPhone, since AirDroid is also compatible with iOS devices (although with some less functions than the Android version).
Transfer photos from iPhone to PC without cable
Possiedi a iPhone and are you wondering how to transfer photos from your "iPhone by" to the PC without resorting to any cable? The answer is simple: using iCloud, the cloud storage service made available by the Cupertino giant. And if you have a Mac at your disposal, you can transfer photos via the convenient AirDrop function that uses Wi-Fi and Bluetooth. Read on to find out more details.
ICloud Photo Library
The best way to transfer photos from iPhone to PC wirelessly is to resort to the service ICloud Photo Library which, as you can well guess, uses the cloud storage service designed by Apple to share photos on the devices associated with the same Apple ID. You can access it both from the browser and by downloading the official client for Windows and macOS (where it is already present "as standard").
As I have already mentioned to you a moment ago, the ICloud Photo Library uses the storage space on iCloud Drive (all Apple users have 5GB for free) and, for this reason, it is advisable to subscribe to one of the subscription plans to expand the storage space (50GB at 0,99 euros / month; 200GB for 2,99 euros / month and 2TB for 9,99 euros / month).
Alternatively, you can use the service Photo stream, which temporarily stores only the photos, not allowing, however, to access them from the browser. If you want to know more, don't hesitate to read the in-depth article in which I explain how to archive photos on iCloud.

If you have not yet done so, first of all proceed to activate the iCloud Photo Library on your iPhone: go to Settings> [Name Surname]> iCloud> Photos and move up ON l'interruttore situato accanto alla voce ICloud Photo Library.
Now you can transfer the photos to your PC by connecting to the iCloud website, logging in with your Apple ID and then clicking on the item Gallery. Wait for your library to load, select with a click the photo you want to download and then click on the icon cloud with arrow pointing down to complete its download.
If you have a PC Windows, you can also download the official iCloud client and automatically sync iCloud Photo Library and Photo Stream with your PC. Then connect to the Apple website, click on the blue button Download and follow the wizard to complete the client installation: open the file .exe, check the box I accept the terms of the license agreement, click the buttons Install, Yes e end and wait for iCloud to start automatically.
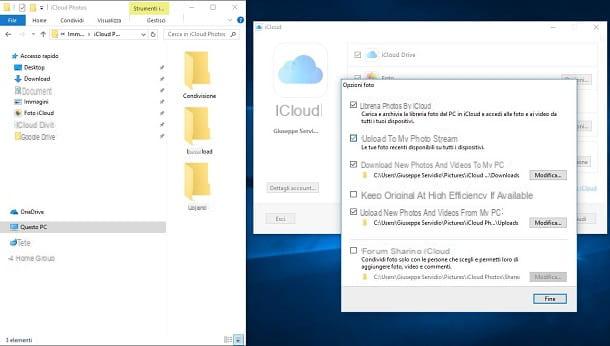
Once you have installed and started iCloud on your PC, log in by entering your Apple ID credentials and click on the button options placed next to the item Gallery. Then choose whether to activate the synchronization of the ICloud Photo Library and / or that of My streaming photo and click on the button OK. Now, wait for the photos to be automatically downloaded from the iPhone to the PC: they will be in the folder Pictures> iCloud Photos.
As I mentioned earlier, come on MacOS it is not necessary to install the iCloud client since this is already installed by default. To use iCloud you must first set up your Apple ID. If you haven't already, go to System preference (the gray gear icon located on the Dock), click the icon of iCloud, enter the username and password of your iCloud account in the appropriate boxes and click on the button Log in.

Then start the app Gallery (the one with the stylized flower icon) and that's it: there you will find the photos taken on your iPhone. Are there no images uploaded to iCloud in the Photos app? Click on the item Preference ... from the menu Gallery, select the tab related to iCloud and activate the ICloud Photo Library and / or it Photo stream by checking the appropriate options.
If you would like more information on how to see photos on iCloud, please read the guide I published on the subject. I'm sure this further reading will also be very useful to you.
AirDrop
Do you want to transfer photos from iPhone to Mac? In that case you can use the function AirDrop, which allows you to transfer files wirelessly using the Bluetooth and Wi-Fi connection of your Apple devices. Before explaining how this very useful function works, make sure your devices have the necessary requirements to share content via AirDrop. In this case you must have an iPhone, iPad or iPod touch updated to iOS 7 or later and a Mac manufactured from 2008 onwards updated to macOS Yosemite or later versions.
If you have a device that supports AirDrop, turn on Wi-Fi and Bluetooth on your iPhone and Mac. Up iPhone, recalls the Control Center of iOS and turn on the Wi-Fi and Bluetooth pressing the corresponding icons (if your iPhone is updated to iOS 11, the Wi-Fi and Bluetooth connections are kept constantly active). Up Macinstead, turn on the Wi-Fi and Bluetooth clicking on the corresponding icons in the macOS menu bar (top right) and then clicking, respectively, on Turn on Wi-Fi e Turn on Bluetooth.
Well: now you are finally ready to transfer photos to Mac via AirDrop! Then start the app Gallery on the iPhone, select the images you want to send to the Mac, press the symbol Share (the arrow pointing up placed at the bottom left), presses on Mac name to which you want to transfer the photos and wait for the operation to be completed.
If you are having trouble transferring photos with AirDrop, make sure Bluetooth and Wi-Fi are turned on on both devices and AirDrop is set to All o Contacts only. If you want more information on how AirDrop works, read the tutorial I dedicated to the topic.
Other useful solutions

In addition to the solutions I mentioned to you earlier, I invite you to consider Send Anywhere, a service to transfer files from smartphone to PC wirelessly, which is extremely convenient and easy to use.
What are the peculiarities of Send Anywhere? Being a multiplatform service, it is compatible with all major operating systems: Windows, macOS, Linux, Android, iOS, etc. Another interesting aspect of Send Anywhere is that the transfer of files is done using simple codes, which means that you will not have to go through tedious registration procedures. And that's not all: this free service is accessible both from the browser and from its official client.
The service, however, is not free from limits, at least in its free version, which allows you to upload up to a maximum of 10GB of data in 48 hours. To break this limit and to take advantage of some advanced Send Anywhere features, you need to subscribe to the Plus subscription, which starts at $ 5,99 per month.
To proceed, all you have to do is download the Send Anywhere app on your Android smartphone or iPhone or Windows 10 Mobile device, and proceed to transfer the data (in this case the photos) through the service. If you are interested in having more details on how Send Anywhere works, read the guides in which I explain how to transfer Android files and how to transfer files to iPad: there you will find all the explanations you are looking for.
How to transfer photos from mobile to PC without cable


