


I knew, you are always the same! You've continually put off buying a new scanner after the old one broke and now you're in trouble because you can't scan the important documents you need to deliver for tomorrow.
Don't complain, start acting right away: pick up your smartphone and start photographing your documents. Trust me, you don't need a scanner now, just a new generation smartphone and some applications free. Do not you believe it? And instead you have to! There are in fact many applications for Android and iOS that allow, in fact, to photograph a document with the built-in camera of the device and then transform the photo taken into a perfect scanned document.
How do you say? Do you think that I am kidding and that I am making fun of you? Certainly no, I would never allow myself. If you want to know how to scan your documents with the camera of your mobile device, all you have to do is take a few minutes of free time to carefully read the instructions that I will give you in this tutorial of mine: I am sure that, at the end of reading, you will be absolutely satisfied with what you have learned. Let it bet? I wish you a good reading and a good job.
Index:
- Foto Scan (Android/iOS)
- Notes (iOS)
- Scanbot (Android / iOS)
- Google Drive (Android)
FotoScan (Android / iOS)
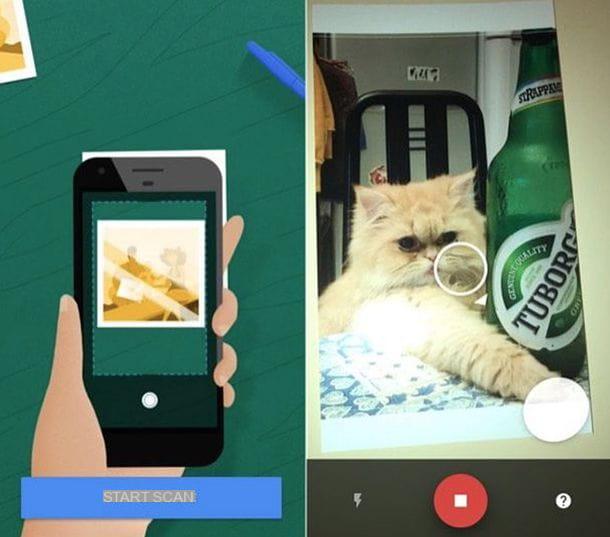
Among the best applications you can download for free on your Android and iOS device, there is the Foto Scan app which, developed by Google, is an excellent tool for scanning photos and documents.
I chose to talk to you in particular about this application since it integrates a powerful scanning tool allowing you to digitize photos and documents and then upload them to Google Photos, a free cloud storage service offered by Google that allows you to save all photos taken in the cloud with no space limits.
Although this application is specially designed for scanning photos, it can also be used successfully for scanning documents. To use it you must have downloaded it from the Android Play Store or from the iOS App Store and then you will have to start it by tapping on its icon.
Then, once you have started it, you will have to frame the document or the photo to be scanned by positioning it in the center of the frame you will see on the screen and then press on the pulsing tondo which you can see below.
At this point you will be prompted to move your smartphone in order to correctly frame the four dots that you will see appear in the corners of the photo or document you intend to scan.
Then move the smartphone in such a way as to frame the dots and make them turn blue. Once this is done you will have to wait for the app to process the scanned document or photo.
If you are having difficulty scanning a document or photo, make sure you have turned off the flash options (lightning bolt symbol) and instead have activated the automatic reflection removal option (symbol of a magic wand).
Once you have finished scanning you can see the final result by tapping on the thumbnail of the photo that will appear at the bottom right.
Once scanned, you will be able to make changes using the cropping and corner adjustment tools. Once all the editing operations have been completed, you can save the scanned document or photo by pressing the button end and then share the scanned document through other applications; to perform this last operation, just tap on theshare icon.
This application certainly gives its best when it comes to scanning photos but it can also be used for scanning documents via the camera of your mobile device.
Notes (iOS)
For those who have an Apple device updated to iOS 11 (or later), a valid alternative to scan documents with the camera is the application Notes already available by default on your device.
Following the update with version 11 of iOS, in fact, the Notes application integrates a function that allows you to scan documents while also making a basic modification.
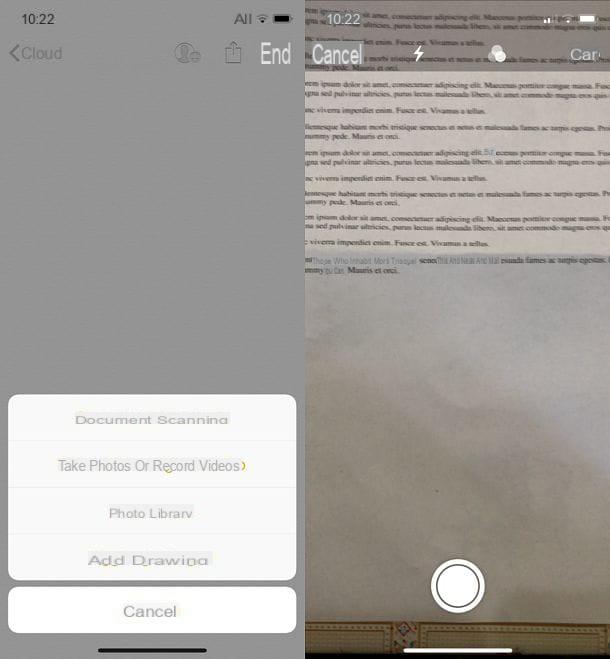
To use this feature you will first have to tap on the Notes app (it is the one that presents the symbol of a notepad) and then tap the button with thepencil and sheet icon which is located in the lower right corner.
Once you have created a new note you will need to press the button capacitor positive (+) lead which is located in the bottom bar; then, from the drop-down menu that you will see on the screen, press on the item Scan documents and, using the camera of your device you can frame the document to be scanned and scan by pressing the round button that you can see located at the bottom.
Before taking the photo and thus performing the scan, you can choose whether to scan in color or black and white by tapping the button with the symbol of the three dots which you can see located at the top.
You can also choose whether to activate or deactivate the flash by pressing the button with thefulmine icon which you can also see located in the top bar.
Once you have taken the photograph, you can make the cropping of the document by dragging the four dots that you will be able to see on the screen and thus adjust the angles of the scanned document. At the end of the modification press on the button Save the scan: this will be automatically saved in a new note created with this application.
The iOS Notes application is therefore capable of scanning documents but the functionality is limited when it comes to editing. Consequently, if you want to change the scanned document, I recommend that you tap on the new note created that contains within the scanned document and forward the document by pressing the button with the symbol of sharing which you can see in the upper right corner.
Scanbot (Android / iOS)
One of the best applications for scanning documents on Android and iOS devices is the application free Scanbot which also comes in version a payment but which offers several interesting features even in the completely free version.
Once you have downloaded it for free on your Android or iOS device you can use it by taking advantage of its functionality free multi-page scan. When the app starts, you can in fact choose whether to pay for the full version or to start using the application completely free.
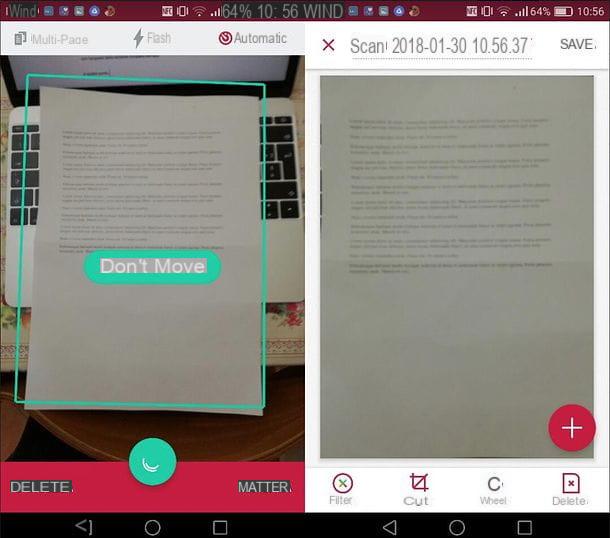
Regarding the use of the application for scanning purposes, in the version free there is the functionality of automatic scan: Once the document is framed, it will be scanned automatically. You can activate the flash by tapping the button with the lightning bolt symbol and activate the multi page function by tapping the button with the two sheets symbol.
To manually scan a document, simply frame it using the camera of your device and then press on pulsing tondo located at the bottom.
Once the document is scanned, you can make a cut using the button Size and apply some of the filters in the section Filter. If you are using the free of this application, however, you will not be able to use the tool Magic Color which will automatically improve the scan performed. However, the other filters will be available, such as the filter colore, filter Grey and the filter black White.
Once you have scanned and, if necessary, applied any changes to the scanned document using the tools I told you about, you can save the scan in the device memory and possibly share it with other applications and cloud storage services.
Google Drive (Android)
For those who own an Android device, an equally valid alternative for scanning documents via the device's camera is the Google Drive application, already present by default on some devices equipped with the Google operating system.
The Google Drive application first of all presents the cloud storage functionality but can also be used for scanning documents and subsequent uploads within the same service.
The Google Drive application allows you to scan documents by photographing them using the camera of your device and optimizes the scans in such a way as to make the documents more readable. The application also offers some basic functions for editing the same documents and is therefore configured as an application that is easy and immediate to use, as well as completely free.
To scan a document through the Google Drive application you will need to launch this application or download it from the Android Play Store. Please note that Google Drive is also present on iOS mobile devices but that the document scanning functionality is not present.
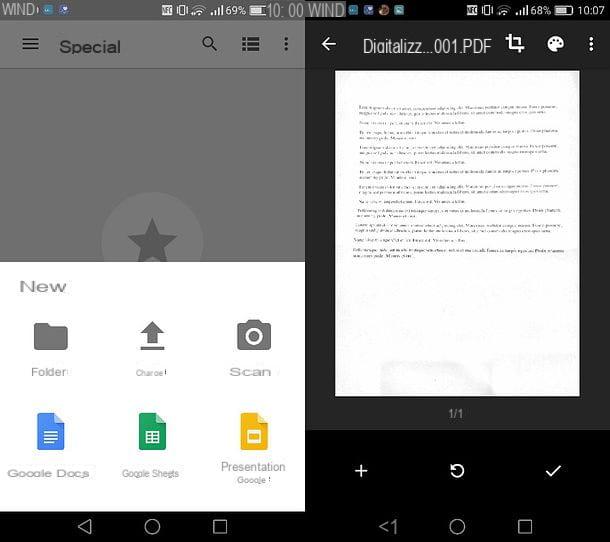
That said, to perform the scan operation you will have to first press the button capacitor positive (+) lead which you can see on the app home screen.
At this point, tap on the wording Scan that you will see in the drop-down menu and, using the camera of your device, take the photo of the document you intend to scan.
Then you can cut or modify the document: in the first case then press the button with the ruler symbol to manually crop and / or set the margins of the scanned document, or press the button with the palette symbol to adjust the application of filters and improve scanning.
To scan more pages and add them to the document, click on the button capacitor positive (+) lead which you can see at the bottom left and scan a new page of the document by taking a new photograph.
At the end of all the operations you will have to press the button with the ssymbol of the V check mark to confirm the scan operation and upload the document to Google Drive.
How to scan documents with the camera


