You have organized your holidays and you will be out of town for a few days. Now everything is ready, but only one thing is missing: to warn colleagues and customers that you will not be there in those days and you will not be able to reply to any of their emails. Sounds like a long job, right? In reality this is not the case, as you can solve through the functionality of auto reply e-mail boxes. By doing so, anyone who contacts you will receive a program response from you, in which you will warn that you are not currently available.
Good! I bet that's just what you were looking for. How do you say? Do you have an Outlook mailbox and want to know if this feature is available? The answer is affirmative and in a few moments I will explain how to activate it. In fact, in today's guide, I'll show you how to set up Outlook auto reply either directly from Webmail or through the Outlook software for Windows and macOS (regardless of the mailboxes configured inside it).
Can't wait to start reading the tips I've written for you in this tutorial of mine? If that's the case, let's not waste any more time and get started immediately. Sit comfortably and pay attention to the procedures that I will indicate to you, so as to be sure to set up an automated reply to use on your Outlook mailbox and beyond. I wish you a good reading and, above all, a good job!
Index
- Set up an automatic reply on Outlook.com
- Set up an automatic reply on Microsoft Outlook
- Use Outlook rules to set up an automatic reply
Set up an automatic reply on Outlook.com
If you want to set up the automatic reply directly to your Outlook Webmail, the procedure to follow is simple. First, go to the link I gave you and log in to your Outlook mailbox with your Microsoft account credentials.
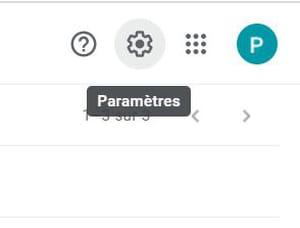
Once logged in, you will be directed to the Outlook inbox to read and compose emails. On the main screen, click theicon with an ingranaggio, which you find located at the top right and, in the box that is shown to you, select the item View all Outlook settings, which you find below.
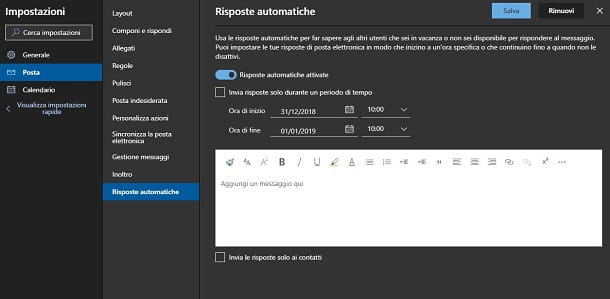
Once this is done, on the screen you see, select the items Mail > Automatic replies, to access the automatic replies configuration panel. Then move the lever from OFF a ON near the wording Turn on automatic replies, so as to activate the functionality.
At this point, all you have to do is configure the automatic reply. To do this, use the text box below to compose the message to be sent automatically every time you receive the email from any sender. You will have an advanced HTML editor to format the text to your liking.
Now you have to decide if the automated reply should be configured on all contacts (default setting) or only on your own contacts stored in the Outlook address book. In the latter case, you simply have to put a check mark in the box below Send replies to contacts only.
The system for sending automatic replies can be configured to work only in a specific time interval, so that you can be sure that this functionality starts and ends even if you do not have the possibility to access the mailbox. To do this, check the box Only post replies during a period of time and set the date andclockwise start and end of this automated operation.
After configuring all the parameters mentioned above, click on the button Save, located at the top right of the screen. By doing so, every time you receive an email, an automatic reply will be sent according to the settings you configured
The above procedure can also be performed on smartphone e tablets, reaching the Outlook Webmail via the browser of the mobile device. After logging in, tap on the icon ☰ located at the top left and presses on the item Automatic replies. Check the box Send automatic replies and perform the same procedure indicated in the previous lines to create and configure the automatic reply message to received emails.
I warn you that this feature cannot be programmed on smartphones and tablets and you will therefore have to manually deactivate it when you no longer need it, by removing the check mark from the box Send automatic replies.
Set up an automatic reply on Microsoft Outlook
Automatic replies can also be configured on an Outlook e-mail account directly from the software Microsoft Outlook, featured in the productivity suite Microsoft Office. Haven't you ever heard of it? In this case I suggest you read my guides on how to download Outlook and how to configure it, to learn more.
In the next chapters, however, I will show you the procedure for setting up an automatic reply on Microsoft Outlook, both through the desktop client available on Windows, and through that for macOS. I warn you that the automatic replies system is available for all those mailboxes that supported this functionality in the past. The client does not need to remain running on the PC, because the automatic reply will be forwarded to the e-mail server to work even when the PC is turned off.
For accounts configured in IMAP e POP3however, this feature may not be available. You can then refer to this chapter to use the feature Regole, which only works if the Outlook client is running on the PC.
Windows
To configure Microsoft Outlook su Windows when sending automatic replies, follow the procedure that I will show you in the next lines, which will only take you a few minutes of your time.
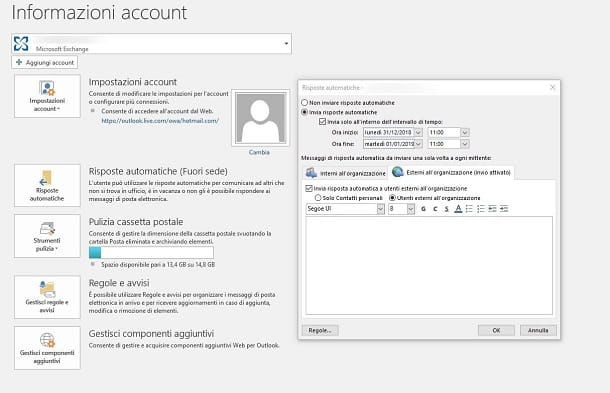
First, start up Microsoft Outlook, via its icon on the desktop or in the menu Start. Once this is done, select the tab Fillet at the top, in order to open a new screen, and press the button Automatic replies (Out of office).
You will be shown a new box through which you can configure the automatic reply to be sent to those who send you a new email. First, then activate the box Send automatic replies and decide whether to set a time interval for the start and end of the automated process by activating the box Send only within the time frame and using the drop-down menus to choose the date andNow beginning and end.
Now, you just have to compose the message of the automatic reply. To do this, use tabs Internal to the organization, to configure a message to be sent to your colleagues belonging to the same work group, and / or External to the organization, that is, to reply to any sender. In the latter case, you must first activate the box Send automatic reply to users outside your organization and then choose whether this reply should only be sent to Outlook contacts (Personal contacts only) or anyone (Users outside the organization).
Finally, use the text box with advanced HTML editor to create the reply message and press the key OK, to confirm the operation. If the operation is successful, you will be shown a notification on the main Outlook screen, indicating that the automatic replies are active and that you can disable them by clicking on the appropriate button disable.
MacOS
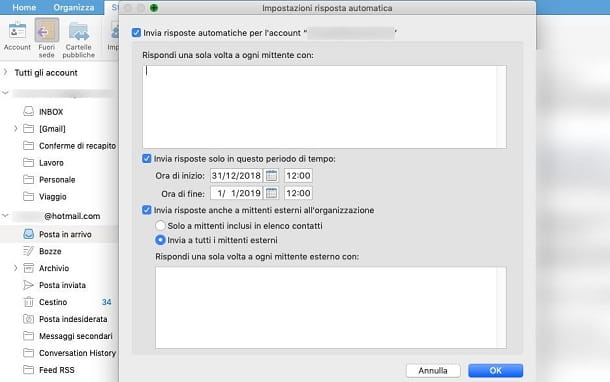
Also through Outlook to MacOS you can configure automatic reply for incoming mail messages. To do this, go to the tab Instruments and premium tasto Offsite.
In the new screen that is shown to you, put a check mark in the box Send automatic replies for the account. At this point, use the text box Reply once to each sender with to fill in the message for use in the automatic reply. Then put a check mark in the box Submit replies only within this time period, to configure the date andNow start and end of the automated operation.
If you want to send a reply also to senders outside your work team, you can enable the box Also send replies to senders outside your organization, by typing the text in the appropriate text area and then choosing the options Only to senders included in the contact list, to send replies to address book members only, or Send to all external senders, i.e. to any email address, including those from newsletters. When you have completed setting up the automatic reply, press the button OK to confirm.
Use Outlook Rules to set up an automatic reply
In Microsoft Outlook you can also configure an automatic reply for those e-mail addresses configured in IMAP o POP3 or boxes that do not support this functionality from Microsoft. However, the replies will only work if Outlook is running on the PC, as the functionality will be used Regole, which I will tell you about in the next paragraphs.
Windows

Su Windowsavvia Outlook and fai clic sul tasto New e-mail message, located on the left in the tab Home. Then fill in the text message for the automatic reply, including the subject, and then click on the items Fillet > Save with name, choosing as the format Modello Outlook OTF.
After saving the autoresponder in OTF, it's time to configure it within an Outlook rule. To do this, click on the tab Fillet and then press the button Rules and warnings. In the screen that is shown to you, click on the button New rule e scegli l'opzione Apply rule to all received messages, premendo poi su NEXT.
At this point, press the button again NEXT, without selecting any options and confirm your choice by clicking on Yes. On the next screen, choose the box Reply using a specific template and click on the wording Specific model that you find below. It then explores the folders on your computer to find the file OTF previously saved and press the button apri.
Now, press the button NEXT twice in a row and, finally, on the one named end. Doing so will create a rule that will send an automatic reply to all messages received when Outlook is running. To deactivate it, just go back to the section Rules and warnings and delete the rule in the list, using the appropriate button Delete.
MacOS
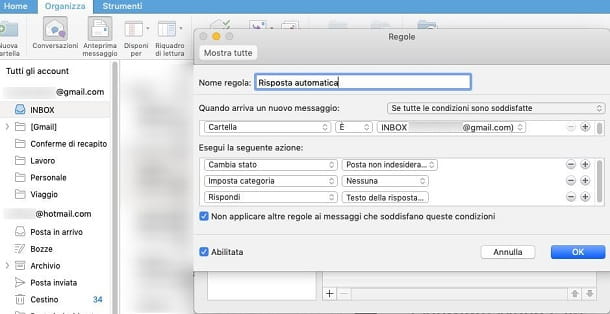
Su MacOSInstead, setting up an automatic reply by rule is easier than the procedure for Windows. Select the tab Organize and premium tasto Regole, selecting the item Edit rules, from the box that is shown to you.
Once this is done, click on the entry IMAP o POP on the left, based on how you configured your mailbox, and press the button + that you find below, to create a new rule. In the section Take the following action, press the button + on the right and click on the drop-down menu corresponding to the item Move message. Select quindi la voce Reply and click on the box next to it Response text. Then type the reply to send and press the key OK. Press the button again OK to confirm the creation of the rule.