


You need to post on the popular photographic social network an image through the stories and therefore you are looking on the Internet for an effective solution. With this guide today we will see how to shrink photos on instagram stories using some applications.
How to shrink photos on Instagram stories from the app itself
The official software of the popular photographic social network integrates a feature that allows you to reduce the size of an image to adapt it to Instagram Stories.
Let's see how to do it:
- Grab your device Android o iOS, start the official app and eventually make the login in case you haven't.
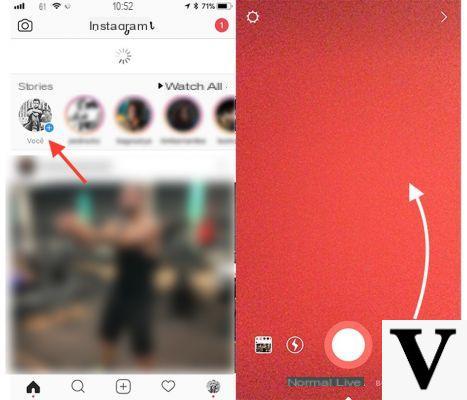
- In the next step, tap on yours profile picture present at the top right with written below His own story or make one swipe from the left edge to the right to access the screen dedicated to Instagram Stories.
- At this point, press on thumbnail of the last photo taken with the smartphone at the bottom right (on Android) or bottom left (on iPhone) and then on thephoto preview that you want to load using the stories.
- Now, to adapt it to the horizontal format, rest two fingers on it and close them so as to make one Zoom out.
- Once you have achieved the desired result, just press on The tua storia at the bottom left to publish the content.
How to shrink photos on Instagram stories via the Gallery app
Another solution you can take advantage of if you own one Android smartphone, in addition to the Instagram, is the stock application used to open photos. This is called Gallery o Gallery. For example, if you own a smartphone Samsung of the latest generation, you can use theGallery app.
Let's see the steps to follow:
- Grab your device Samsung and open the app Gallery that you find on the home screen or in the drawer.
- In the next step, click on the tab Images, identify the photo you want to upload to Instagram in landscape format and click on it.
- At this point, tap on the icon of square with an arrow pointing to the right and move i 4 side edges square inwards to form a vertical image.
- Once you have achieved the desired result, tap on the button Save at the top right to proceed with saving.
- Now you just have to open the app Instagram and follow the same steps indicated above.
How to shrink photos on Instagram stories via the Photos app
If you are the owner of a iDevice (iPhone o iPad), you can take advantage of the app Gallery and Apple pre-installs on all its devices.
Here are the steps to follow:
- From your terminal iOS, tap on the icon Gallery to start it and then on Gallery located at the bottom left to access all the images saved on the iDevice.
- Once you have located the desired image, tap on its miniature and then on the button Modification located at the top right.
- To proceed with the cropping, click on square containing two arrows at the bottom and create the vertical proportions by acting on the side edges.
- Once you have achieved the desired result, tap on end at the bottom right to automatically save theimage as a new file.
- At this point, you just have to follow the same steps indicated above to publish the story on Instagram.
How to make photos on Instagram stories smaller: other solutions
In addition to the software mentioned above, on Android e iOS you can take advantage of alternative applications to transform a vertical photo into a horizontal one in a few simple steps. Find the list below.
- Google Photo (Android / iOS)
- Aviary (Android/iOS)
- InShot Photo Editor Pro (Android)
- CyberLink PhotoDirector (Android/iOS)
- Snapseed (Android / iOS)
- Adobe Photoshop Express (Android/iOS)
- Pixlr (Android / iOS)


