


Even if you don't consider yourself a professional photographer, you want to make a good impression on your friends when you show them the photos you take with your mobile phone or, even better, with your camera. Since you want to hone your photography skills, you have searched the internet how to take professional photos and so you have come to this guide. Well, there is no doubt: you have come to the right place at the right time!
In the next paragraphs, in fact, I will be able to give you some practical "tips" that will surely allow you to improve the quality of your shots, avoiding making some rather common mistakes that would risk ruining them. Among the various things you can do to take quality photos, there is choosing the right lighting and manually adjusting some shooting settings.
So, would you like to deepen the subject? Yup? Great: make yourself comfortable, take all the time you need to concentrate on reading the next paragraphs and, more importantly, try to follow the instructions I will give you step-by-step, so as to be able to create photos worthy of being defined. such. There is nothing left for me to do, except wish you a good read and, above all, have fun!
How to take professional photos with your smartphone
If you use your phone as your primary tool for taking pictures, I'd say start this discussion by seeing how to take professional photos with your smartphone. Even if the quality of the shots that can be obtained with a mobile phone camera is not, for obvious technical limitations, comparable to that of professional cameras, I am sure that, thanks to the precautions I am about to give you, you will be able to take a lot of shots. interesting.
Use the right lighting

Use the right lighting it is very important when you are about to take a photo, especially when taking it with a smartphone. Adequate lighting, in fact, allows you to start from the right conditions to take quality shots, avoiding that they are overexposed (when there is too much light) or underexposed (when there is too little light).
The ideal conditions for taking a photo are those that take advantage of natural light coming from light sources, such as the window (if you are indoors) or that of the sun (if you are outdoors). If you are in a dimly lit environment, you can try to compensate for the problem by trying to adjust the ISO value of your smartphone's camera and increasing the i exposure times (later you will find explained how to do this).
Use manual shooting settings
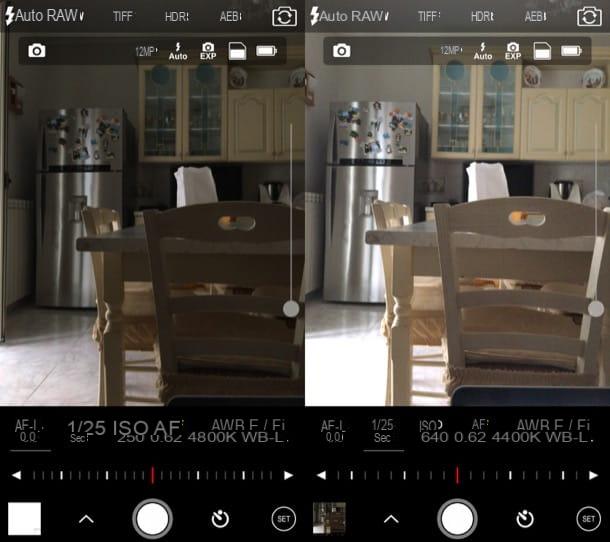
Use manual shooting settings it is a great way to try to improve the quality of your shots, as it allows you to act on specific parameters by correcting any starting problems (such as suboptimal lighting conditions). Since it is not possible to change the shooting parameters with the functions included "standard" in Android and iOS, you will necessarily have to resort to third-party apps, such as Camera FV-5 for Android (free) and ProCam (6,99 euros ) or Halide (6,99 euros) for iPhone.
After you have installed one of the apps mentioned above, you will be able to change some basic shooting parameters.
- ISO sensitivity - is the degree of amplification of the electrical signal sent to the sensor cells. If you increase this value, the photo will be brighter. When increasing the ISO, however, keep in mind that the shot could become "noisy" (ie present a noise generated by the "effort" made by the sensor to capture more light): therefore, modify this parameter sparingly.
- Shutter speed - by increasing this value, you will avoid running into blurred photos (even if the shot could be darker); decreasing it, however, the photo will be brighter (but it could be moved due to the movement of the photographed subject and / or to normal hand shake).
- Maximum aperture of the diaphragm - usually the apps on the stores do not allow you to change the aperture. If the one you use allows you to do so, know that this value indicates the amount of light that passes through the lens, which is measured in f-stop (Eg. f / 1.8 o f / 4.5, etc.). The lower this value is, the wider the aperture and, consequently, more light will enter the lens making the shots appear brighter.
Do not use digital zoom
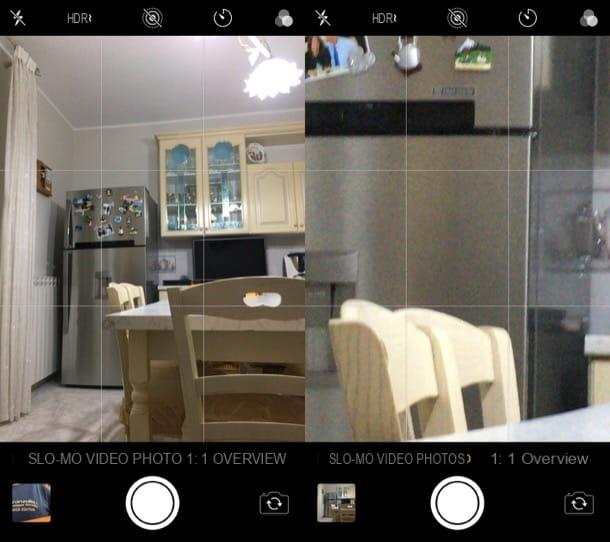
Maybe it will seem strange to you, but do not use digital zoom is another trick you can take to take professional photos with your smartphone. For what reason? It is not difficult to understand: the digital zoom, unlike the optical one, is simply a digital enlargement of the photo and, consequently, this generates a very ugly grain effect that makes the shot practically unusable (as you can see from the example image you find at the beginning of the chapter).
The optical zoom (which has been implemented on many smartphones in recent years, using a game of rear camera lenses), on the other hand, brings the subject of the image to be shot closer by using optical and mechanical elements that shorten or lengthen the focal length, not resulting in a loss of quality. If your smartphone integrates the latter, use the optical zoom instead of the digital one. Understood?
Compose the photo

Compose the photo it is one of the most important things to pay attention to when shooting, as it is through the composition that the photo is actually “born”. When composing the photo, try not to position the subject in front of a background that is too "confused", as it may not adequately bring out the subject that is in the foreground and make sure that there are no disturbing elements in the image (eg. passers-by, unwanted reflections, etc.).
A great way to compose the photo is to use the very famous rule of thirds, according to which the composition of the image must be divided into an imaginary grid made up of 9 rectangles. To make a subject stand out, it is advisable to place it in one of the intersection points where the imaginary grid lines intersect, because these are the ones where the eye of the viewer will "fall". Following this very simple trick will give a more professional touch to your shots: you can be sure!
To facilitate the composition of the photo using the rule of thirds, I suggest you activate the grid on your device (if it is not already activated). Here's how you need to proceed.
- Your Android - start the app Camera, presses the icon of roller to go to the Camera Settings and move to ON the switch lever placed in correspondence with the wording Grid.
- Your iPhone - go to Settings> Camera and move up ON the switch lever placed in correspondence with the wording Grid.
Take more photos

Take more photos it's a trick that even professional photographers use, since the danger of making a mistake in production is always around the corner. For this reason, I invite you to take more photos, perhaps from different angles, so you can choose the ones that came out best.
On many smartphones it is possible to use the "burst" mode for this purpose (which can be recalled simply by holding down the software shutter button), but don't think about using it to try your hand at sports photography, because it is not designed for this purpose.
If you want to learn more about the subject and get more advice on how to take beautiful photos with an Android phone or an iPhone, take a look at the tutorials that I linked to you because they will certainly be useful to you.
How to take professional photos with the Reflex
You recently bought one reflex and would you like to know how to take professional photos with the latter? In this case, let me give you some "tips" that will certainly be useful to achieve your goal.
Choose the right lens
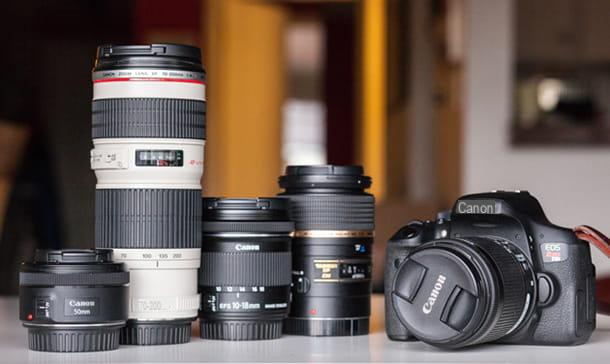
Choose the right lens is the first step to taking professional photos with your camera. When choosing the lens to use in a given circumstance, you must mainly take into account the type of photography you want to make. I'll give you some practical examples, so that you can understand the point well.
Let's say you want to try your hand at nature photography. In that case, you will most likely have to use a telephoto, that is a lens that has a rather pushed focal length, preferably from 300 mm in su. For what reason? Because, as you can well understand, to photograph an animal from a distance without sacrificing the quality of the shot is essential: you certainly cannot get close to it, since it could run away or, even worse, attack you.
To photograph landscapes, however, it would be better to use a wide-angle lens, with a focal length less than 35 mm. This way, you can capture a larger portion of the scene. If you want to try your hand at portrait photography, however, the ideal would be to use a lens with a focal length of 50 mm.
Please note: when choosing a lens, also take into account the type of camera you have. If your Reflex has a sensor APS-C, in fact, you have to calculate the crop ratio due to the latter which is equal to 1,5x for the DSLRs produced by Sony, Nikon and Pentax or 1,6x for the Canon DSLRs.
See offer on Amazon See offer on Amazon See offer on Amazon See offer on Amazon See offer on Amazon See offer on Amazon See offer on AmazonFor more information on which lens to buy, consult the purchase guide I have dedicated to the topic: it will certainly be useful for you to choose the one that best suits your needs (and possibly also your budget).
Manually set the shooting parameters
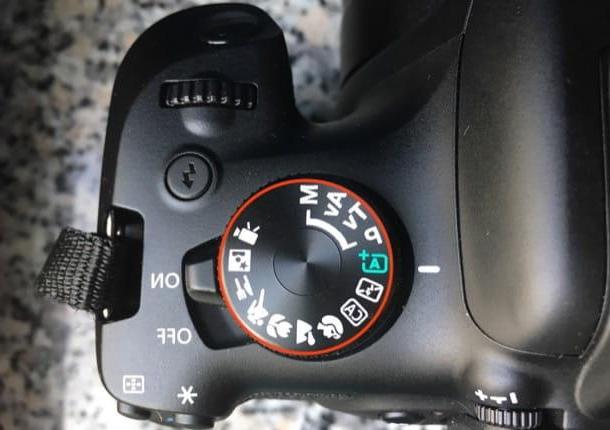
Instead of using the auto shooting mode, manually set the shooting parameters, so as to be able to create professional and original photos. To set the manual shooting mode you have to rotate the selection dial so that the letter M appears next to the symbol of dash. Then adjust the main shooting parameters taking into account the conditions in which you are about to take the photo and the final result you want to obtain.
- ISO sensitivity - as I have already explained to you previously, this value indicates the sensitivity of the sensor to light. The higher the ISO value used, the greater the “effort” that the sensor will have to make to capture a greater quantity of light, even in non-optimal conditions (eg at night). Raising the ISO a little will allow you to get brighter shots, but don't overdo it if you don't want to get very noisy shots.
- Shutter time - this parameter indicates the time for which the shutter remains open in order to let in the light that must reach the sensor. If this value is very high (eg. 1/50, 1 ", 30 " etc.), the photo will be very bright because the amount of light that will reach the sensor will be greater; if it is very low (eg. 1/320, 1/1000, etc.), however, the shutter will remain open for a much shorter time and the amount of light reaching the sensor will be less, resulting in a less bright shot. When choosing the shutter speed, take into account the lighting conditions in which you are going to operate (to avoid overexposed or underexposed photos) and the subject you want to capture (to avoid photos that have micro-blur or blur).
- Opening the diaphragm - the diaphragm is a system of blades that are positioned in an inverse fan pattern, which open and close according to the choices made by the photographer. The aperture is measured in f / stop and affects the depth of field, that is, the range of distances from the camera within which the immortalized subjects will be sharp or blurry. If you want to decrease the depth of field to take photos with the foreground subject in focus and the background out of focus, you must set an aperture as high as possible (eg. f / 1.4, f / 1.8, f / 2, etc.), while if you want to take a picture with the whole scene in focus you have to set a very low aperture (ex. f / 4, f / 8, f / 16, Etc.).
For more information on how to choose the shooting mode and how to manually set the shooting parameters, see the insights I linked to you. If, on the other hand, you want more specific information on how to set the shooting parameters listed above to create blurred photos or with a blurred background, read the guides dedicated to these topics.
Other useful tips for taking professional photos with the Reflex
There are so many other useful tips for taking professional photos with the Reflex, including using the right lighting, composing the photo and taking multiple shots (possibly from different angles). Since I have already told you about these tricks in the chapter dedicated to how to take professional photos with the smartphone, I invite you to take a look at the latter if you have not already done so, as the suggestions there are valid online in principle even using a camera.
If, on the other hand, you want technical information on how to use a Reflex, because you have difficulty understanding how to take a picture and use the various functions available, consult the tutorial I linked to you, because it will certainly be useful to clarify your doubts.
How to make professional photos for Instagram

I told you more than once: to "break through" on Instagram you have to focus everything on quality. If you want to know how to take professional photos for the photographic social network, all you have to do is pay attention to the precautions that I have indicated in the previous chapters.
If you take a photo following the criteria I have indicated in this guide, in fact, you will be able to pull off professional shots that will surely hit the Instagram community and maybe allow you to expand your audience. In taking pictures for Instagram, however, try to be original and understand what emotions you want to convey with your shots - this will help you avoid mundane and uninteresting photos.
If you want to deepen the subject further and get some more information on how to take beautiful photos for Instagram, please consult the guide I have already published on this subject.
How to take professional photos


