


It should be noted that Windows media is a media player created by the Microsoft company for the Microsoft Windows operating system. It has several versions that add functions to the liking of its users.
Windows allows the reproduction of different digital formats such as: WMV (Windows Media Video), Audio CD, MPG, Audio CDD, VD-Video, WMA (Windows Media Audio), DVD-Audio, MP3, MPG, among others. Likewise, this format allows for video playback but on paid servers.
Likewise, Windows Media allows you to copy songs to a USB memory and vice versa. Likewise, this player can search for songs on the internet along with the names and album, also showing the album cover.
It should be noted that a USB memory is a device for storing information and transferring files. It has variety of names among which they have been heard: memory stick, USB flash drive, memory drive, memory key, pendrive, among others.
How to store a playlist from Windows Media?
It should be noted that Windows Media is known as the player of choice for many users, as through it it is possible to listen to music from their computer. It also allows the creation of playlists that can be transferred to a USB device. The ideal is to update it.
It is convenient to be able to know how the Windows media player enables its users to be able move songs to a USB memory and that in this way they can be listened to on another PC. This can be achieved through a few simple steps which we will explain below.
First you can "Find the Windows media player" and find the playlist you created, right click. Another window will automatically open in which you need to select the option "Open file path".
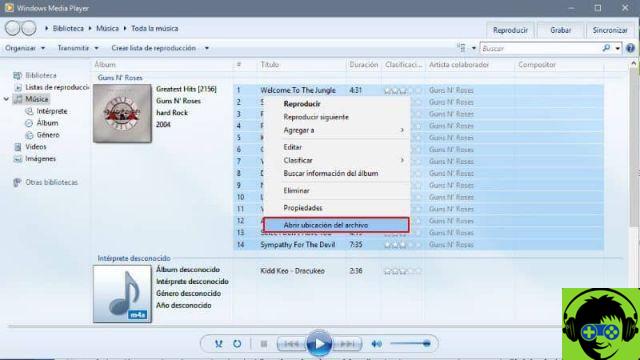
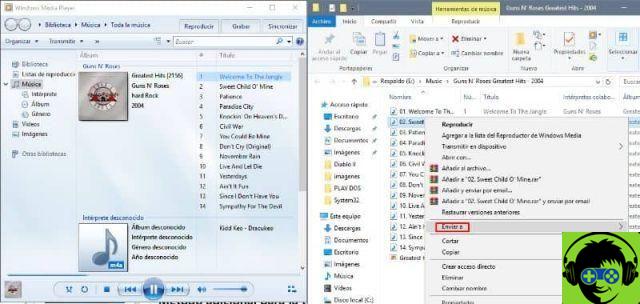
This option will automatically open the «file explorer» and from that moment you will be able "Start the playlist transfer" from Windows media to USB memory, you just have to copy the entire playlist and that's it. This way you will have the saved lists from Windows media in your memory.
Additional method for transferring playlists
It is important to remember that another option is to have third party software and the most important thing is that it can be obtained for free, it is SyncPlaylist. This software was created precisely to perform this function.
First of all, the instrument must be docked to the desktop after installation, then the USB memory must be connected to the computer. In this way you can start transferring the playlist to memory.
It should be clear that the software will detect the playlist if it is in the default location and you just have to click on the option "Start transfer". This will save the complete list on the USB memory.
Likewise, this software allows you to save the list in m3u format, this with the intention that if the device on which you will play the list later is not compatible with the playlist file.
Likewise, this tool allows that when the list is transferred, keep the order of the songs as you saved them.
Another feature of this software is that if you edit a song on the pendrive or delete it, when you reconnect the USB memory to your computer, the cast may be synchronized and it will automatically update in Windows media.
Likewise, this program allows users to create a playlist in an orderly manner. Also, skip duplicate songs, sync changes if the list has already been saved, and the folder can be cleaned before transfer.
In short, with these two methods you will be able to move songs from Windows Media to your memory, it's a simple procedure.
Finally, we hope this article has helped you. However, we would like to hear from you Have you been able to transfer a Windows Media playlist to a USB stick? Do you know of another method to perform this action? Leave us your answers in the comments.


![[Free] Software to Play and Listen to Music on Windows PC -](/images/posts/bce57ef3d2bc9852e0fa758f66120b13-0.jpg)