


The latest iPad models have excellent cameras that allow you to take photos of more than good quality: it would be a real shame not to safeguard them by creating backup copies on your PC, also because it is an extremely simple operation that does not require any. advanced computer knowledge.
How do you say? Are you a landslide with technological devices and do not know how to "tinker" with the iPad and the computer? No problem, below is a step-by-step guide on how to transfer photos from iPad to PC that is just waiting to be consulted and put into practice. Regardless of the operating system you have installed on your computer - be it Windows or macOS - I assure you that you will find answers to all the doubts you may have about transferring photos and videos from the iPad memory to your computer.
So, can you know what are you waiting for? Take five minutes of free time and try to put into practice all the information I am about to give you. I assure you that everything will go as smooth as oil. The directions apply to all iPad models and all the latest versions of the iOS operating system. Happy reading and have fun!
Transfer photos from iPad to a Windows PC
If you want to know how to transfer photos from iPad to PC and you're using Windows, all you need to do is connect your iPad to your computer using the supplied Lightning / Dock cable. In order for the device to be recognized correctly, it must be installed on your PC iTunes, Apple's multimedia software. If you haven't done so yet, then connect to the Windows 10 Microsoft Store and download iTunes from there.
Alternatively, connect to the Apple website and click on the link to download the classic version of the program on your PC. When the download is complete, in this second case, open the iTunes installation package (eg. iTunes6464Setup.exe) and first click on NEXT and then Install, Yes, Yes e end to complete the software installation.

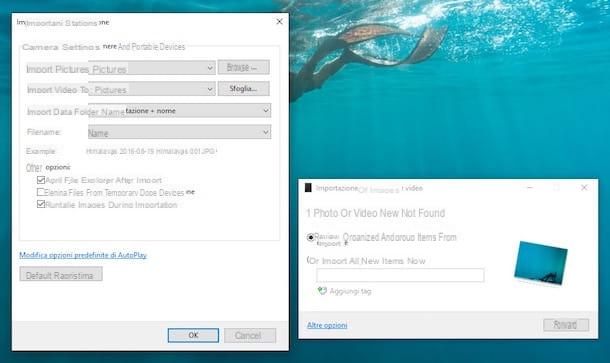
At this point, connect the iPad to the computer and wait for a window with the AutoPlay options to be shown, then click on the item Import images and videos and wait a few seconds for the photo import box to appear.
If the autoplay window does not appear, open theFile Explorer Windows (the yellow folder icon located at the bottom left of the taskbar), select the item Computer / This PC from the left sidebar, right click on theiPad and select the item Import images and videos give the menu to compare.

Now, put the check mark next to the item Review, organize and group the items to import and click the button Next / Import to view all the photos on the iPad divided into groups. Therefore, choose whether to customize the names of the groups of photos, whether to change the time criteria according to which the groups of photos are organized (using the adjustment bar Adjust groups) and, if you want, assign gods tag to photos by typing them in the appropriate text field. To conclude, click on the button Import and wait for the image transfer to complete.
The procedure can take up to several minutes, depending on the number of photos (and videos) to be copied to your computer. If at the end of the operation you want to delete the images from the tablet memory, put the check mark next to the item Delete after import.
You can also customize the settings for importing photos from iPad to PC by clicking on the item Other options which is located at the bottom left. This way you can choose the folder to copy the images to, the names to assign to the photos and much more. By default, images are saved in the folder Images Windows in folders named with the current date.
Alternative methods
There is a PC equipped with Windows 10, you can also import photos from iPad using the application Gallery Microsoft operating system (which you can easily find by searching the Start menu). To import photos via the app of the same name, click on the icon of arrow that located at the top right, select the images and videos you want to copy to your PC and press the button Continue.
Alternatively, if you are not interested in cataloging and organizing photos in a precise way, you can also open theFile Explorer, go to Computer / This PC and copy "manually" the images you find in the folder to your computer iPad > Internal storage > DCIM > 100APPLE.

Please note: the first time you connect the iPad to the PC, you must authorize the communication between the two devices by pressing the appropriate button that appears on the tablet screen.
Transfer photos from iPad to Mac
Transferring photos from iPad to computer when using a Mac is even easier, as Apple computers have pre-installed iTunes and, most importantly, a program like Gallery which allows you to easily import and manage photos on portable devices (not only iPads but also iPhones, digital cameras and other devices).
What does this mean? That all you need to do to transfer photos from iPad to Mac is to connect the tablet to the computer via the supplied Lightning / Dock cable and wait for it to open Gallery (otherwise you can start it manually by clicking on the app icon in the Dock bar). Then wait for the images on the iPad to load and click on the blue button Import all new photos located at the top right to start the process of importing photos to your computer. By putting the mark next to the item Delete items after import you can automatically delete all photos transferred to Mac from iPad.

If you don't want to import all the photos on the iPad to your Mac, but only some of them, select them using the combination cmd + click and import them to your computer by clicking on the button Import selected. If the photos on your iPad are not automatically displayed, select the tab Import located at the top right of the Photos application.
Alternative methods
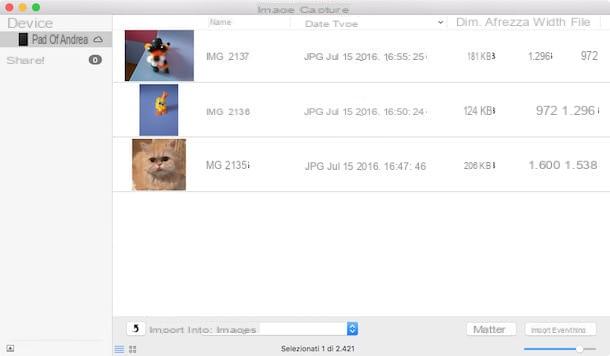
By importing photos to your Mac via the Photos application, they are saved in an archive that can only be used by Photos and compatible programs. If you want to save them as simple JPG and PNG files to keep in a folder on your computer, you have to resort to the utility Image capture located in the folder Other from the launchpad.
The operation of the Image Capture utility is extremely simple. After selecting theiPad icon from the left sidebar, all you have to do is drag the photos on the tablet to a folder of your preference or, alternatively, select a destination in the drop-down menu Import into and click on the button Import everything to import them all.
Transfer photos from iPad to PC via iCloud
The service should be enabled on your iPad by default Photo stream, which automatically stores all the photos taken with the tablet on iCloud (and therefore on the Internet). It is a completely free solution and it does not erode the storage space available on the iCloud account. However, it has severe limitations: photos are only stored for a total period of 30 days and with numerical limits of 1.000 photos per hour, 10.000 photos per day and 25.000 photos per month. Furthermore, the videos are not stored, which therefore remain only on the iPad memory.
To have permanent online storage of your photos (and videos) you must contact the ICloud Photo Library. This is another Apple service that unlike Photo Stream does not delete images after a certain amount of time, but erodes the space on iCloud. This means that to activate it you have to subscribe to a paid plan for iCloud Drive (50GB for € 0,99 / month; 200GB for € 2,99 / month and 2TB for € 9,99 / month). More information on both of Apple's services can be found in my tutorial on how to store photos on iCloud.
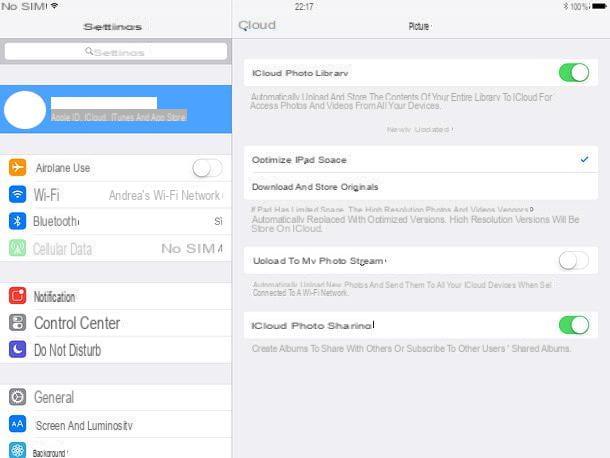
Once you have activated Photo Stream or iCloud Photo Library on your iPad (just go to the menu Settings> [Name]> iCloud> Photos of iOS or Settings> iCloud> Photos on older versions of the Apple operating system) you can automatically synchronize photos between iPad and computer via the Internet, so without connecting the two devices together. How? I'll explain it to you right away.
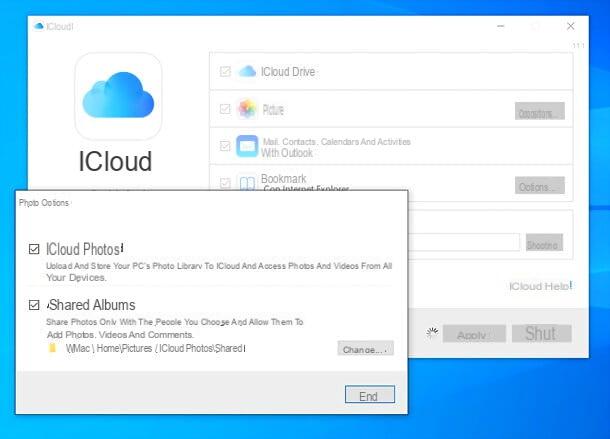
- If you use a PC Windows, install the official iCloud client on your computer from the Windows 10 Microsoft Store or, if you are using an older version of the Microsoft operating system, from the Apple website (by clicking on the link On Windows 7 and Windows 8, you can download iCloud for Windows from Apple's website, log in using your data Apple ID (the same one you configured on the iPad) and put the check mark next to the item Gallery. ICloud photos will be automatically downloaded to your PC, in an optimized version, in the folder ImagesiCloud Photos.
- If you use a Mac, you open System preference, click on the icon Apple ID / iCloud and make sure the sync function is on Gallery and that the Apple ID configured on the computer and the iPad is the same. That's all! Now open the application Gallery and photos stored in iCloud will be automatically imported into iCloud.
I also point out that by activating the iCloud Photo Library you can connect to the iCloud.com site from your computer (using any browser) and access your entire photo library by clicking on the icon Gallery. Obviously, access to the site must be done with the same Apple ID used on the iPad. You can download the photos by selecting them (you can press Ctrl + a o cmd + a to select them all) and pressing the icon nuvola located at the top right.
Alternative solutions to transfer photos from iPad to PC
There are also workarounds for transfer photos from iPad to PC. Some of them involve the use of cloud systems, while others rely on direct wireless communication between tablet and computer. Here are some that I highly recommend you try.
- Google Photos - this is a Google application that allows you to automatically synchronize all the photos and videos taken with the iPad to Google Drive. A sort of iCloud Photo Library, but free and with no storage limits. The only limit imposed by the free plan of the service is related to the resolution of the photos, which cannot exceed 16MP, and of the videos, which cannot go beyond 1080p.
- AirDrop - if you have a fairly recent iPad and Mac, you can pass photos from tablet to computer using AirDrop. If you've never heard of it, it's a wireless file sharing system that uses Bluetooth and Wi-Fi to connect Apple devices. To better understand how it works, read my guide on how AirDrop works.
- Send Anywhere - this is a service similar to AirDrop, but multi-platform and which also works by exploiting the Internet. It is compatible with iPad, iPhone, Android, Windows and macOS. To make it work, just copy the code generated by the device sending the file and paste it, or rather, type it on the receiving device.


