


Taking advantage of your last trip out of town, you took lots of photos with yours iPhone and now you have an urgent need to transfer them to the Mac, to be able to modify them and insert them in a job that has been entrusted to you. The problem, however, is that you cannot find the Lightning cable that you usually use for this procedure and, therefore, you are forced to rely on alternative solutions: you had thought about the wireless transfer of photos, but you do not know how to do it.
How do you say? Did I hit the point perfectly? In this case, know that, if you want, I can help you. In fact, during this tutorial I will take care to explain to you how to transfer photos from iPhone to Mac without cable using both the official tools made available by Apple and some useful third-party services, equally valid.
So, without waiting any longer, make yourself comfortable and carefully read everything I have to explain to you on the subject: I guarantee you that, within a few minutes, you will have acquired the necessary skills to successfully complete the task you have set for yourself. Having said that, there is nothing left for me to do, except wish you good reading and ... good photo transfer!
ICloud Photos
iCloud, as you certainly know, it is the cloud storage service made available by Apple. Using the latter and the Photo app, you can store the images online and synchronize them with all the devices associated with your Apple ID, including Mac, using the service ICloud Photos.
The latter allows you to archive all the photos taken via iPhone and iPad on the Internet at the highest possible quality and to find them within the macOS Photos application, all automatically. Alternatively, you can view the photos using the iCloud Photos web panel (which I'll tell you about later).
However, it should be noted that iCloud Photos is not active by default and must be enabled manually. Also, photos uploaded to the Internet erode the space available on iCloud Drive: enabling iCloud Photos (which also supports videos), in fact, it is very easy to finish the free 5 GB made available by Apple.
For this reason, if you intend to take advantage of this possibility, my advice is to enable one of the paid plans of iCloud Drive, with prices starting at € 0,99 / month for 50 GB: you can do it by going to the menu Settings> [your name]> iCloud> Manage space> Change plan of iOS, or in the sections System Preferences> Apple ID> iCloud> Manage> Buy More Space say macOS.
If you are interested in learning more about the plans available for iCloud Drive and the detailed instructions to activate them, I recommend reading my guide on how to buy space on iCloud, in which I have dealt with the subject in a more specific way.
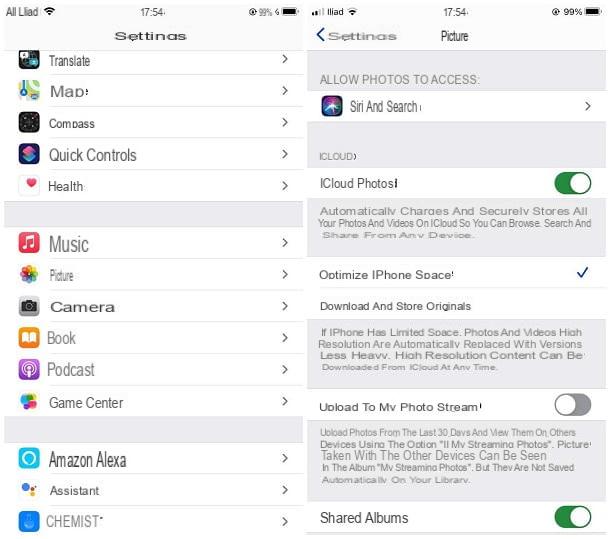
At this point, to activate the synchronization of iCloud Photos, go to the menu Settings iPhone (by tapping on the icon in the shape ofgear, which resides on the Home screen or in the App Library of the device), tap on the item Gallery and move up ON the levetta relating to ICloud Photos; if you have not yet associated an Apple ID to the "iPhone by", you will be offered a wizard to do so.
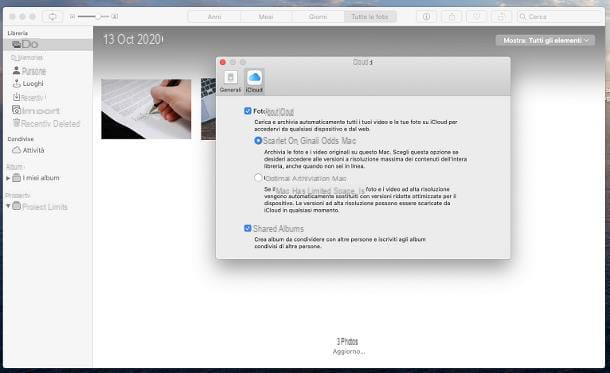
Once this operation is completed, if the Mac is associated with the same Apple ID used on the iPhone, you can easily synchronize the images by enabling the iCloud Photos service also on the computer: to do this, open the application Gallery of macOS, click on the menu Gallery resident in the Mac menu bar, then on the item Pref Renze and, later, on the card iCloud, present in the next screen.
Finally, put a check mark next to the entry ICloud Photos and choose whether to download the images in original quality or in optimized version: in the first case, photos and videos will be downloaded in original quality on the Mac and will be kept on the computer disk; in the second, however, you will see the thumbnails of all the contents but you will download on the Mac only those that you are actually going to view (recommended choice, if you do not want to fill the computer disk in a short time!).
When you are done, close the Photo Preferences window and, if everything went well, after some time (depending on the size of the files, it could take several minutes; even hours if you download all the content in resolution original), you should find all iPhone photos, videos and albums in the application Gallery from the Mac.
Alternatively, you can view (and possibly download) the photos stored on iCloud by connecting, via the browser of your choice, to the website iCloud.com: after logging in with the Apple ID associated with the iPhone and, if necessary, having completed the two-factor authentication, click on the Gallery to view archived images and videos (at first access you may be asked to wait a few minutes for the library to be prepared). To download one or more items, click on the relevant previews and then on the button Download, located at the top right (the symbol of the cloud with down arrow).
Once the download is complete, if you wish, you can import the downloaded items into Gallery, simply by dragging them on its window, or by using the menu File> Import application.
Photo stream
If you are not going to activate an iCloud paid plan, you can sync photos between iPhone and Mac via iCloud using the service Photo stream: it allows you to save all the photos taken via iPhone (or iPad), over the last 30 days, in an online library that can contain up to 1000 images.
Unlike iCloud Photos, Photo Stream is a free service that it does not consume available space on iCloud Drive but it also suffers some limitations, in addition to the fact that it does not keep videos and even images are kept in a non-permanent way: for example, changes made to an image belonging to the Photo Stream are not updated on all devices paired with the same ID Apple and it is not possible to access the photos and videos stored in this way directly from the iCloud site. Consequently, it is essential that, to view (and possibly download) the images, the iPhone and Mac are connected to the same Apple ID.
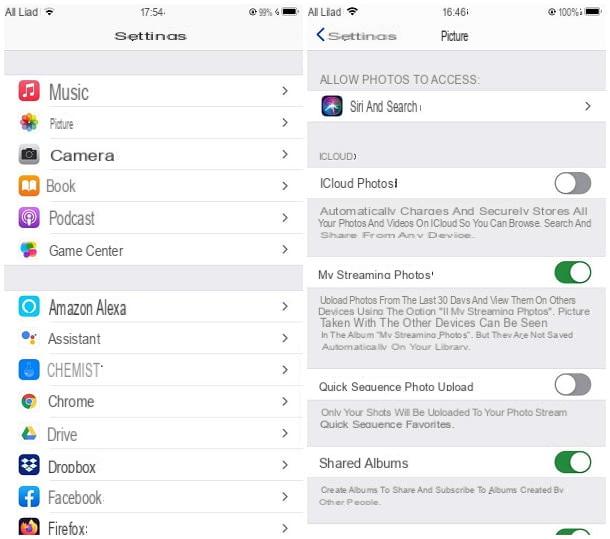
That said, to turn on Photo Stream on iPhone, go to Settings di, iOS by touching the icon depicting a gear placed in Home or in the App Library, reach the section Gallery and move up ON the levetta relating to My Photo Stream; if you use the camera's "fast frequency" mode and prefer to store only your favorite shots, also enable the lever Upload quick sequence photos.
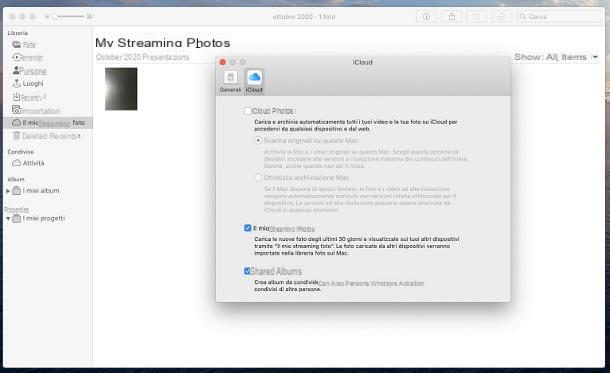
Once this is done, go to Mac, open the application Gallery and access the menu Photos> Preferences, located on the Mac menu bar, top left. Now, click on the tab iCloud resident in the new window opened and put the check mark next to the box My Photo Stream. Keep in mind that iCloud Photos and Photo Stream cannot coexist on Mac, therefore, if you do not see the option relating to the last service mentioned, you must necessarily disable the first by removing the check mark from the box next to the item ICloud Photos.
To access the synchronized images, all you have to do is start the application Gallery; to view the most recent images added to the stream, click on the item My Photo Stream resident in the left sidebar.
Note: Photo Stream may not be available for newer Apple IDs.
AirDrop
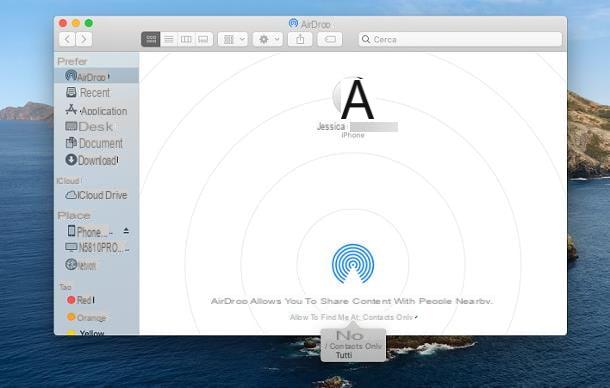
If you need to transfer a few images and not the entire iPhone photo archive, I suggest you evaluate the use of AirDrop: if you had never heard of it, it is a mechanism that, using Bluetooth and Wi-Fi connection, allows the almost instant exchange of files between iPhone, iPad, iPod Touch and Mac at very high speeds and without limits of file size.
To use it, you must first enable the reception of files on Mac: therefore, use the menu bar located at the top of the screen to access the section Go> AirDrop macOS and, if Wi-Fi and / or Bluetooth are not active, click on the appropriate button to enable them. Once this is done, locate the option Allow to find me a (located below) and choose whether to receive photos only from contacts or from all devices that are nearby and on which AirDrop is enabled. If your phone and computer are associated with the same Apple ID, I highly recommend enabling the first option.
After setting up your Mac to receive files, go toiPhone, avvia l'app Gallery and open the photo to send to the computer; if you want to act on multiple images, tap the button Select, located at the top right, and then on each of the thumbnails of the photos of your interest, to select them.
Finally, touch the symbol of sharing of iOS (depicting a square with the arrow pointing upwards) and select the name of the user / Mac to which to send everything, identified by the symbol of AirDrop.
Now, if both devices involved are paired with the same Apple ID, the photos will be automatically stored inside the folder Download of macOS; if not, you will have to to accept the reception of the files, by clicking on the appropriate button that will appear on the Mac screen.
If you are interested in learning more about how AirDrop works, I refer you to reading my article dedicated to the topic, in which I have provided you with more in-depth information on the subject.
Google Photos
Another method for transfer photos from iPhone to Mac which is definitely worth mentioning is Google Photos: if you had never heard of it, this is the cloud storage service for photos and videos made available by “Big G” and based on Google Drive.
Specifically, Google Photos allows you to archive, automatically and completely free if in high quality (with a maximum resolution of 16MP for photos and 1080 for videos), the contents in the photo gallery of smartphones and tablets. Afterwards, the photos can be viewed and downloaded to Mac via the software Google Drive Backup and Sync or through the website of the service. Clearly, in order to use Photos, it is essential to have a Google account.
If you intend to take advantage of this possibility, first download Google Photos from the App Store (by pressing Ottieni / Installa and verifying your identity) and, after starting the app, granted access to the device memory and to send notifications (if desired), responding affirmatively to the warnings shown on the screen.
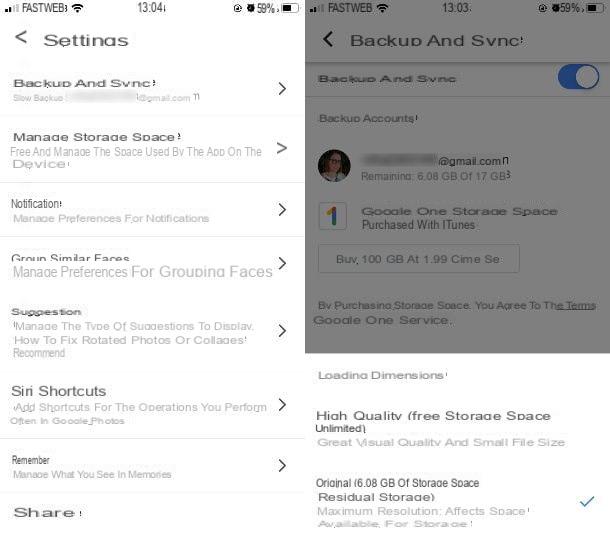
Next, log in using theGoogle account to use for the backup, activate the lever relative to the automatic backup of the photos (if necessary, choose to use the free and unlimited space with upload in high quality) the game is done!
After synchronization, if you prefer to transfer the photos to Mac using the appropriate program, connected to this website, click on the link Download related to Backup and synchronization and, once the download is complete, launch the file obtained.
Now, using the window that appears, drag the software icon to the folder Applications of the Mac and start the program by double clicking on its icon and then on the button apri; if requested, reply affirmatively to the warnings that are proposed to you later by clicking on the button OK.
Almost there: press the button now Start, log in to the same Google account configured on the iPhone, click on the button OK and, if you prefer, choose the folders on your computer to synchronize with Google Drive; make sure you have selected the option for Google Photos (bearing in mind that the photos and videos of the Mac will be saved on the latter), put the check mark next to the item High quality and click the button again OK. Finally, put the check mark next to the item Sync my Drive to this computer e premi sui pulsnti starts e Close, to finish it all off.
From now on, you should find a folder containing the photos (and videos) uploaded to Google Photos in the folder Google Drive on the Mac, which you can quickly access using the Finder sidebar.
Alternatively, you can copy the photos to Mac by going to this website: after logging into the Google account configured on the iPhone, locate the photo to download, position the mouse cursor on its preview and click on the checkbox that appears at the top, in order to enter selection mode; if you are interested in downloading more files, click on the respective previews, in order to select them.
Fatta la tua scelta, pigia sul pulsating (⋮) situato in alto a destra e seleciona la voce Download from the proposed menu. For further information on Google Photos, I suggest you read the specific tutorial I dedicated to the service.
Other ways to transfer photos from iPhone to Mac without cable

The ones I have told you about so far are just some of the methods to easily transfer photos from iPhone to Mac without the aid of cables, but they are not the only ones.
In this regard, the service deserves mention Send Anywhere: it is a free application, compatible with iPhone and macOS (but also with Windows and Android), which allows you to share files of various types between multiple devices, including photos, using a system of numerical codes and links. I told you about Send Anywhere in my guide on how to transfer photos from iPhone to computer without iTunes.
Last but not least, there are cloud services such as OneDrive, Dropbox and others: most of them have an app that allows you to automatically upload images to the cloud. To access it, simply install the dedicated management program on the Mac, or intervene through the website of the chosen service. To get more information on what are the best cloud services of the moment, take a look at the in-depth guide I have dedicated to the topic.
How to transfer photos from iPhone to Mac without cable


