


The camera has always been one of the strengths of iPhone. With the Apple mobile phone it is possible to take excellent quality shots and apply a wide range of filters to them that can turn them into small works of art. It is often a shame to confine such beautiful photos to the small screen of a smartphone, and that is why today I want to offer you a guide on how to transfer photos from iPhone to PC: so you can print your images on paper, use them as wallpaper and store them together with the other photos stored on your computer without running the risk of losing them.
We will also see how to make the most of iCloud, Apple's cloud storage service that allows you to store photos online and automatically synchronize them on a wide range of devices: Windows computers, Macs, iPhones, iPads, Apple TVs and more. All you have to do is take five minutes of free time and follow the instructions I am about to give you, I assure you that it is all very simple.
The tutorial was created using an iPhone XS Max equipped with iOS 13.x and an animated PC running Windows 10, but the instructions below apply to all iPhone models, all the latest versions of iOS and Windows. Happy reading and have fun!
Preliminary operation

If you want to learn how to transfer photos from iPhone to PC, you must make sure that Windows recognizes your "iPhone by" correctly. In other words, you need iTunes, Apple's famous multimedia software that also includes drivers to connect Windows computers and the iPhone.
If you have Windows 10, you can install iTunes directly from the Microsoft Store, by clicking on this link, then on the item to open the Microsoft Store on your PC and finally clicking on the button Install. If necessary, sign in with your Microsoft account.
If, on the other hand, you are using an older version of the Microsoft operating system, you can download iTunes from the Apple website, in the form of a classic installation package. Once the download is complete, start the .exe file obtained and click on first NEXT and then Install, Yes, twice in a row and end, to conclude the setup. If any steps aren't clear to you, check out my guide on how to download iTunes.
Once the installation is complete, regardless of the version of Windows and iTunes you have, connect the iPhone to the PC using the supplied Lightning cable, start iTunes (if it doesn't start by itself), accepts its conditions of use and, if it is the first time you connect the "iPhone by" to the computer, click on the button Continue of iTunes, then on that Authorize of iOS and enter the unlock code of the smartphone, in order to authorize communication with the PC.
Once this is done, I suggest you start a first synchronization of iPhone and iTunes, as explained in my tutorial on the subject: without this move, there could be some problems in accessing the photos and videos stored on the "iPhone by".
Standard import process
To start importing photos on Windows, connect the "iPhone by" to the PC, wait for the autoplay menu to appear and select the item Import images and videos from the latter. If the autoplay screen does not appear, open theFile Explorer Windows and select the item What PC from the left sidebar, then right click on theiPhone and choose the item Import images and videos give the menu to compare.
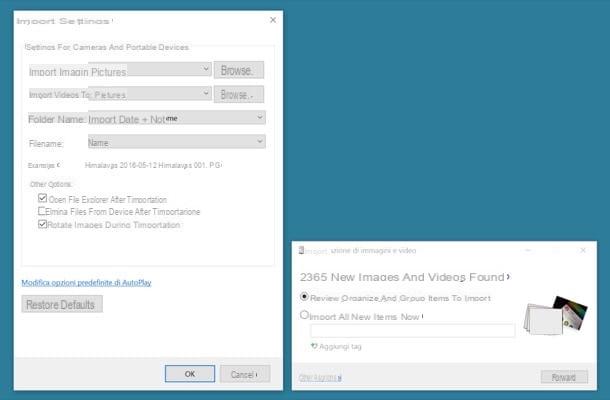
In the window that opens, put the check mark next to the item Review, organize and group the items to import, presses the button NEXT and organize the groups of photos to be imported to the PC using the selection boxes located on the left (to choose which groups of images to transfer to the computer) and the adjustment bar located at the bottom right (to determine the time interval that must pass from one group of photos to another). Finally click on the button Import And that's it.
If you are not interested in organizing groups of photos before importing them to your PC, put the check mark next to the item Import all new items now (in the initial screen of the photo import process), type the tags to be assigned to the photos on the iPhone in the appropriate text field (optional operation) and click on the button Import, to start transferring photos from iPhone to computer.
When the operation is completed you will find the photos taken with the iPhone camera in the folder Images Windows. A folder will be automatically created with the name of the date of the day you imported the images (eg. 2020-01-01, for January 1, 2020) but you can also change the destination folder and other settings of the photos to be transferred by clicking on the item Import settings located at the bottom left of the window where you can assign tags to images.
Alternatively, even if less convenient and organized as a solution, you can manually copy to the PC all the folders in which iPhone saves photos and videos: to do this, start theFile Explorer Windows (the yellow folder on the bar located at the bottom of the screen), select What PC from the sidebar of the window that opens, double-click the icon first Apple iPhone and then on that Internal Storage.
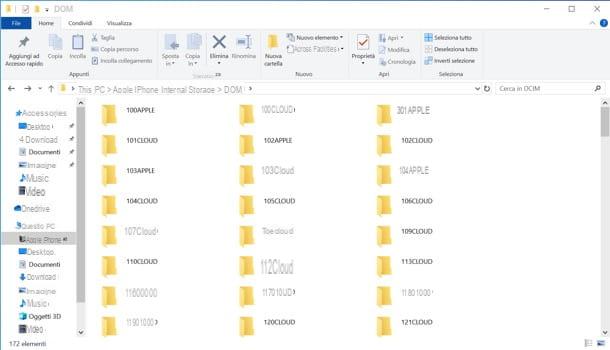
In conclusion, you just have to copy the folder to your computer DCIM, which contains within it all the sub-folders in which iPhone organizes photos and videos.
Windows 10 Photos application
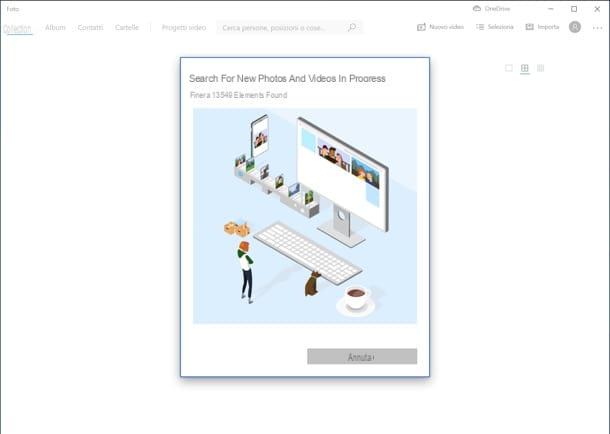
It was used Windows 10In addition to the standard photo import process, you can also transfer photos from iPhone to PC via the application Gallery you find in the menu Home (and which is automatically called up if you choose the voice Import images and videos from the autoplay menu). How to use? I'll explain it to you right away.
After connecting the iPhone to the computer, all you have to do is start the Photos application, press the button Import located at the top right, choose the option From a USB device from the menu that opens and wait a few seconds for the images (and videos) to be imported to the PC to be found.
At this point, put the check mark next to the thumbnails of the images and videos you want to transfer to the PC, click on the button Continue and choose the folder in which to save the selected items (import location). Then click on the button Import and wait for the data transfer to complete.
Importing photos via iCloud
If you don't feel like connecting your iPhone to your computer just to transfer a few photos, you can transfer photos from iPhone to PC also through iCloud, Apple's cloud storage service that allows you to save data, applications and preferences online in order to have them automatically synchronized on all devices. The service is free up to 5GB of space, then there are paid plans that we will talk about shortly.
To activate the automatic upload of the photos you take with the iPhone in your personal space of iCloud, you must have activated the function ICloud Photo Library (which permanently saves photos and videos online, eroding the storage space on iCloud Drive) or that photo streaming (which only saves photos from the last 30 days to the cloud). You can activate both services by going to the menu Settings> Photos of your iPhone: more info here.
Once you have enabled photo saving to iCloud, you need to install the official iCloud client on your PC: if you use Windows 10, you can download the software directly from the Microsoft Store, by visiting the appropriate page and clicking on the button Install.
If, on the other hand, you are using an older version of Windows, you must download the traditional software installation package from the Apple website. When the download is complete, start the .exe file obtained and complete the software installation process, placing the check mark next to the item I accept the terms of the license agreement and clicking on the buttons Install, Yes e end. You may be asked to restart your PC to properly apply all changes.
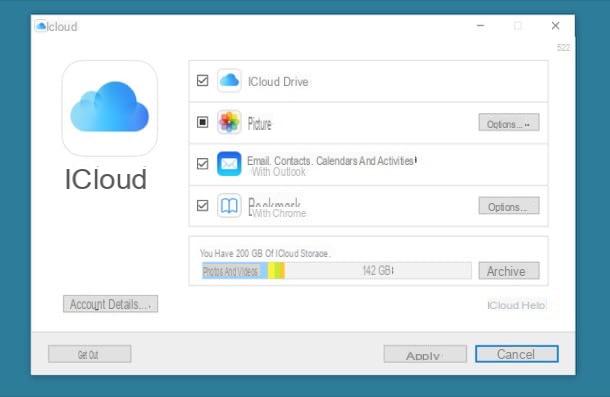
Once setup is complete, if it does not start automatically, open the iCloud control panel for Windows (by selecting the icon iCloud from the menu Home), log in with your Apple ID and the photos uploaded to your iCloud space will be automatically downloaded to the folder Images / iCloud Photos Windows via the Internet.
To change the folder where iCloud photos are to be saved and activate / deactivate services such as iCloud Photo Library, click the button options located next to the icon Gallery. What is iCloud Photo Library? I'll explain it to you right away.
As mentioned above, iCloud Photo Stream can store up to 1.000 images at a time for a total period of 30 days but, starting with iOS 8.1, Apple has introduced a new service called ICloud Photo Library that allows you to use iCloud as a real online hard disk by saving all the photos and videos made with the iPhone permanently on the "cloud".
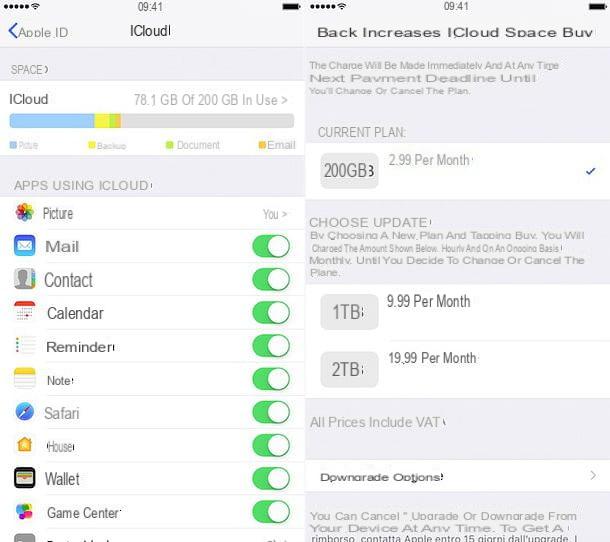
It is a free service but unlike Photo Streaming it affects the iCloud Drive storage space, it goes without saying that the 5GB of the free account offered by Apple are not enough to exploit it properly. It is necessary to subscribe to one of the paid plans of the service, such as the one that offers 0,99GB of storage for 50 euros / month.
To subscribe to an iCloud Drive paid plan, go to Settings of iOS, select the you don't knowi went his iCloud, then up Manage space, Change plan and choose the type of subscription that seems most interesting to you.
If you are using an iOS version earlier than 10.3, you can change the iCloud storage plan by going to the menu Settings> iCloud> Storage> Change Storage Plan.
To activate the iCloud Photo Library, go to instead Settings> [Your Name]> iCloud> Photos (Or Settings> iCloud> Photos if you are using an iOS version earlier than 10.3) and move to ON the lever for the option ICloud Photos.
In this way you will always keep your shots in the cloud and you can also view them from the browser by logging into the iCloud.com site. For more info on this, take a look at my tutorial on how to store photos on iCloud.
Download the photos from the browser

As just mentioned, by activating the iCloud Photo Library on your iPhone you can also view - and download - photos directly from the browser. To do this, connect to the iCloud.com website and log in with your Apple ID (which clearly must be the same one you configured on the "iPhone by").
Once logged in, click on the icon Gallery and, if this is your first time accessing the service, wait a few seconds for your photo library to be organized on the cloud. When the thumbnails of the photos on your online space appear, select the images you want to download to your PC using the key combination Ctrl + click (o cmd + click if you are using a Mac) and click on the icon cloud with arrow going down located at the top right, to start the download.
How to transfer photos from iPhone to Mac

Do you use a Mac? No problem. Check out my guide on how to download photos from iPhone to Mac and you'll find out how to safely store your shots on your computer hard drive. It is even easier than on Windows since the drivers for the recognition of the phone and iCloud are already included "as standard" in the operating system.
How to transfer photos from iPhone to PC


