


You are back from that vacation you have long wanted to do and, after downloading all the photos taken with your digital camera to your Mac, you would have the desire to upload them to Instagram to share them with friends, relatives and acquaintances. The problem, however, is that you are perfectly aware of the fact that uploading photos to the social network is "officially" feasible only from smartphones and tablets: you really don't like this option, since the photos are really too many, so the The idea of throwing in the towel and using other methods of sharing is already caressing your mind.
What if I told you, instead, that it is possible upload photos to Instagram from Mac with a few more tricks? Yes, I'm not kidding and, by reading this guide carefully, you will realize it too: below I intend to explain how to upload your images from Mac to Instagram using the most popular browsers (Safari, Google Chrome and macOS) and some little trick of the trade. Furthermore, it will be my care to show you how to do the same operation using an Android emulator for Mac and, consequently, the official Instagram app. Before continuing, however, I want to make you a more than necessary premise: if you choose to upload the photos through the browser, you won't have Instagram filters and effects available, then the images will be loaded exactly as they are.
All clear? Well, then make yourself comfortable, take some time for yourself and read very carefully everything I have to say on this topic: I'm sure that, at the end of the reading, you will be perfectly able to choose the solution that best suits your case and to transfer without problems the photos of your choice on one of the most used social networks of the moment. Having said that, I just have to wish you good reading and have fun!
Upload photos to Instagram via Instagram Web
As you well know, the version of Instagram dedicated to computer browsers does not natively allow images to be uploaded. However, with a little trick, it is possible to deceive the website and pretend that the browser in question is in use by a smartphone or tablet, by modifying the so-called user-agent within the computer navigation program: below I am going to teach you how to put this into practice with Safari, Google Chrome e Mozilla Firefox.
Safari

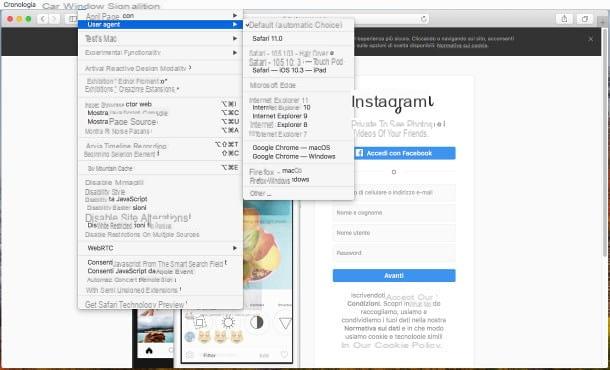
For Safari, the browser present "standard" in MacOS, the modification of the user-agent is integrated in the development functions and does not require additional software. To activate this option, first access the menu Safari> Preferences ... located at the top left, click on the tab Advanced in the window that opens on the screen and put the check mark next to the item Show menu Sviluppo nella barra dei menu.
Once this is done, close the Safari settings panel, connected to the Instagram website, then click on the menu Development> User agent browser and select one of the options related to Safari on iOS (Eg. Safari - iOS xx - iPhone).
At this point, the game is practically done and you just have to share a photo as you normally would: if necessary, log in to Instagram by pressing the button first Log in and then typing your username and password, then click on the button Not now to avoid downloading the app and, to start the image upload procedure, click on the button capacitor positive (+) lead placed at the bottom.
Once this is done, use the Finder to select the image to upload, click on the button Choose, use the appropriate icons in the shape of arrows to activate / deactivate the zoom or rotate the image, click on the button NEXT, enter the caption and the hashtags you want and press the button Share, located at the top right, to finalize the procedure. Easy, right?
Google Chrome
As for the browser Google Chrome (if you don't already have it, you can install it by consulting my dedicated tutorial), you can change the user-agent using the extension User-agent switcher for Google Chrome.
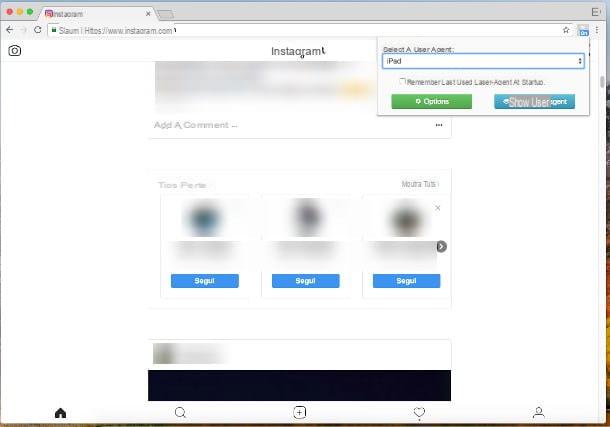
First, then, connected to the add-on's web page, click on the button Add and then on the button Add extension to complete the software installation. Once this is done, connected to the Instagram website, click on the icon of the newly added extension (the button in the shape of globe located at the top right), then on the drop-down menu Select a user-agent and choose, from the proposed list, one of the items relating to Android or iOS (Safari on iPhone, Safari on iPad, iPhone, iPad or iPod, just to name a few).
After a few moments, the Instagram interface dedicated to the chosen device will be loaded on the screen: at this point, all you have to do is follow the instructions I gave you in the previous section to upload the image. Once you have finished your task, you can bring the situation back to normal by clicking once again on the add-on icon and selecting the item Default from the proposed list.
Mozilla Firefox
You use Mozilla Firefox and would like to use the same trick for upload photos to Instagram from Mac? No problem! Again, however, you will have to rely on an add-on known as User-agent Switcher.
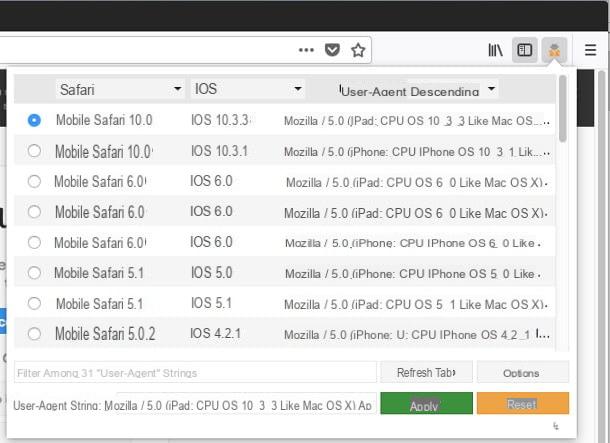
To start, connected to the website dedicated to the extension, press the button Aggiungi to Firefox and finalize the operation by clicking on the button Install. At this point, open a new tab, click on the extension button at the top right (marked with an icon in the shape of little man in raincoat and hat), select the item from the drop-down menu on the left Safari and from the central one the voice iOS, put the check mark next to the latest version of the browser (eg. Mobile Safari 10.0 on iOS 10.3.3) and finalize the operation by clicking on the button Apply placed at the bottom.
The game is practically done: via the previously opened tab, connected to the Instagram website, log in as usual and follow the instructions I gave you in the section relating to Safari to upload the photo you want. When you are done, remember to bring navigation back to normal: click once again on the User-agent Switcher icon, press the buttons Reset e Apply and continue browsing as usual.
Upload photos to Instagram via BlueStacks
The absence of filters represents a significant limit for you, so you would have the desire to upload photos to Instagram from Mac using an interface identical to that of the app for smartphones and tablets?
I think I have the right solution for your case: below I intend to explain how to do this using BlueStacks, an Android emulator available for free for Mac. Through it, in fact, you can install the Instagram app for Android on the Mac, and upload the photos you want through it.
Before continuing, I want to clarify a fundamental aspect: the free version of BlueStacks occasionally recommends the automatic installation of some apps for advertising purposes. However, these can be safely ignored. Alternatively, you can take out a subscription ($ 4 / month or $ 40 / year) to remove them.
That said, it's time to take action: first, connect to the official website of the emulator, first press the button Download Bluestacks, then click on the button Download located on the next page and then wait for the file (BlueStacksInstaller_xx.dmg) is copied to the Mac.
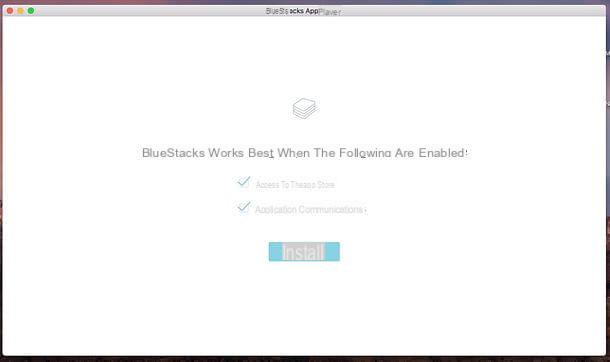
Once this is done, start the program you just downloaded by doing Double-click on the BlueStacks icon that appears on the screen, then to start the installation, press the button apri. Once this is done, click on Continuation and then on too Install, insert, when requested, the Password of your user account and press the button Install assistant, to finalize the procedure.
At this point, pigia sul pulsating Open the system preferences and, via the Mac settings panel, first click on Allow e poi sull'icona del padlock located at the bottom left. To finish installing BlueStacks on macOS, type the again Password from the Mac and awarded her Unlock.
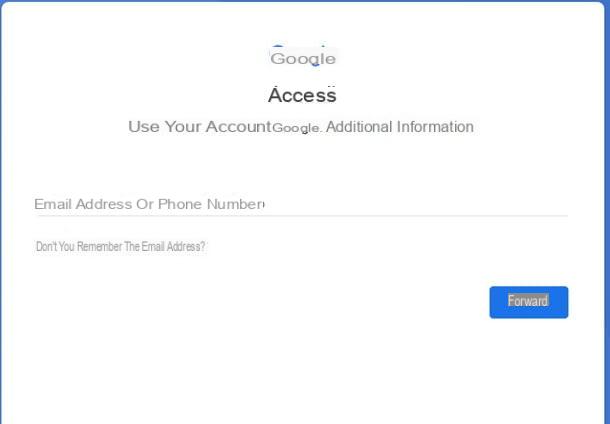
Once this is done, you can finally configure the software, as you will be asked to create a BlueStacks account, to continue using the program. To do this, click on Start and enter the login credentials of the Google account you have (email address e Password). To continue, first press on NEXT, Then Accept and finally, su Get started with BlueStacks.
Possibly, if you do not have a Google account, consult my tutorial dedicated to the topic), in order to understand how to carry out the registration procedure.
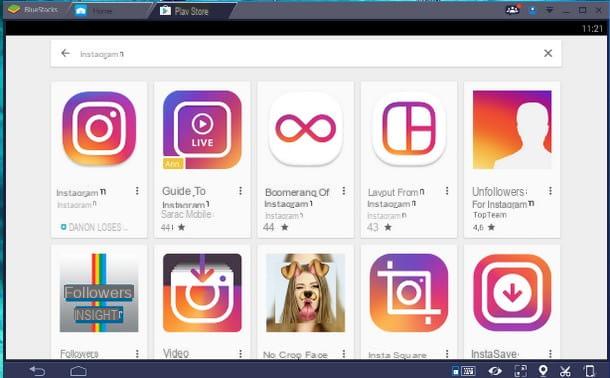
Once the configuration is complete, you can finally start downloading the apps from Google Play: then start the Play Store pressing on its icon you see in the section Home by BlueStacks is looking for the app Instagram, using the appropriate search bar and proceed to install the app by pressing the buttons Install e Accept.
At this point, the game is done: start Instagram recalling it from the icon just added in BlueStacks, log in with your credentials and press the button [+] located at the bottom to start the image upload procedure, practically identical to that of the app for smartphones and tablets.
The only aspect to keep in mind, at this stage, is the choice of the "source" from which to take the image: if you intend to use photos stored on the BlueStacks memory, press without hesitation on the item Gallery; if you intend to upload photos stored in the computer memory, select the item instead Choose from Mac.
Other Android emulators

How do you say? The idea of using an emulator for Android appeals to you, but you haven't found the ideal solution for you in BlueStacks? Don't throw in the towel yet! In fact, there are numerous software designed for the purpose, compatible with macOS, which allow the installation of apps from the Google Play Store: this means, in other words, that you can use the Instagram app for Android even through other than BlueStacks.
How do you say? You just don't know where to start? Then I suggest you jump on my guide to the best Android emulators: I'm sure you won't regret it!
How to upload photos to Instagram from Mac


