


Weapons affect your nose guns, wing turrets, and orders.
For starters, the first two locations may look similar and allow similar weapons, but they go to different locations. The first slot is for your nose gun, which the Railjack pilot will fire. The second slot is for gunners, and you cannot mix and match the two gunner seats. It's a choice for both. The last location is your order, these are the special attacks that require replenished ammo at the forge.
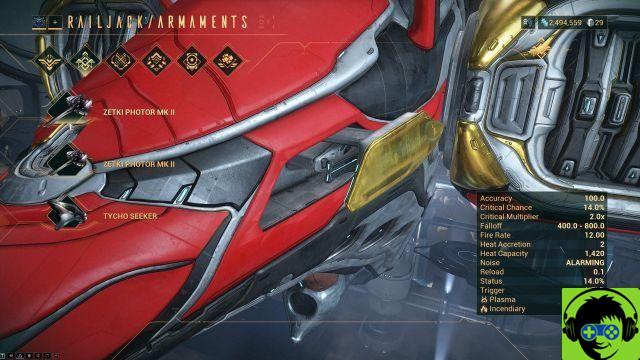
While the Ordinance slot has its own unique drops, the weapons are shared between the nose and wing turrets. Suppose you are repairing a Zetki Photor MK II, like in the image above, and want to use it on the nose. Just click on the slit in the nose and it will be there. Rather use it on the fenders instead? Then click on the wing location and equip it from there. Now you can run the same gun in both locations: you will need a second copy of this gun if you want to run two photors like above.
It should be noted the damage and randomization of armaments. A weapon's base stats are shared among its peers - a Zetki Photor MK II will have the same base stats as any other Zetki Photor MK II you collect. What makes them different is the random stat at the top, when you go to the stats page. Some will have an increased rate of fire, others a damage bump. This is the statistic that you essentially "cultivate" when looking for the perfect roll.
All three component houses / variants also exist here (Lavan, Vidar, Zetki), and they all have varying strengths and weaknesses. Zetki armaments have been hit hard, but quickly overheat for example. Additionally, there are different types of weapons with different status effects attached to them, such as Pulse Lasers which deal ionic damage and close range Frost Orbs which deal massive damage as if they were were aerial shotguns that could slow down. It's all about preference, so play around with each to find what you like before focusing on the random stats (free flight is great for this).
Plus, keep an eye out for heat buildup and a weapon's heat capacity. Heat capacity can be increased with avionics and intrinsic, but heat buildup is locked out. The higher the number, the sooner the weapon will overheat and be stuck out of combat for a short time when it cools.
Think of heat capacity as the amount of heat a weapon can generate, and buildup as the amount of heat the weapon will contribute to that total per shot. So a fast-firing Apoc with 80 Heat Accretion and 1000 Capacity will overheat in no time; meaning that all of the increased damage will likely be wasted, especially if your partners don't have the Gunnery Intrinsics which helps with heat management.
A final point to mention is the total damage: what you see when selecting an armament will be less than what you see on the general armaments page. This is normal, because the general page takes into account your avionics. So if you want to see the damage affected by your avionics, use the stats sheet on the general page and not the one provided when previewing the weapon. The preview gives you a good idea of where this weaponry is located, but to know what it will look like on your Railjack you'll need to plug it in and return to a menu.
For more from our Railjack guide series, come back to our hub page!
-


