


Google Photos made its debut in May 2021 during Google I / O. An application that not only allows you to store your photos but also to better organize them and even edit them, and of course, find them on all of your devices, including your PC.
1. Save your photos for free and unlimited
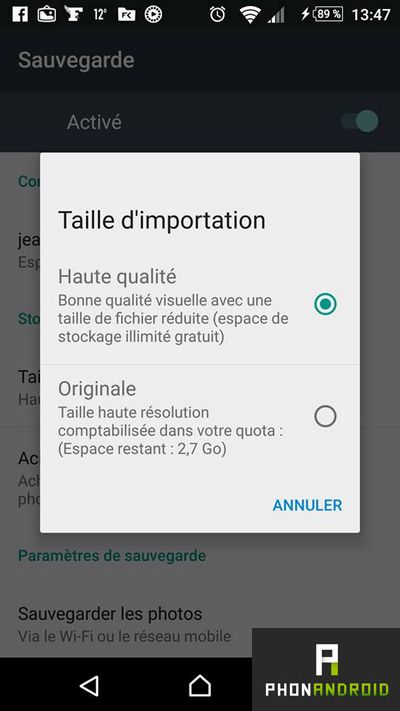
What you should know is that the Google Photos app offers two storage options. A first (High quality) which allows you to store your photos and videos for free in the cloud and in an unlimited way, with slight compression, and a second allowing to keep the original format but which will be deducted from your storage space.
Quite frankly, the first option is more than enough, the images are not degraded and the application accepts up to 16 Megapixels of definition.
- To read: our test of Google Photos
2. Clean up your phone
This is one of the latest options added to the app. Google Photos now allows you to delete photos and videos already stored in the cloud from your Android smartphone in order to free up memory. In addition, she warns you when your phone's storage is almost full and it's time to clean up. To access this option, all you need to do is:
- Click on the button at the top left to open the menu then select "Settings"
- To choose "Free up storage space". The app will then analyze your images for duplicates
- Confirm the first time then a second the deletion of the media
3. Save photos from other apps
Google Photos allows you to save not only the photos you take with your smartphone's photo sensor but also those you upload to Facebook, Instagram and other applications as well as the images you download to your phone and even your captures screen. An option that however needs to be activated. Here is how to do it:
- Open the menu by clicking the left button
- Select "Device folders"
- You will then see all the folders on your phone containing images appear. To activate the backup of a folder, simply click on the icon at the top right
4. Optimize your search engine
The search engine built into Google Photos is powerful enough, allowing you to search for places where you took photos or specific dates. But did you know that you can also use it with keywords?
- Open one of your photos
- Press the round information panel at the bottom of it
- At the top of this page, add a comment
Thanks to this, you will now be able to search for your photos with the keywords that you have commented! What easily find you.
5. Group the faces of your friends
This is a super nice option that will allow you to group your photos according to the people photographed. Unfortunately, it is not officially available in Europe because it uses face recognition, it is nevertheless possible to activate it using a VPN as we already explained to you in our previous tutorial how to activate face recognition in Google Photos and rest assured, it's very simple.
6. Create shared albums with your friends
On Google Photos, you are the only one to see the media saved in your cloud but you can also choose to share them with your friends and even create shared and collaborative albums where everyone can add their images. And be reassured for confidentiality, only the people to whom you will have sent the link will be able to see the shared photos. Here is how to do it:
- Open an image and click the share button at the bottom left
- Three options are then available to you, to simply share the image, click on " Create a link ". You will then just have to copy paste with another application to share it
- To create a shared album quickly, select multiple photos at once as below and click on “New shared album”
7. Create your own animations, in GIF or video
Not many people know this, but you don't need a separate second app to be able to create your own animations - Google Photos integrates it for you! And this in the simplest way:
- Select the photos you want to animate
- Tap the “+” at the top of the screen
- Select “Animation”To make a GIF
- Or select “Movie”To make a video
For this last option, you will then have the possibility to change the animations and the background music.
8. Edit your photos like a pro
Just like back in the days when it was just an option of Google+, the service also has a full touch-up tool. You can arrange your images or add filters. Here is how to do it:
- To get started, open a photo in the app then click on the pencil icon to open the editing tool
- Three tabs are then offered to you: a first with all the basic settings (automatic retouching, brightness, color, etc.) a second with filters and a third with various rotation options. It's your turn !
And if you still don't like the quality of the images, take a look at our tutorial on how to take better photos on Android.
9. Start a slideshow on your Chromecast
With the latest update to Google Photos, slideshows have been implemented. So this is the perfect opportunity to show your photos to your friends or family! To launch it, it's just as easy:
- Log in to your Chromecast via the Cast icon at the top of the app
- Open a photo of a album or your news feed
- Tap 3 small dots top right
- Select Slideshow
And presto, the slideshow starts on your television! All you have to do is tell your adventures in front of your spectators of the moment, captivated by your exploits!
- Google Photos
- Share
- Tweet
- Share
- Envoyer à un ami


