


At work, you saw a colleague log in to his Google account in a "strange" way for you: after entering your username and password, he started an app on his phone, generating a code that gave him allowed to complete login. Interested in this particular security system, you asked for clarification: the colleague explained to you that he had previously activated the Google two-step verification and to use the app Google Authenticator, for secure access.
How do you say? You would like to use this system too and for this reason you want to know how Google Authenticator works? Well, know that you couldn't have come to a better place! In the next chapters, in fact, I will explain in detail what two-factor authentication consists of and how to use the app in question. In detail, I will give you an overview of this security system, and then show you how to activate it on Google and give you additional information about other sites and services through which you can use it.
So, without waiting a moment longer, make yourself comfortable and allow a few minutes of your time to read this guide: I'm sure that, once it is finished, you will have acquired the necessary skills to secure all the accounts you care about. Moreover. That said, there is nothing left for me to do but wish you good reading and good work!
Index
- How Google Authenticator works
- Google Authenticator Download
- How to use Google Authenticator
- Back up Google Authenticator
- Where to use Google Authenticator
How Google Authenticator works
As I mentioned in the introductory lines of this guide, Google Authenticator is a code generator to be used to complete the process of two-factor authenticationthe two-step verification, or again 2FA, supported by an ever-growing number of Web sites and services.
For your information, two-factor authentication is an additional level of protection provided by numerous portals and services (such as Gmail): it supports, in addition to the user name and password, also that of a disposable code generated through a specific app (such as Google Authenticator, in fact), received via SMS, email or other communication methods that can identify the actual owner of the account.
Google Authenticator Download

The app Google Authenticator it can only be downloaded on smartphones and tablets Android or on iPhone e iPad. It is not possible to download Google Authenticator on PC, as there is no client for this app to install on a computer. You could possibly use an Android emulator, but the app is designed to run on mobile devices.
Having said that, download the app on your smartphone / tablet Android through this link, which refers to the Google Authenticator page on the Play Store: then press the button Install to start the automatic download and installation of the app on your device.
If you have a iPhone or iPad, you can download the app from the iOS / iPadOS App Store (for convenience you can tap this link from your device). On the page of the official Apple app store, press the button Get and then unlock the download and installation via Face ID, Touch ID or Apple ID password.
How to use Google Authenticator
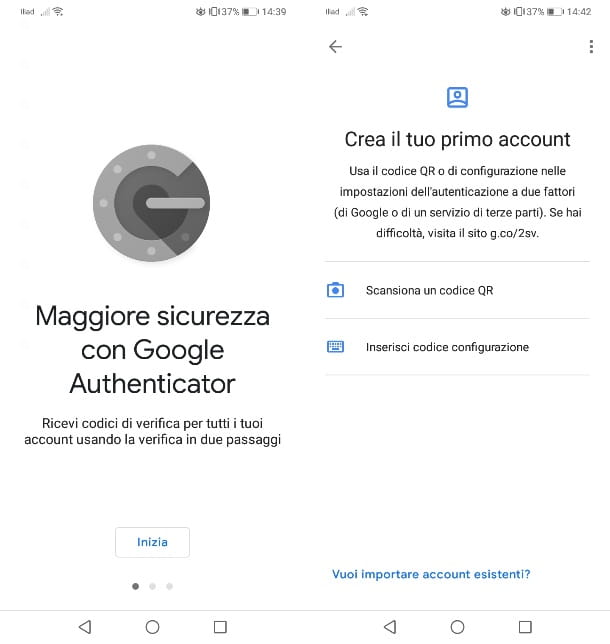
Now that you have installed the app Google Authenticator on your device, let's see together how to use it. First, tap on its icon that you find on the home screen or in the area relating to the library of apps installed on your phone or tablet. Once this is done, on the home screen that is shown to you, press the button Start to choose one of the operations displayed on the screen.
The basic concept of operation of Google Authenticator (as for all other similar apps) is to integrate the authentication token by scanning a QR code or inserting a configuration code. The latter are provided directly by the service you want to configure with two-factor authentication and, therefore, all you have to do is bring them back into the Google Authenticator app.
In any case, I will explain in a later chapter how to find these codes, now let's focus on the fact that you already have the QR code or the configuration code and just want to understand how to integrate it within the Google Authenticator app. To do this, choose Scan a QR code to log in with the device's camera (consent to access permissions) and frame the QR code generated by the digital service you want to protect.
If you do not have the ability to scan the QR code, you can always add the configuration code that is provided to you in the digital service two-factor authentication setup screen. In the latter case, simply press on the item Enter configuration code. You will be asked to enter a name for the service and the configuration code; then press the button NEXT, to continue.
After you have successfully added this data to the Google Authenticator app, a new screen will confirm that the account has been added and a 6-digit numeric code will be available on the smartphone / tablet display. What you need to do is return the aforementioned code to the digital service to complete the two-factor authentication activation procedure. I recommend that you don't waste too much time, because the code is constantly changing every 30 seconds.
If you have carried out the procedures indicated in the previous paragraphs to the letter, Google Authenticator is correctly configured with the account of your digital service and, at the next access in the latter, in addition to entering the email and password, you will also have to enter the your identity verification code, which you can find on the main screen of the Google Authenticator app.
Whenever you want to add a new account on Google Authenticator, on its main screen press the + icon and choose one of the methods mentioned in this chapter of mine, so as to proceed with the configuration of two-factor authentication for all the services you need. greater protection of your account.
Back up Google Authenticator
You changed your smartphone and you want to transfer two-factor authentication systems Google Authenticator set to the new one? Nothing simpler! But I must make you a premise: the Google Authenticator app manages this data locally, ie on the device itself; therefore, if you lose it or it no longer works for you, you will not be able to perform any transfer of Google Authenticator data. The procedure is possible if the “old” device is also completely accessible.
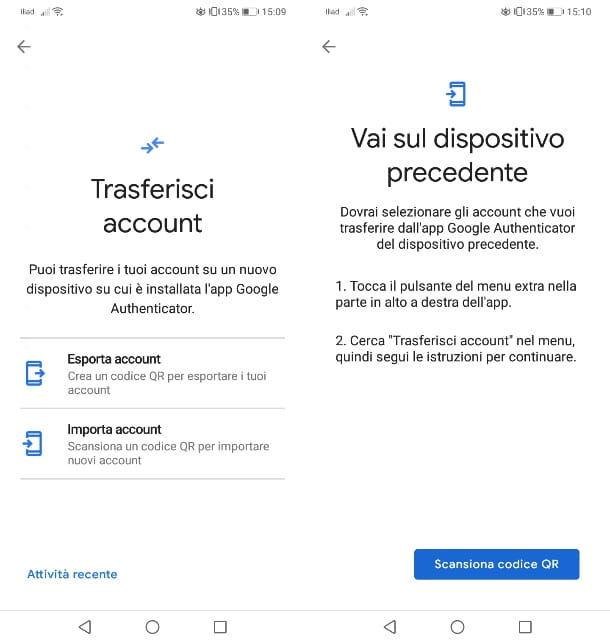
Having said that, let's see how to proceed! First, install the app on the new device Google Authenticator, following the same steps that I showed you in this chapter. Once this is done, when the app starts, press on the wording Do you want to import existing accounts? that you find below. This import section is also accessible from the main screen of the app, by pressing the icon (...) at the top and selecting the items Transfer Accounts> Import Account.
Once this is done, press the Scan QR code button to enable the use of the camera. Meanwhile, on the old device, tap on the icon (...) at the top and select the items Transfer Accounts> Export Accounts. Now, put a check mark next to the account you want to export to the other device and press the Next button to generate a QR code.
As you can well guess, now what you have to do is simply frame the backup QR code via the camera enabled in the new device via the Google Authenticator app. By doing so, all previously configured accounts will be migrated without you having to proceed to configure this security system for all digital services again in the Google Authenticator app. Easy, am I right?
Where to use Google Authenticator
Now that you are familiar with this authentication app, let's see what digital services they allow you to use Google Authenticator (or any other similar app) for identity verification. Know that the services that I will show you are just some of the many that now use this system to improve the security of their customers' accounts.
The first company I want to tell you about is precisely Google and all associated services, such as gmail e Google Drive. First, connect to this website relating to the management of your Google account and, if requested, enter your login details.
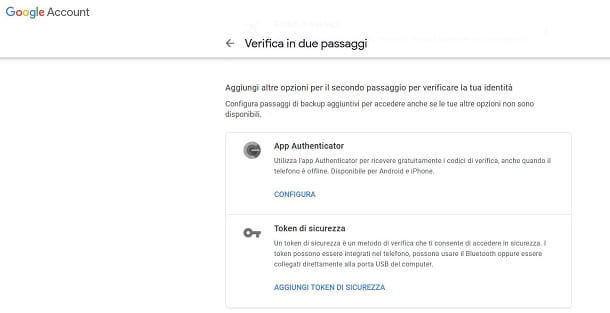
Once this is done, click on the entry Safety on the sidebar and locate the section Access to Google. At this point, press on the item Two-step verification, type the again Password of your Google account located within it and locate the wording Authenticator App.
Now, press the button Configure that you find right at the bottom, select the type of device in your possession (to be chosen between Android o iPhone) so as to generate the QR code that you will need to scan with the app Google Authenticator, as I explained to you in this chapter dedicated to the operation of this app. If you have problems reading the QR code, press on the item Can't read it? to get the configuration code manual.
Once this is done, on the next screen enter the identity verification code generated by the app Google Authenticator to complete the two-factor authentication setup process on your Google account. I remind you that the use of an authentication app for the Google account is only possible if you have previously configured a phone number (or security token). If you want to know more about this topic, I recommend reading my tutorial on how to authenticate Google account.
Lifestyle
How do you say? Did you really appreciate this authentication method and would like to use it also for the other services you usually use? You can do this, as long as these provide the ability to enable two-factor authentication by generating timed password via app (TOPT, time-based one-time password).
Either way, to activate 2FA, you must first enter to the site of your interest, enter the section dedicated to safety and act on the option for enable two-factor authentication (two-step verification, 2FA or other similar names), then choose theWhatsapp as a system for receiving the identity verification code and, once the QR code or configuration code is displayed, enter it in Google Authenticator as I explained to you in a previous chapter.
Unfortunately, I cannot provide you with more precise information on how to activate two-step verification for all existing sites and services: all the pages of my site would not be enough to list them all! What I can do, however, is to explain how to do it on the most used portals.
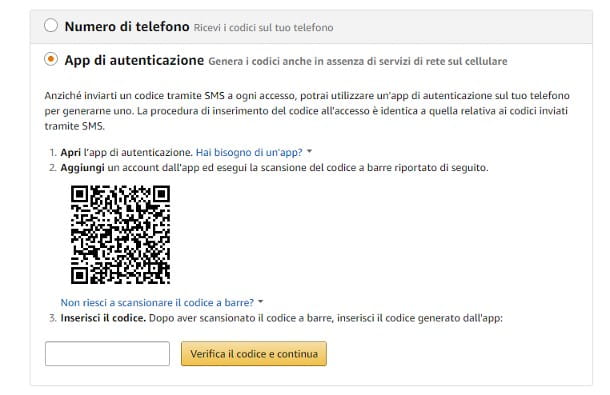
- Amazon - connected to this web page, enter your login credentials, then click on the item Login and security settings. Then press the button Modification attached to the box of Two-Step Verification (2SV) Settings and choose Authentication app. Finally, proceed with the configuration of Google Authenticator.
- Facebook - visit this web page, log in using your credentials and click on the button Start located at the top of the page. Next, choose the voice Authentication app and complete the configuration within Google Authenticator.
- Instagram - connect to this website, log in if necessary, therefore, put the check mark next to the item Use the authentication app, awarded his OK and proceed with entering the account in Google Authenticator.
- dropbox - access this link, enter your credentials and activate the lever corresponding to the item Two-step verification. Next, click on the button Start, re-enter the Password and apponi il segno di spunta accanto alla voce Use a mobile application. Finally, pair Dropbox with Google Authenticator.
- Fortnite - connect to the Epic Games site, log in via the account most congenial to you (PlayStation, Xbox, Nintendo Switch, etc.) and move the lever next to the wording Third Party Authenticator App to access the QR Code, which you will then need to link to Google Authenticator. For further information, I invite you to consult my specific tutorial on the subject.
If the service of your interest does not appear among those listed, you can get precise information about the steps to take to activate the two-step verification by searching on Google for the phrases enable two-factor authentication [service name], enable 2FA [service name] or similar and consulting my generic 2FA tutorial.


