


Recently, your manager asked me to edit a spreadsheet made with Excel: after viewing the file, you quickly realized that the work, among other things, also requires the insertion of new lines.
Not being particularly familiar with Microsoft's spreadsheet program, you asked a few colleagues to explain to you how to add rows in excel, but you have not found a satisfactory answer that will help you complete the task assigned to you.
So you didn't give up and, trying to find the solution to your dilemma on the Internet, you landed on this tutorial of mine. Well, I am happy to tell you that you are in the right place! By continuing to read the next paragraphs, you will be able to find out how to add one or more lines to Excel, both manually and automatically, both on PC and on smartphones and tablets. That said, there is nothing left for me to do, except invite you to continue reading the guide and wish you a good job!
Index
- How to add rows to Excel from PC
- How to add rows in Excel Online
- How to add rows to Excel from smartphones and tablets
How to add rows to Excel from PC

You are in front of your computer, you have already started the famous Office suite program and opened the XLS or XLSX file that you need to modify: now all you have to do is follow the simple instructions I am about to give you to find out how to add rows to excel from pc, or from Mac (the steps to learn how to add a row on excel mac they are in fact the same).
How to add a row in Excel
Let's start right away with the most common feature: if your purpose is to learn how to add a row in excel, in this chapter you will discover that there are several ways to perform this simple operation: all you have to do is choose the one that is most convenient for you.
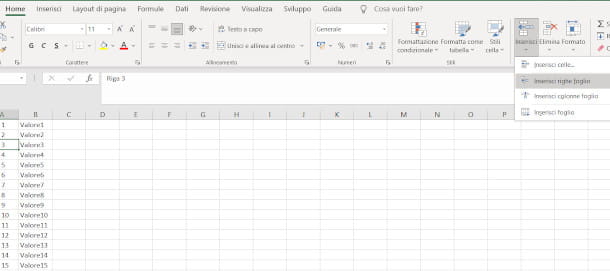
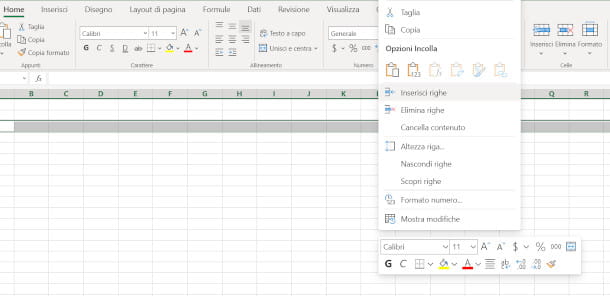
First, when you are in front of the table to be modified, click on one cell any of the next line to the one you want to insert, in order to select it. Once this is done, click on the menu Home, located at the top left, and presses the functionality Inserisci in the toolbar below, then click the option Insert sheet rows.
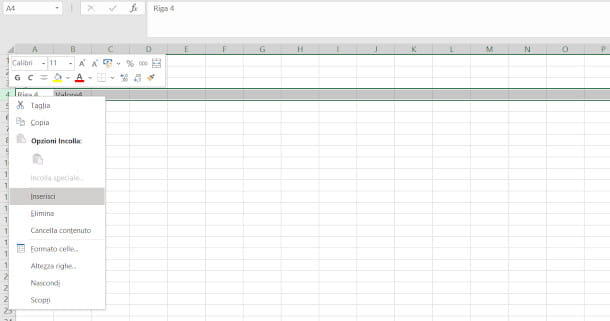
Alternatively, you can also proceed by right-clicking on the line number (which must always be subsequent to the one you intend to add) in the left column and pressing on the item Inserisci context menu. In all cases, however, a new row will be produced just above the selected one.
If you want to transfer the formatting of the selected row, you can use the specific function on the left, which shows the symbol of a brush: by clicking on it you will be offered, in fact, the possibility to format the new row by choosing the one already applied in the bottom (or top) row, but also to completely delete the formatting.
How do you say? You would like to know how to insert row in excel with keyboard via a convenient shortcut? I'll settle you immediately: select the row (you can also perform this operation without taking your hands off the keyboard, positioning yourself on the cell using the directional arrows and pressing the keys Shift + Spacebar simultaneously), then type the combination Ctrl + [+] (cmd + [+] on Mac). Easy, right?
How to add multiple rows in Excel

Is your need to insert a greater number of lines on the table you are editing? Do not worry, even in this case it is not absolutely difficult to understand how to add multiple rows to excel.
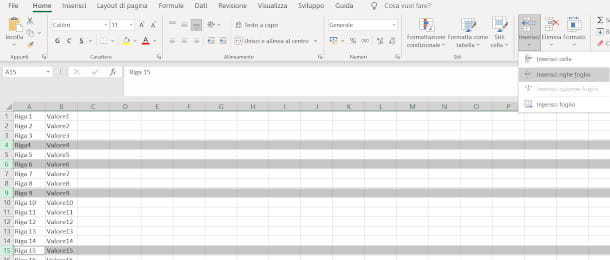
Let's start with the most common hypothesis, namely that of inserting new ones adjacent rows: in this case the solution is particularly intuitive, as you will simply have to select a number of rows equal to those you want to add. To do this, position the cursor on the number of the row immediately following the one you want to create, then hold down the left mouse button and drag it down to highlight all the subsequent rows you want.
Next, press the right mouse button inside the selected area, then select the option Inserisci from the context menu or, alternatively, use the function Insert> Insert Sheet Rows within the menu Home: you will see that as many lines will automatically be created.
If the rows aren't adjacent, the method doesn't change much: click the first line number you need to select, then press and hold the key Ctrl (cmd on Mac) and click on the next ones as well. When finished, release the key Ctrl / cmd and insert the lines following the same steps illustrated in the previous paragraph.
How to insert rows automatically in Excel
How do you say? The file you are working on is really too long and you would like to be able to reference one automatic procedure that allows you to add more lines in a simple and intuitive way?
I have excellent news for you: the operation, in fact, is absolutely feasible, but it is necessary to activate a special one macro, that is a feature that executes a set of editable instructions using the appropriate developer tools.
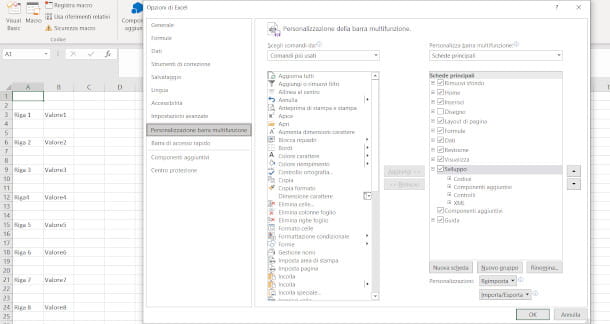
In order to proceed, therefore, it is necessary to enable the menu in advance Development, which by default is not visible: to do this, press on the menu File> Options (top left), then, in the new window that appears, presses on the wording Customize Ribbon from the left column and click on the box Development present on the right, inside the section Main cards.
To confirm the change, press the button Ok: you will notice that the card is now present Development in the top menu. By clicking on the latter you will be shown new tools dedicated to the creation and recording of macros in the bar below: click on the functionality Visual Basics, located on the left, to open the relevant screen.
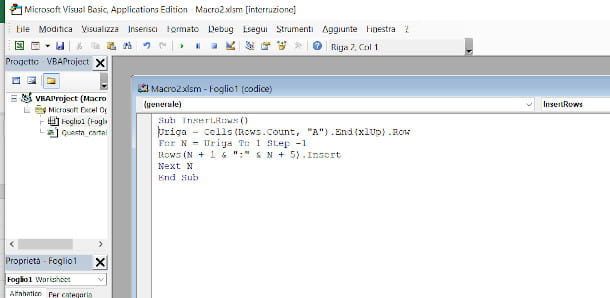
First, now, select with a Double-click the sheet you want to apply the macro to in the section browser, to the left. In the central editing window that appears, instead, paste the following instructions.
Sub InsertRows()
Uriga = Cells(Rows.Count, "A").End(xlUp).Row
For N = Uriga To 1 Step -1
Rows(N + 1 & ":" & N + 5).Insert
Next N
End Sub
Of course, you will have to adapt the instructions to the spreadsheet you are processing according to your needs: this simple example version allows you to add 5 new lines automatically under each line in the file, starting from the first.
To make the instruction start from a predetermined point, for example from the sixth line, it is necessary to edit the first value following the wording N+ inside the Rows instruction, by inserting the starting line number (in this case, therefore, 6). To change the number of added lines, however, you will have to edit the second value always contained in the instruction Rows (then N + 2, if you want to add two lines).
At this point, it is important to save the file, which must take place in very specific ways so that everything works properly: go, therefore, to the menu File> Save and, only the first time, click the button No in the information window that is proposed to you.
On the next save screen, select the option Excel macro-enabled workbook from the drop-down menu Save eat e pulsing sul pulsating Save.
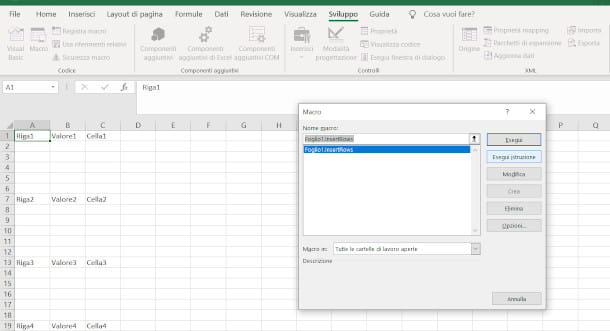
Now everything is ready to run the macro: close the Visual Basic window by pressing the [X] located at the top right and, from the menu Development, click on functionality Macro.
In the window that opens, then, select the one named InsertRows and his bottone award Run: in no time, the script will be applied to the spreadsheet and the new rows will be generated automatically.
How to add rows in Excel Online
Are you using the online version of Microsoft Excel to edit your spreadsheet? Well, you will be pleased to know that there are no particular differences in applying the line insertion functionality compared to the computer version.
To understand how to add rows in Excel Online therefore, all you need to do is refer to the previous chapters relating to the insertion of one or more lines in the desktop version of the program. But unfortunately, macros cannot be run to create lines automatically.
How to add rows to Excel from smartphones and tablets
Your work mostly takes place on mobile devices and, therefore, you are looking for instructions on how to add rows to Excel from smartphones and tablets? No problem: as you will see in the next paragraphs, the procedure to follow is really very simple.
The only warning I want to give you before proceeding to the practical explanation is to consider that the Excel app for smartphones shows the main menu at the bottom, while the one for tablets shows it at the top as tabs, similarly to what happens in the PC version . The app is available on Android (also on alternative stores) and iOS / iPadOS and is free for devices up to 10.1 "; for larger ones it requires the subscription of a Microsoft 365 plan (starting from 7 euros / month. ).
How to add a row in Excel
If you want to learn how to add a row on excel mobile, you will be pleased to know that also in this case the procedure is very intuitive and the operation does not differ much from those illustrated in the previous chapters.
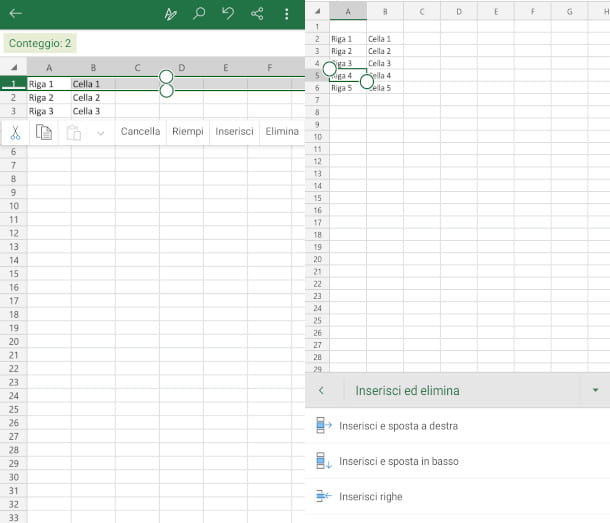
In essence, therefore, you must first select the row following the one you want to insert, an operation that can be easily performed on the row number indicated in the appropriate column on the left. At the same time, you will be shown a menu just above the selected line, both on smartphone and tablet and all you have to do is press on the item Inserisci but I will complete the operation.
Alternatively, if the app is installed on a mobile phone, after selecting the row (or even a single cell within the row) you can press the arrow symbol at the bottom right and tap on the option Insert and delete, then, in the next step, you will have to tap the item Insert lines.
On a tablet, however, you can press on the menu Home, top left, and press on a table symbol with a green [+] and a red [X], then select the wording Insert lines.
How to add multiple rows in Excel
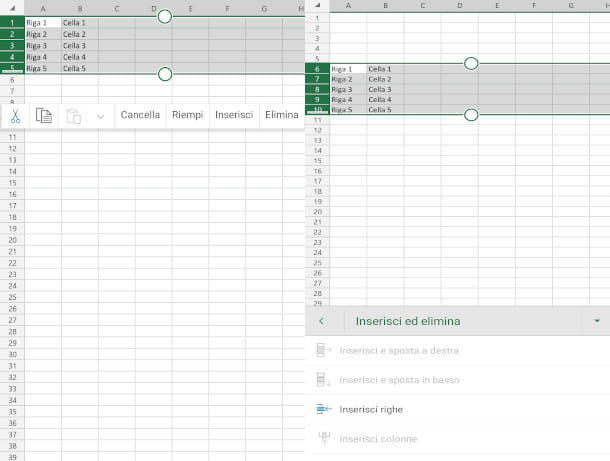
In the mobile version of Microsoft's powerful table processing tool, you can also insert more rows. If, then, you want to understand how to add multiple rows on excel mobile and these are adjacent to each other, all you have to do is highlight the first row on the corresponding number in the left column and act on the ball-shaped anchors that are shown in the center of the selection, dragging them up or down with a movement of the finger.
To complete the operation, press on the menu Inserisci that is proposed to you, or presses on the symbol of down arrow, tap on the item Insert and delete from the pop-up menu and tap the option Insert lines: in this way a number of rows equal to those just selected will be generated.
If you have a tablet you can also take advantage of the built-in functionality on the menu Home: the symbol of a is present in the toolbar below table with a green [+] and a red [X] that, once pressed, it will give you the possibility to interact with the voice Insert lines.
I sincerely hope I have been helpful in this little task: if you found this guide particularly useful and interesting and you want to learn more about how this extraordinary software works, I invite you to read my most complete tutorial on how to use Excel.
Staying on the subject, maybe you might want to know more, for example, on how to block lines, or explore new topics related to the use of formulas, which are essential for performing various operations such as additions, subtractions, multiplications, divisions or percentages.


