


The analytical index makes it possible to provide readers of a book, or in any case of a very long text, with quick references on the pages in which certain topics are dealt with. In other words, it is an index that - usually positioned at the end of a text - contains references to key words and phrases with the numbers of the pages where they can be found.
Word, the word processor included in Microsoft's Office suite, includes a feature that allows you to create it quickly and easily. For this reason, in today's guide, I will take care to illustrate you in detail how to create Word index through procedures that you can put into practice regardless of the version of the software and the computer you use (I will therefore mainly refer to the classic version of Word for Windows and macOS and not to Word Online or the Word apps for smartphones and tablets).
So if you want to find out how to succeed in creating an index in your documents, let's not waste any more time and let's take action. Come on, sit down comfortably, pay close attention to the tips that I will show you and try to put them into practice. Having said that, I just have to wish you a good reading and, above all, a good job!
Index
- How to create an index on Word
- How to create a table index in Word
- How to create Word Auto Index
How to create an index on Word
If you want to know how to create an index on Word, in the next chapters I will explain, step by step, everything you need to do to be able to achieve this goal using Microsoft Word desktop software for Windows or macOS.
Insert entries into the index
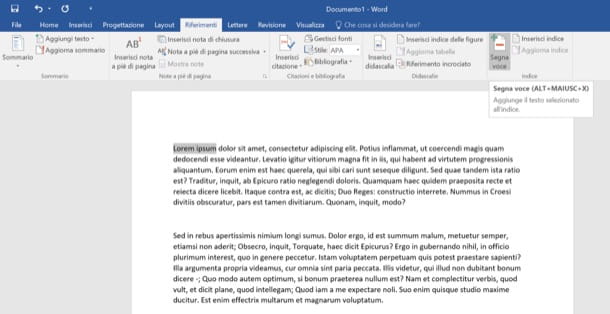
If you want create an index in Word, the first step you have to take is to select with the mouse a phrase or a word that you want to insert in it. After selecting the text, go to the tab References Word and click on the button Mark entry which is located at the top right.
In the window that opens, make sure that in the field Main item the phrase or word you have just selected is set and choose whether to index only the selected occurrence by clicking on the button Mark, or whether to bring back in the index all the pages of the document in which to buy the chosen phrase / word, by pressing on Mark all.
If you want to change the formatting of the page numbers, use the boxes Bold e italic located in the lower part of the window (so that the page numbers appear in the index in italics or in bold).

You can also create bookmarks and limit the search for occurrences to a custom page span. To create a bookmark in your document, select with the mouse the content of the pages to which you want to limit the search, then go to the tab Inserisci and click on the button Bookmark. In the window that opens, then type a name for the bookmark and press on Add but I will complete the operation.
Once the bookmark is created, to limit the indexing of a term or phrase to a specific range of pages, call the function Mark entry Word, put the check mark next to the item Page range, select the desired bookmark from the appropriate drop-down menu and click on Mark.
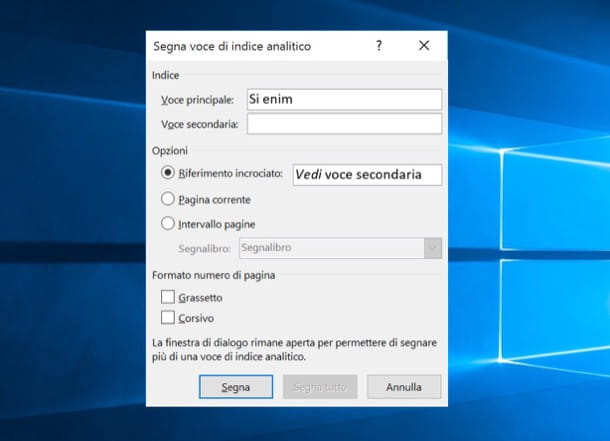
You want to insert a secondary entry in your index so that a primary entry, rather than the number of pages, matches the wording "See [sub item name]"? Nothing easier.
After calling the function Mark entry Microsoft Word, put the check mark on Cross reference and type in the adjacent text field the name of the sub-item you want to appear in the index.
Create the index
After you have correctly configured all the items you want to appear in the document index, for create Word index you have to move to the last page of the file (at the bottom) and insert a new one page breakby selecting the appropriate item from the menu Inserisci.
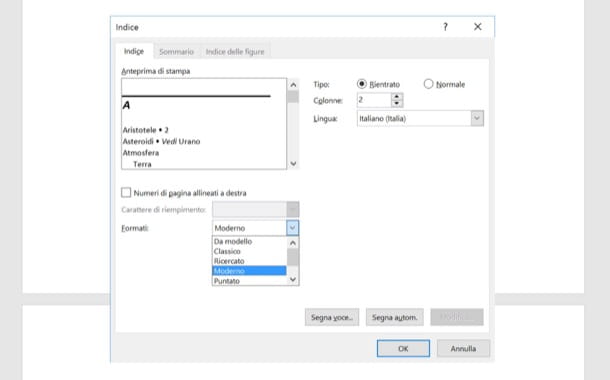
At this point, go back to the tab References and click on the button Insert index located at the top right. In the window that opens, then put the check mark next to the item Page numbers aligned to the right, if you want to right-align the index numbers, and select one of the styles available in the drop-down menu Formats.
Then choose how many column you want to arrange the index, using the appropriate text field located at the top right, choose a fill character from the menu at the bottom left (the fill character is the one used to fill the space between each index entry and its page number) and click on OK to insert the index into your document.
Update the index
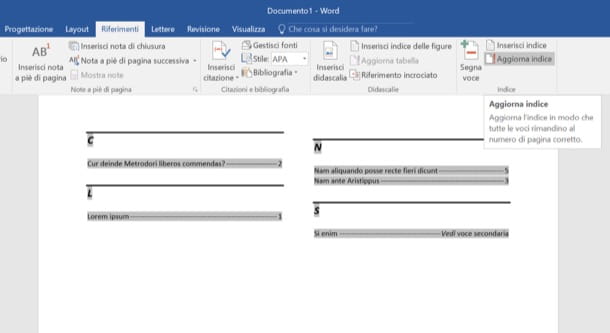
Forgot to make a major change to your document after you've already indexed it? Do not fear. Word includes a handy feature of index update which completely automatically changes the contents of the index, correcting incorrect page numbers.
To correct the analytical index in your document, click on the index, go to the tab References of the toolbar and presses the button Update index located at the top right.
In addition to being able to add new items, you can change the index of your document by acting on the titles already present in it. To change one of the titles in the index, search for its reference in the document and change the text in brackets.
For example, if you want to change the title Lorem Ipsum to turn it into Lorem Ipsum 2 you have to search for the text Home {XE "Home" } in the document and turn it into Thank him {XE "Home 2"}. When the operation is completed, select the index, click on the button Update index located on the tab References Word and that's it.
If, on the other hand, you want to delete an entry from the index, look for references to it in the document and remove the text in brackets. For example, if you want to remove Lorem Ipsum from the index, you need to search for the text Home {XE "Home" } in the document and turn it into Lorem Ipsum. When the operation is completed, select the index and update it by clicking on the appropriate button.
The procedure, as mentioned at the beginning of the post, applies to both Windows and macOS. Unfortunately it is not feasible on smartphones and tablets, nor in Word Online, as these versions of Word do not yet include a function for creating indexes.
How to create a table index in Word
Indexes can also be created for tables and images present in Word. How? In a similar way to that already seen in the previous chapter, always working from the panel References Microsoft Word for computers.
The first step is to create one caption for images and tables in the document. Therefore, click on one of these elements to highlight it: for tables, place the mouse on the grid and then click on thecross icon present in the upper left corner.
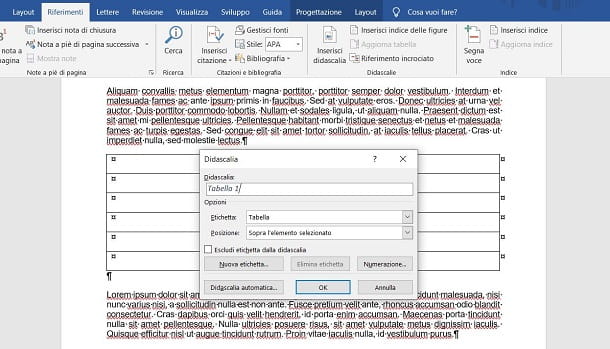
Now that you've selected the table or image, go to the tab References, at the top, find the section Didascalia and premium tasto Insert caption. In the screen that is shown to you, fill in the data required to add the caption.
You can leave the present data unchanged, but make sure that the position of the caption is correct (via the drop-down menu Location) and that the label is correct. Regarding the latter option, via the drop-down menu Label you can choose if the content to add the caption is a table, a figure or anequation.
Therefore, make sure that the correct value is set, which in this case will be Table, for a table; or figure, in the case of an image. Then you just have to press the button OK to confirm the insertion of the caption.
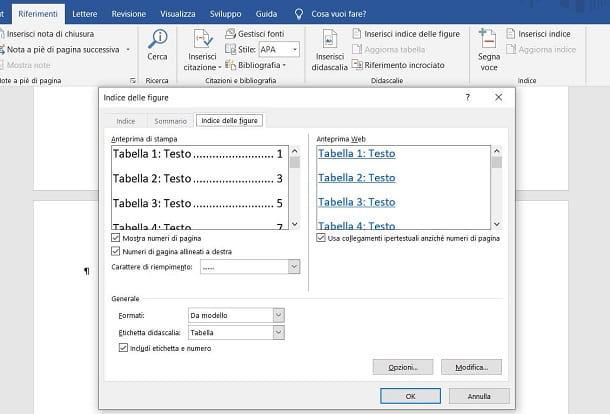
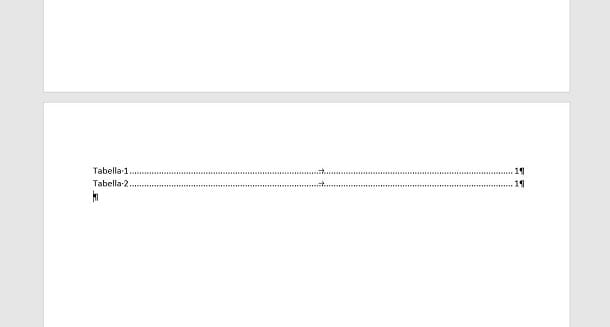
Now that you have labeled all the images and tables in the document, let's see how to insert the index. Reach, therefore, the last page and insert a 'page break, using the appropriate button on the card Inserisci. Once this is done, go back to the tab References and fai clic sul tasto Insert index of figures.
In the screen that is shown to you, you can customize the way the index of tables and images will be displayed, deciding if show page numbersis align the latter to the right and which fill character it will have to be between the index label and the page number, just to give you some examples.
Finally, make sure in the section General the correct type of elements you want to show in the index is set, using the drop-down menu Caption label: Choose Table if you want to bring the table index of the document or figure, for images. Then press on OK to confirm the entry.
In case you have added new tables or images, you can update the index by selecting it and clicking the button Update table, which you find in the card References. To remove an entry from the index, however, all you have to do is delete the caption you added to the table or image, simply by removing the text.
How to create Word Auto Index
On the desktop client of Microsoft Word or on Word Online, the Web version of the famous Microsoft word processing software, it is also possible to manage automatic indexes, also defined summaries. Unlike, however, the index, which I told you extensively in the previous chapters, the summary automatically generates an index based on the chapters.
This means that the index will only be generated based on the presence of text set for example as 1 title, 2 title o 3 title. The indexes on specific words or phrases or on tables and figures must instead be generated manually, as I have already explained to you previously.
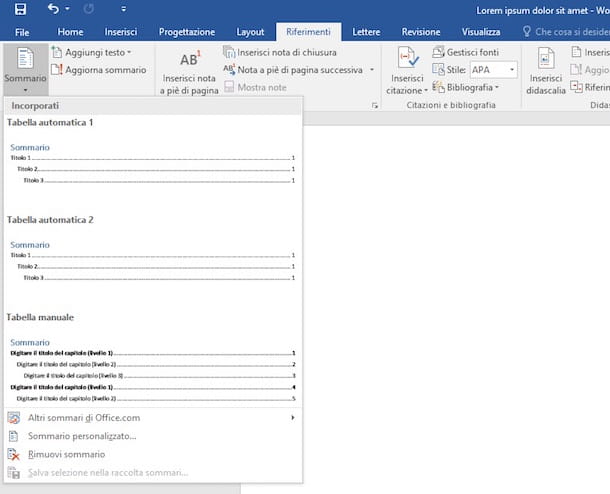
In any case, the functionality of inserting the table of contents on Microsoft Word can be found in the tab Referencesby pressing the key Contents and choosing one of the models present in the panel on the screen. The index can be updated simply by adding or removing chapters and pressing the button Update summary, in the tab References.
In Word Onlineinstead, you cannot directly create a table of contents but, if you have imported or saved the document on OneDrive, you can update the table by clicking on it and reaching the items Table of Contents> Update Table of Contents in the tab References up.
In case you want to deepen the topic related to Word summaries, I suggest you consult my guide dedicated to the topic, in which you will find useful information to be able to quickly create an index for the chapters of your document.


