


Have you tried to download the photos you took with your iPad to your computer but nothing happens when you connect the tablet to the computer? Are you tired of connecting iPad to computer every day and would like to know if there is a way to download photos from tablet to PC wirelessly? I am happy to announce that you have come to the right place at the right time.
With today's tutorial, in fact, we will see together how to download photos from iPad adopting the more traditional procedures (therefore physically connecting the tablet to the computer) and the new cloud synchronization services that allow you to download photos from Apple devices via the Internet (without physically connecting the device to the computer). Either way - I can assure you - it's really child's play.
All you have to do is take five minutes of free time (maybe even less) and follow the directions I am about to give you. Whether you have a Windows PC or a Mac, a basic iCloud account or a pay subscription, you will surely find a way to copy photos from your iPad to your computer without any effort. So, are you ready to get started? Find all the steps you need to take below.
Download photos from iPad to PC
Do you use a Windows PC? Well, then know that you can take two different solutions to download photos from your iPad to your computer. The first, the more traditional one, is to connect the tablet to the PC and take advantage of the import functions included in Windows. The second one uses iCloud synchronization (Apple's cloud storage service) and allows you to synchronize photos between iPad and computer via the Internet. Would you like to know more? Perfect, then read on.
Import via Windows
To import photos from iPad to computer, it must be installed on your PC iTunes, Apple's multimedia software that also includes drivers to communicate with Windows and iOS devices (iPad, iPhone and iPod Touch). To download iTunes on your PC, use the Windows 10 Microsoft Store or connect to the Apple website and click on the appropriate item.
In the latter case, when the download is complete, open the file iTunes64Setup.exe just downloaded on your computer and complete the program installation process by clicking first on NEXT and then Install, Yes e end. Then launch iTunes, accept the software terms of use and connect the iPad to the PC using the Lightning / Dock cable supplied with the tablet.
The first time you connect the iPad to the computer, you must authorize the communication between the two devices by first pressing the button Authorize that appears on the tablet screen and then on the button Continue that appears on the Windows desktop.
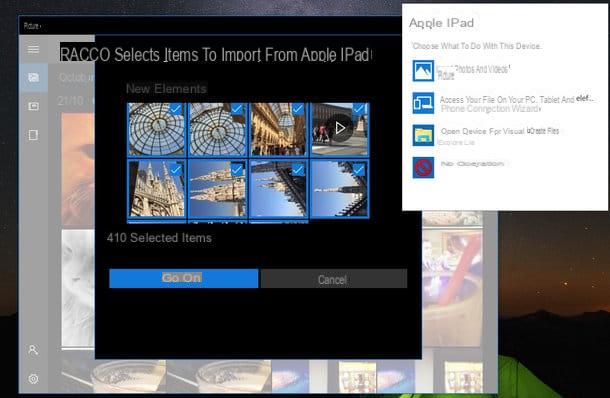
Once this is done, disconnect the iPad from the computer and connect it again. If everything went well, a notification from the Windows Explorer will appear asking you what you want to do with the device you just connected to your PC. Then click on the option Import photos and videos, put the check mark next to the images and videos to be copied to the PC and click on the button Continue.
At this point, you choose if delete items imported from Apple iPad after import putting the check mark next to the appropriate option and presses the button Import to complete the operation. By default, photos are saved in the folder Images Windows. If you want to change this path, click on the button before starting to import the photos Change the import location.
The above guidelines apply to newer versions of Windows, such as Windows 10. If you are using Windows 7 or an earlier edition of the Microsoft operating system you need to follow a slightly different procedure (which is actually also available in newer versions of Windows , but only if you start importing photos "manually" from File Explorer): after selecting the option for Import images and videos you have to click on the link Import settings and set your preferences regarding the destination folder of the images, their name and the tags to be assigned to them. Then you have to press the button OK, you have to type in the tags to be associated with the photos and start importing them on your computer by clicking on the button Import.
If when you connect your iPad to your computer you are not asked if you want to import photos and videos to your PC, do this: open theExplore Resources Windows (the yellow folder icon located in the taskbar), select the item computer o What PC from the left sidebar, right click on theiPad and select the item Import images and videos from the menu that opens. The rest of the procedure is identical to what is illustrated in the previous paragraph.
Synchronization with iCloud

Would you like to sync photos between iPad and computer without physically connecting the two devices? In this case you can rely on iCloud, Apple's cloud storage service that allows you to perform an automatic backup of all photos taken with iOS devices (the photos are uploaded online and then downloaded to your computer via the iCloud client).
There are two ways to sync photos with iCloud, one temporary and one permanent. The temporary one is called ICloud Photo Stream, does not erode the space available on iCloud (which is free up to 5GB) and provides for the storage of a maximum number of 1.000 images for a period of 30 days (once this time or space limit is exceeded, the images are therefore progressively deleted) . To keep photos permanently on iCloud you need to sign up for a pay subscription to iCloud (paid plans start at 99 cents / month for 50GB of storage) and activate the service ICloud Photo Library which stores photos and videos on iCloud with no number or time limits. If you want to learn more, read my tutorial on how to store photos on iCloud in which I explained how to use both services.
Once you have activated Photo Stream (active by default on all iOS devices) or the iCloud Photo Library (accessible from the menu Settings> [Your Name]> iCloud> Photos on iOS or from the menu Settings> iCloud> Photos on iOS versions prior to 10.3), connected to the Windows 10 Microsoft Store or to this page of the Apple website and click on the button Download to download the official iCloud client: a free program that allows you to automatically synchronize iCloud data on your PC.
At the end of the installation, log into the iCloud client using the credentials of your Apple ID (the same one you configured on the iPad) and check the box Gallery. By default, photos are automatically downloaded in an optimized version to the folder of iCloud contained in the folder Images of Windows.
Download photos from iPad to Mac

On Macs the procedure for download photos from iPad it is much simpler than the one just seen together for Windows PCs. It is all done through Gallery, the digital imaging application included "standard" with OS X. Plus, there's no need to download drivers because iTunes is already installed on your computer by default.
To copy photos from your iPad to Mac in the traditional way, that is by physically connecting the tablet to the computer, wait for the application Gallery starts automatically (it should start as soon as the iPad is connected to the Mac), click on the tab Import placed at the top right and presses the button Import new photos to start the photo and video import process.
If you don't want to import all the photos and videos on your iPad, but only some of them, select their thumbnails using the combination cmd + click e pulsing sul pulsating Import selected xx which is located at the top right.
Do you prefer to synchronize photos via the Internet, via iCloud? No problem. You open Pref Renze system, click on the icon Apple ID / iCloud and make sure there is a check mark next to the item Gallery. Then open the application Gallery, go to the menu Pref Renze of the latter and make sure that in the card iCloud the options are active ICloud Photos e My Photo Stream. This way, all photos uploaded to iCloud will be accessible directly from your Mac's Photos application. With iCloud Photo Library turned on, your images will be automatically downloaded to your computer's hard drive without you even having to open the Photos app. As you can easily understand, for the synchronization of photos to work you must use the same Apple ID on both the iPad and the Mac.
If you only need to transfer a few photos from iPad to Mac and not the entire photo library, you can also use AirDrop, a wireless data transfer system supported by all latest Macs and iOS devices. I told you about it in more detail in my tutorial on how AirDrop works.
Download photos from iPad via the Internet

If you have activated the service on your iPad ICloud Photo Library (I invite you to read my post on how to store photos on iCloud again if you want to know more), you can download the photos from your account to your computer also via browser.
All you have to do is connect to the iCloud.com website, log in with your Apple ID credentials and click on the icon Gallery. Then you have to wait a few moments for your online image library to be organized (this is only necessary the first time you log in to the service via browser), you have to select the thumbnails of the photos to download offline using the key combination Ctrl + Click on Windows and cmd + click on Mac (or Ctrl+A/cmd+a to select them all) and, when the operation is completed, you have to click on the icon cloud with arrow going down located at the top right.
How to download photos from iPad


