


Are you tired of the “standard” fonts available on your computer? Would you like to create documents, greeting cards or posters using alternative fonts downloaded from the Internet but you don't know how to install them? If the answer to these or other similar questions is yes ... don't worry! You don't need an expert to do it! If you want to know how to install fonts on your Windows PC or on your Mac, all you have to do is take five minutes of free time and follow the instructions I am about to give you in this guide.
Before you can get alarmed and think about who knows what, I want to make you aware right away that, contrary to appearances, this is not a complicated operation at all. Installing fonts is, in fact, such a simple procedure to perform that even a child novice with the world of computer science could succeed without encountering problems. So, even you - who do not consider yourself exactly a "geek" - can install fonts on your computer in a practical and immediate way, you have my word.
But now let's ban the chatter and get down to business! But I recommend, before downloading and installing fonts and using them in documents to be distributed in public or for commercial purposes, make sure that the relative license allows it. Understood? Good. That said, let's proceed!
Index
How to install fonts on PC
Do you want install fonts on your computer Windows or your Mac Don't worry, because in the next chapters you will find all the information you need to be able to perform this operation easily in just a few clicks!
scaricare font da Internet

If you haven't found any fonts yet to use in your projects, the first step you need to take is, of course, to download new ones right away. To do this, you can turn to some Internet sites that make available free and for all tastes.
You can, for example, take a look at Google Fonts. This is the Google portal dedicated to fonts for the Web, which allows you to use hundreds of different fonts on blogs and Internet sites, but also to download them locally for your computer; all totally free.
To view the fonts available on Google Fonts, click here in order to immediately connect to the home page of the service. Then use the bar located at the top to filter the various writing characters available.
Check the boxes under the heading Categories to view only the fonts belonging to specific categories. There are those Sans Serif (without "thank you"), Serif (with "thank you"), Monospace (fixed width), Handwriting (handwriting style) or type Display.
In addition, you can choose in which order to display the fonts by selecting one of the options available in the drop-down menu Sort by. You can also decide to view only and exclusively the fonts related to a specific language, by clicking on the drop-down menu located under the heading Language.
You can then further refine your search for fonts, thanks to the drop-down menu Font properties: you can choose one or more of the options Number of styles (number of styles), Thickness (thickness), Slant (inclination) e Width (width), moving the relative sliders according to your preferences and needs.
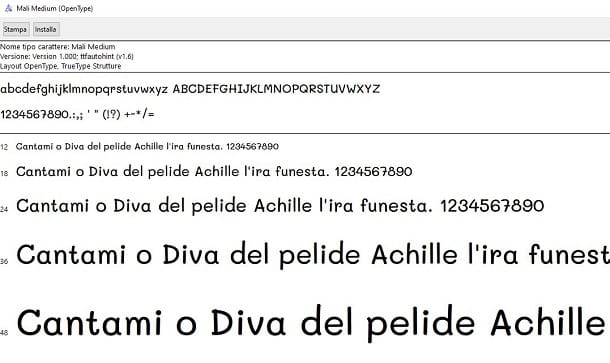
Once you have found the font to download (or, rather, the family of fonts to download), click on it and press on the item Download Family, which you find at the top right. Once this is done, the font you have chosen will be immediately downloaded to your computer, inside a ZIP archive, which you can open and extract by following the advice I have given you in this guide.
In the unfortunate event that the fonts present on Google Fonts have not particularly attracted your attention and if you have not yet been able to find the font that is most suitable for you, I suggest you do not throw in the towel yet.
Before giving up, in fact, I invite you to consult my guide on how to download fonts, through which I have provided you with further and interesting online resources useful for the purpose.
Install fonts on Windows
Once you have found the font you intend to use for your projects, you can finally start the actual procedure to install the font. If you own a PC Windows, you can act in different ways, depending on the edition of the operating system installed on your computer.
As I already mentioned in the previous chapter, the fonts you download are usually distributed in a ZIP archive, inside which there are files in the format FTT. Generally, just double-click file .ttf and, in the screen that is shown to you, press the key Install, located at the top. By doing so, the font will be installed on your PC automatically.
Obviously, however, this operation is feasible only if you have a few fonts to install on your PC: if the number of fonts were to be high, following the procedure I indicated in the previous lines could be time-consuming.
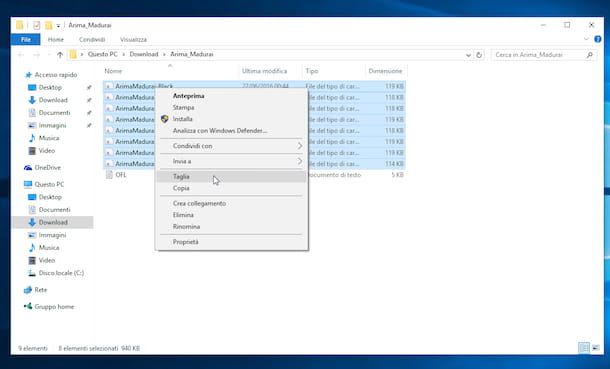
In this regard, you can speed up this practice simply by starting theFile Explorer Windows (the yellow folder on the taskbar, which can also be called up via the shortcut Win + E from the keyboard) and selecting the item computer or What PC (the item may vary depending on the version of Windows used) attached to the left of the screen.
Then double-click on the item Local disk (C), go to the folder Windows and then double-click the folder Fonts on your computer (i.e. the folder where all Windows fonts are saved).
Now you need to move the file .ttf that you previously extracted to your computer inside this folder. Then copy and paste (or cut-paste) the aforementioned files into the folder Fonts And that's it.

Keep in mind that, as an alternative to the procedure I just indicated, you can install fonts on Windows from Control Panel. To do this, in the Windows search box, located on the taskbar (or in the Start menu for previous editions of the operating system), type the terms "Pannello di controllo".
Then click on the corresponding search result and, in the screen that is shown to you, select the items Appearance and Personalization> Fonts.
Then you will have to drag, in the window that will be shown to you, the file .ttf of the fonts you intend to install, so as to allow the operating system to integrate them.

If it is installed on your PC Windows 10, you can also act from the panel of Settings. Then start the latter using the key combination Win+[i] or by selecting the appropriate item that you find in the box that is shown to you when you right-click on the button Start.
In the panel you see, select the items Personalization> Fonts and drag i file .ttf inside the box Drag and drop to install, which you find in the section above.
In the event that, after installing fonts on Windows, the new font is not immediately available for use, restart the computer. The next time you log into the system, everything should be fine.
At this point, you can finally say you are satisfied: you have managed to complete the whole procedure by which to install fonts on your Windows PC and now you have new fonts to use as you see fit for all your projects, congratulations! You will find the new font just installed along with all the others, directly in the programs menu from which you usually select the type of font to use.
Then open Word or any other program for writing, creating greeting cards, web pages, etc. and in the list of fonts you will also find the ones you just installed on your PC.
Install fonts on Mac
If you have a Mac and you are interested in understanding what you need to do to be able to install the fonts, know that the procedure to follow is, if possible, even simpler than what you have to put into practice on Windows PCs. Now I'll explain everything.
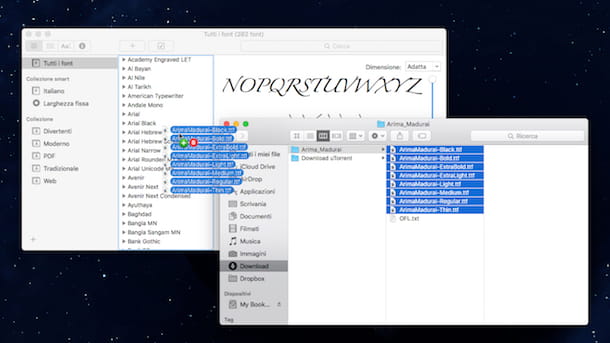
To install fonts on Mac, the first step you need to take is to launch the application Book Font present in the folder Other of Launchpad (or the folder Applications Finder).
Once the application window is displayed, press the button + located at the top left, select the font in . Ttf you intend to add on macOS (or the folder where the fonts are contained) and then click on the button apri.
As an alternative to the procedure I just indicated, you can take the font files and drag them directly into the Book Font. Next, click the button Install selected And that's it.
In the event that, after installing the fonts on macOS, the new font is not immediately available for use, restart the computer.
Once these operations have been completed, you can finally feel satisfied: you have successfully completed all the procedure by which to install fonts on Mac and now you can finally use it as you see fit.
To use the fonts you just installed, all you have to do is open Pages or any other program to write, create brochures, business cards and so on and, in the list of writing fonts, you will also find the fonts you just installed using Book Font say macOS.
How to install fonts on smartphones and tablets
On smartphones and tablets with operating system Android e iOS / iPadOS you can change the font of the texts that are shown on the display. Do you want to know how to do it? Then read carefully the information I will provide you in the next chapters.
Download fonts on Android
Some models of smartphones and tablets Android allow you to easily change the font of the system menus, as well as those of the apps. This operation is possible through the panel of the Settings or via some system apps pre-installed on the device.
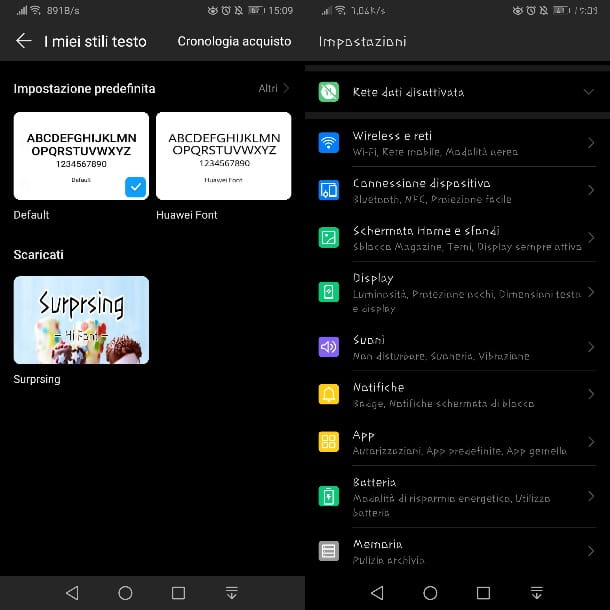
For example, on smartphones Huawei, via the app Temi, you can download all the fonts you want, both for free and for a fee, by accessing the section Text style.
When you have found the one you are interested in, tap on it and press the button Download. Once this is done, click on the tab personal located at the bottom and tap on the icon Text style, to access the list of fonts installed on the device. At this point, tap on the one you just downloaded and press the button Apply, to confirm the use of the downloaded font.
On other smartphones and tablets, however, through the panel of Settings of Android (theicona dell'ingranaggio located on the home screen or in the drawer), you can set the font you want, reaching the section Display> Font (The path may vary depending on your device model and Android version).
If you are not allowed any customization to that effect, then the advice I give you is to use gods launcher alternatives, which you can install through the Play Store. The latter allow you to replace the Android home screen with a customized one. In this regard, I suggest you read my guide on the best launchers for Android.
Scaricare font su iPhone/iPad
Su iPhone e iPad you can install fonts that you can use in some apps that support font customization, such as Pages. However, this operation is only possible on Apple devices equipped with iOS 13 (or iPadOS 13) and later.
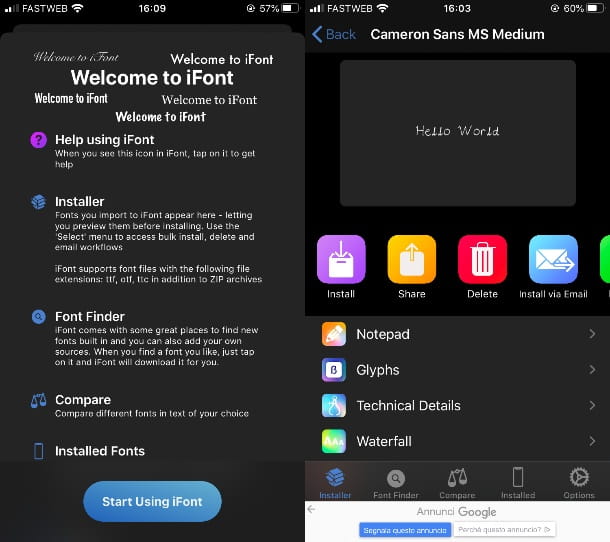
To install a font, you must first download an app that allows the addition of the latter. There are several on the App Store, but in this tutorial of mine I'll tell you about iFont, a free app supported by advertising banners, which can be removed at the cost of 2,29 €.
After starting the app in question, press the button Start using iFont, to access its home screen. Once this is done, click on the tab Font Finder located below and select a provider from which to download fonts, such as Google Fonts.
At this point, use the search engine to search for the font whose name you already know or scroll down the screen. When you have found what you want to use, press the button Get and tap on the tab Installer down.
In this new section, tap the font name you have previously selected and press the button install. At this point, press the button Allow and then on the rumors Close e end, to complete the font download process on your iPhone / iPad.
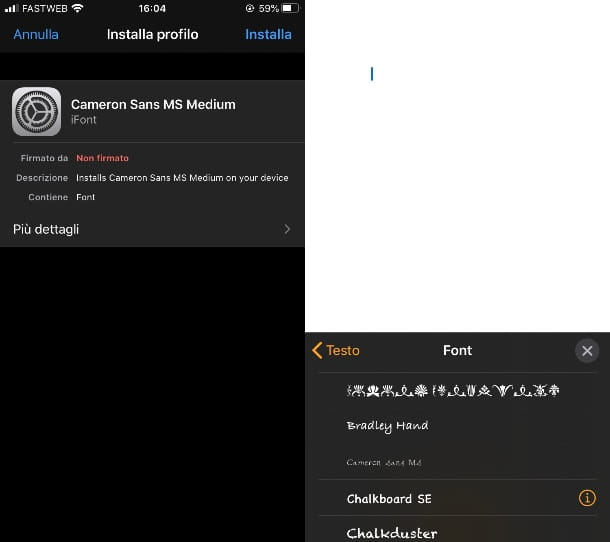
Now, launch the app Settings iOS / iPadOS and select the items General> Profiles. You will find the name of the font you just downloaded via iFont in the screen that is shown to you. So he presses on his own name and tap the button Install.
Almost there: type the Password iPhone and press on the item Install (twice in a row) and then on end, to complete the installation process. You can verify that the font has actually been installed by reaching the section General> Font app Settings.
Now, launch the app Pages or any other app that allows you to customize the text you type: you will find the one you just installed in the list of fonts. It was easy, wasn't it?


