


During the days you bought your first device Android o Windows Phone and immediately you started experimenting with all its features. The first thing you did was test the "thanks" of the integrated camera and thus found yourself taking a bunch of photos. The result, however, was that you found yourself a device full of beautiful photos that have literally "clogged" the memory but that you are not willing to delete to make room for everything else. I am wrong? No, indeed. Well, given the situation then why don't you try to move photos to SD?
How do you say? The thing interests you but being a novice user you don't have the faintest idea how to do it? But don't worry, I can explain everything to you. In today's guide I will in fact go to show you, in detail, what are the steps that must be taken to succeed in what at the moment seems to you a difficult task but which, you must believe me, is actually a very simple operation. to perform.
Then? Do you want to try? Yup? Fantastic! So I would say not to waste any more precious time, to ban the chatter and immediately start getting busy. You will see, in the end you will be able to tell yourself very happy and satisfied with the discoveries made and in case of need you will also be ready to explain to all your friends in need of receiving a similar tip how to do to be able to move photos to SD. What do you say, we bet?
Preliminary operation
Before explaining how to proceed to be able to move photos to SD, I invite you to make sure that in your Android device or Windows Phone it is actually possible to insert a memory card. Then you will then have to check if this is already inserted or not (for example, on some devices it is supplied “in spider form) and if not, you will obviously have to purchase one in order to complete the whole procedure.
To check if an SD card can be inserted in your smartphone or tablet, first make sure that there is a small compartment on the edge of the device or that of ad hoc slots in the battery compartment of the same. In most cases, in fact, in these compartments and slots it is possible to insert an SD card. Keep in mind that usually the space dedicated to inserting the SD card is easily recognizable by the presence, on the side or above, of the voice SD o microSD.
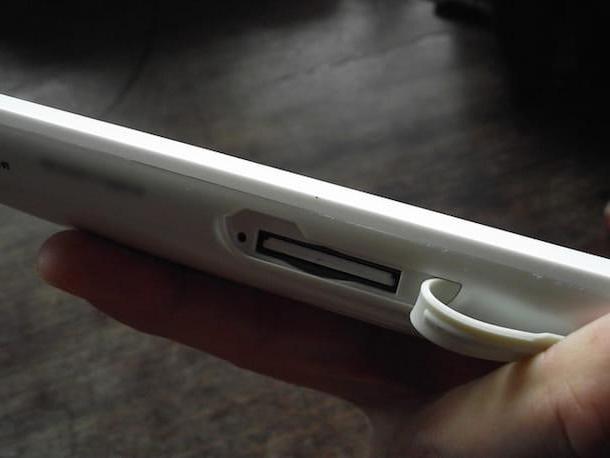
If you can't find the compartment or the slot in which to insert the SD card, I invite you to consult the user manual of your device, there you should find all the necessary information. Alternatively, you can do a Google search by typing, for example, [smartphone or tablet model name] sd card. Once you have ascertained that your device is equipped with a special compartment for inserting a memory card, check that a memory card has been inserted inside it or in the slot identified and dedicated to the SD card simply by looking at it. 'indoor.
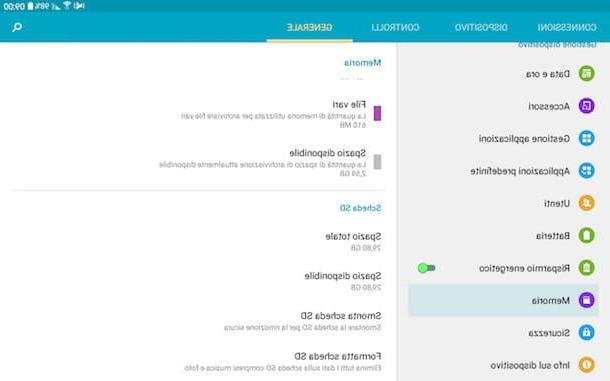
In addition to what I have just indicated, you can check if a memory card has been inserted in your Android smartphone or tablet by accessing the device screen in which all the applications are grouped, by pressing on Settings (l'icona a forma di gear) and accessing the section Memory. Subsequently, if by scrolling the screen that is shown you can locate the section SD card and the data relating to it then it is evident that a memory card is inserted in your device. If, on the other hand, you cannot locate the aforementioned section or if no information is available about it, then surely no SD card is inserted in your Android smartphone or tablet.
Also make sure you have a file management app on your Android smartphone or tablet. Most of the Android devices on the square integrate an app named archive responsible, in fact, for the purpose in question. If, on the other hand, there is no app used to manage files on your device, don't worry, you can fix it by downloading a special resource from the Google Play Store. I suggest you use it ES File Manager which you can get by pressing here.
If, on the other hand, you are using a Windows Phone device, you can check if a memory card is inserted on this device or not by going to the list of apps, pressing on memory sensor and making sure that the voice is then available SD card.

Once the above operations have been carried out, if a memory card is inserted in your device, go directly to reading the next paragraph. Otherwise, in order to move photos to SD you will first need to purchase and insert a memory card in your smartphone or tablet. If you want some advice on which product to buy, you can read my guide on which SD card to buy and my tutorial on which micro SD to buy.
Move photos to SD
Android
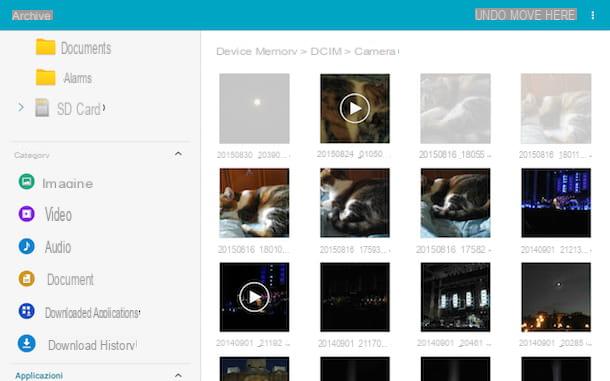
At this point I would say that you are finally ready to take the real action! If you are using Android, start the file management application by pressing on its icon in the diagram in which all the apps are grouped, then press on the item Device memory, Device Storage o storage (the item may vary based on the model of smartphone or tablet in your possession and / or based on the application for managing files you use) then scroll down the screen that is shown to you, locate the folder DCIM and press on it.
Then tap on the folder Camera. Note that most third-party applications save photos in their own specific folder. These folders usually have the same name as the application that created them. So, if to take photos with your device you use an app other than the default one, the folder you will need to find to be able to move photos to SD will be different from the one I just indicated and most likely will be marked by the name of the application. employed by you.
Proceed by tapping the button with i three dots which is located at the top right, choose the item Select from the menu that is shown to you and select all the photos you want to move to the memory card and then press the button with the three points which is located at the top right, select the option Move and indicates the destination folder on the SD card. If your smartphone or tablet does not offer this option, after selecting the photos to be moved to the SD card, presses on destination folder present on the SD card and then tap on the item Move placed at the top or tap the button that allows you to do this (generally it is a button depicting a folder with an arrow next to it).
If in the position where you intend to move photos SD card there is no folder that you consider suitable for storing images, you can also create one, before or after moving the files, by pressing the button to create a new folder located at the top , typing the name to be assigned to the directory and then tapping on OK.
After moving photos to SD by logging into the app Gallery or in any case to the one you usually use to view videos and photos stored on your device, you will find the images in a separate group from the others that may be available and labeled with the name of the folder previously chosen for the "move" or with the one you have decided to assign to the specially created directory. You will also be able to easily recognize the photos you have moved to the SD card from all the others due to the presence of an indicator depicting a memory card above or next to the group name.
Finally, I would like to point out that, as I have just indicated, you can also move photos from the SD card by making sure that all the shots taken with the camera of your device are automatically stored on the memory card.
To do this, access the screen of your Android smartphone or tablet in which all the apps are grouped, presses on the app Camera or in any case on the one you generally use to take pictures, presses on Settings, its Settings or on the gear wheel icon (the command may vary based on the model of smartphone or tablet in your possession and / or based on the application to take pictures you use), then locate the item Memorization and press on it and to finish tap on the item SD card o SD card.
To confirm the correct outcome of the operation, after selecting the SD card as the default for storing the photos taken on your device, you should see a small icon appearing at the top of the app screen that you generally use to take photos. memory card.
Windows Phone

If, on the other hand, you are using a Windows Phone smartphone, you can move photos to SD by going to the app list, pressing on memory sensor, tapping on phone and then photo. Then select the items you want to transfer to the memory card by pressing on them. At this point, tap on the icon move located in the lower corner of the screen, select the location on the memory card where you want to move the images and click on move here.
Once this is done, the previously selected photos will immediately be moved to the indicated location. To confirm this, by going to the section sd card di memory sensor, pressing on the voice photo you will be able to view all the images previously selected and transferred to the SD card.
How to move photos to SD


