


You have to do the editing of a video on your computer but, since you are full of commitments, you do not have the time to use professional software to accomplish this task. So I bet you would like to know how to use Movie Maker; you have always underestimated this program, but now it would be just for you.
If you want to know how to use the well-known editing software, know that I can help you, but first it is necessary to make a small but important premise. As of January 10, 2022, Microsoft has stopped supporting the Windows Essentials 2012 suite of programs, which also included Movie Maker. With the discontinuation of support, it is no longer possible to download Movie Maker from the official Microsoft website; consequently, in this guide of mine, I will explain how to download it from unofficial websites, in case the program is no longer installed on your PC.
You do not have to worry about doing this, in the course of this tutorial I will explain step by step how to do it. Before starting, I also remind you that, most of the programs present within Windows Essentials 2012 have been replaced by other applications and features available on Windows 8.1 or later systems. Unfortunately though, but as of this writing, there is no official application that has replaced Movie Maker. Consequently, as an alternative to downloading the software in question from unofficial Internet sites, you can use similar applications in the Microsoft Store. Try to take a look at the link I gave you, there might be some that might be right for you. Having said that we can begin, I wish you a good read.
Index:
- How to download and install Movie Maker
- How to create a photo slideshow with music
- How to edit a video with Movie Maker
- How to add audio and video in real time
- How to save a project and export it
How to download and install Movie Maker
So if you need to download Movie Maker on your computer with a recent version of Windows (Windows 7, Windows 8 / 8.1 or Windows 10) you can download it from MajorGeeks.com, where however you can only find it in English.
Exceptions indicated separately, I always advise you not to download software from unofficial sources, as the program may have been altered and no longer guarantee those security conditions that were instead guaranteed by the developer company.
To proceed with the download, click on the MajorGeeks website link I provided above and click on the wording Download @ MajorGeeks, so as to start the automatic download of the Movie Maker installation file.
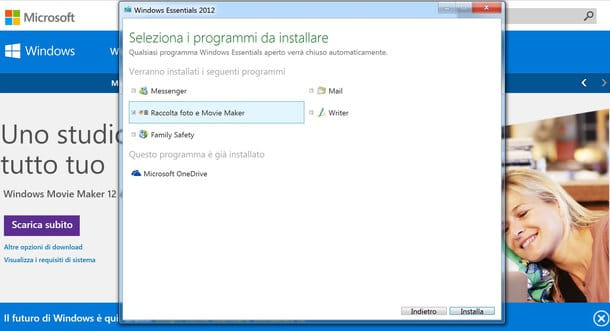
Now start the installation file and click on the button Si. The installation screen for the Windows Essentials 2012 program package will appear, on which you will have to make a choice between two available options. Click on the entry Select the programs to install and then leave the check mark only on Photo Collection and Movie Maker, while you will have to uncheck all the other boxes related to software that you will not have to install. Then click the button Install and wait for the end of the installation process. If a message appears asking you to install additional features, such as Net Framework 3.5, click your Download and install this feature.
Once the software is installed, start the program and click on the button Accept related to Microsoft Services Agreement.
How to create a photo slideshow with music

If your goal is to make a simple video with a photo slideshow inside, with a backing track that accompanies it, then I can explain to you in a few simple steps how to make it.
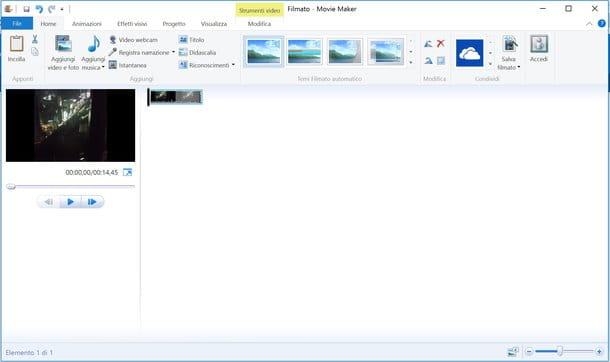
The first thing you will need to do after opening Movie Maker is to click on the button Add videos and photos (tab Home) which is located at the top left. You will be able to arrange your photos in the timeline manually or using one of the themes available within Movie Maker. You can find them by clicking on one of the cartoons that you will find corresponding to the item Automatic movie themes, in the horizontal bar at the top. Once you click on one of the available themes, you will be prompted to add music. Then click the button Si and select the audio track to use as background music for your presentation.
You will be able to modify every single element that has been automatically added with the theme, by clicking on the various tabs you see above: Video tools, Music instruments e Text tools. By clicking on the various elements within the timeline, you will be able to make changes to the captions, animations and any other elements you have added.
If, on the other hand, you want to create your presentation manually, then you simply have to add all the images using the button Add videos and photos (tab Home). Next you will have to insert the various transition effects by clicking on the individual images in the timeline and select the animation effects that you will find in the tab Animations, in the horizontal bar at the top. You can set its duration on each individual effect (button Duration) or apply it to all (button Apply to everyone).
To add music, click the button Add music (tab Home). You can make any changes to the audio track you entered by clicking on the tab Music instruments and setting any fade in or out and the overall volume.
How to edit a video with Movie Maker
Editing a video with Movie Maker is really a simple procedure, which I will show you in the following paragraphs. What I want to let you know is that when you add a video in Movie Maker, it doesn't necessarily mean it's in a supported format (like MKV format files for example). Whenever you add a video, Movie Maker will scan it (just see the loading bar below). If after which you see a symbol with a yellow exclamation point near the preview of the file in the timeline, then the file is not supported.
After this small but necessary premise, let's get back to our job: editing a video with Movie Maker, maybe even with a backing track. To do this, first click on the button Add videos and photos and select all the files you want to import into your project.
You can now decide how to proceed with the editing of your video, perhaps cutting the videos in various scenes, to which you will apply animation or transition effects.
To do this, you will first need to select the video file you want to edit in the timeline and click on the tab Video tools, which is located in the horizontal bar at the top. Now, from the timeline, drag the black navigation finger in the video scene where you want to set the cut. Then click Divide to confirm the video cut.
If instead you want to crop a video into a smaller one in length, click on it from the timeline and then click on the tab Video tools. Now click the button Crop tool and use the two levers that you find in the preview on the left to set the start and end point of the scene. When you are sure of your crop, click the button above Save Clipping.
From tab Video tools you can also set the video volume and set fades in and out, the speed of the video and even stabilize the image in case of a shaky video shot with an unprofessional video camera. All animations and video effects can instead be inserted via the tab Entrainment , while titles, acknowledgments and captions can be added by the corresponding buttons present in the tab Home.
As I explained to you for photo slideshows, to add an accompanying music track to the video, you will have to proceed via the button Add music and set any changes; then click on it from the timeline and finally click on the tab Music instruments.
How to add audio and video in real time
Among the most interesting features of Movie Maker, there are two that can be really useful: the use of videos recorded in real time from your webcam and the recording of a narration in real time through your microphone.
These two features can prove useful. How? Well, let's give an example: you have to make a video to share on the various social network platforms: you can do it using the Webcam feature to take pictures of yourself and the real-time narration feature to make the voiceover.
Consequently, to add a video by recording it from your webcam, just reach the tab Home and click on the button video web cam. By doing so, you will have opened a new screen with the preview of your webcam, on which you will have to click on the button Register to start recording video in real time. Once you're done, tap on Stop to import the video into your timeline and be able to apply changes if necessary.
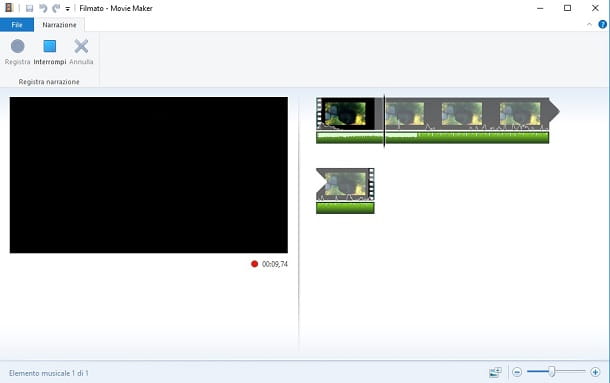
If you want to record a voiceover to accompany and describe the video, from the tab Home, click your Record narration to open a new screen. Now, from the timeline, move the black navigation bar to the scene where you want to start the narration and press the button Register. When done, click the button Stop, so as to import the audio track into your project.
How to save a project and export it

We are almost there; now that you have created your video, applying all the changes you needed, you are afraid of losing all your work if the software suddenly crashes or your computer turns off. How to do? I'm about to explain how to save your project and how you can take it back in your hand also at a later time.
Click on the tab Fillet which is located at the top left and choose the item Save project as. In the new window, choose the folder where to save your project and click the button Save.
If you have to interrupt your work and resume it at another time, just open Movie Maker, select the tab Fillet I will select the voice Open project or simply double left-click on the saved project file to automatically open Movie Maker with the changes made when saving your project.
Let's say that you have now finished working on your project and you want to export the video to be able to share it on your social networks or simply keep it on your computer. How to do? Find the answer in the following lines.
Click on the tab Fillet at the top left and select the item Save movie. You will be offered some settings based on the device on which you want to play your video. Choose one, select the folder where you want to save the video file and press the button Save. Then wait for the saving to finish and click on one of the buttons that is proposed to you: Play, Open folder or Close.


