


We take thousands of photos with our style and with our favorite gear; sometimes something else is added to accompany our images: a fixed spot on the sensor. This tells us it's time to clean the sensor properly.
The problem presents itself to everyone, both to those who are more careful in handling the equipment and to those who are more casual in using it. This problem increases with frequent use of the camera.
The type of spots is varied with spots visible only on images with homogeneous areas such as the sky, or really intrusive spots that compromise the image quality.
We can quickly fix the images with editing software but this involves repetitive work that takes a lot of time; being able to cure the problem is a good way to save time.
Dirt on the sensor is related to several factors, we can indicate these:
- frequent lens changes
- lens change with camera on (not to do in fact)
- continuous use of zoom at high magnification
- dirt in the bag
- particularly dusty environments
Frequent use of zooms like 18-135 or 70-200 with high excursion produces turbulence that often brings in air and dust from outside. This happens less on tropicalized optics and much more on standard ones.
You clean the protective glass, not the sensor itself
It's common to talk about sensor cleaning because we know the problem is with it. The sensor is actually always neat and clean, what it is the upper glass that protects it is dirty. In fact, on the sensor there are several layers that allow it to function correctly, for example the IR filter to block the passage of infrared rays
Step 1: Clean the sensor on the fly with self-cleaning
The first step is to activate the camera's internal self-cleaning system several times. In the camera maintenance menus (usually with a wrench icon) we will find the correct entry. We can repeat the operation several times with the advice of keep the camera facing down , without optics or protective cap. This way the dust should come out of the camera body and fall out.
This mechanism is able to "shake" away the lighter particles. The result is good but it is not the fundamental solution.
Step 2: compressed air or hand pump
This step is more delicate and requires some attention. The idea is to blow a jet of air on the sensor to move the particles more forcefully.
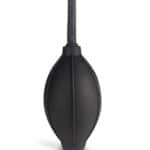

The simplest way is to use a hand blower for the darkroom. The jet is always delicate and never runs out. It should be considered that the pump sprays air which it first sucks from the environment and therefore could contain other dust.
The cans of compressed air contain only filtered air and therefore do not add anything else. They are practical but need special attention: they are used by holding them vertically. If we incline them by distraction, the propellant will come out together with the jet of air; this leads to the formation of a film of ice inside the camera, with serious risks for the electronics. It is for this reason that some companies advise against cleaning the sensor with cans.

For the first few times it is better to get help from someone who will hold the camera facing downwards and we, by bending the plastic straw of the can, will direct the jet upwards.
Step 3: Clean the sensor manually
This is the method used by professional laboratories. It is impractical to do it in the field, for the first few times it is better to do it calmly at home. The technique involves these steps:
- visual check of dirt
- cleaning with a special dustpan
- new visual verification
La check for dirt on the sensor is a system that gives us a detailed analysis of all the elements that are disturbing our images. In fact, there are often more compromised points than you would normally see. The procedure involves software Adobe come Bridge, Photoshop o Lightroom, let's see how to take the first steps:
- On our computer we prepare an empty text file and send it to full screen, in order to have a large white area
- On our camera let's get ready for a monitor shot at these settings
- a memory in the room
- file raw
- ISO 100
- Aperture Priority (Av or A) with intermediate aperture such as f8
- +1 Stop overexposure ("+/-" function)
- Manual focus on infinity
- We frame the screen so we only see white and shoot
With Adobe Camera Raw it's easy to find all the dirt
Now it's time to do the visual verification. We transfer the image just taken to the computer and open it with one of the programs mentioned above; each of them will start Adobe Camera Raw, the raw interpreter that every Adobe program uses to handle raw files; Lightroom uses it as a base. The next steps are these:
- We look for the Dust Removal or Spot Removal function, it has a patch icon
- activate the "view spots" option
- let's adjust the slider to exclude background noise and show only the largest points
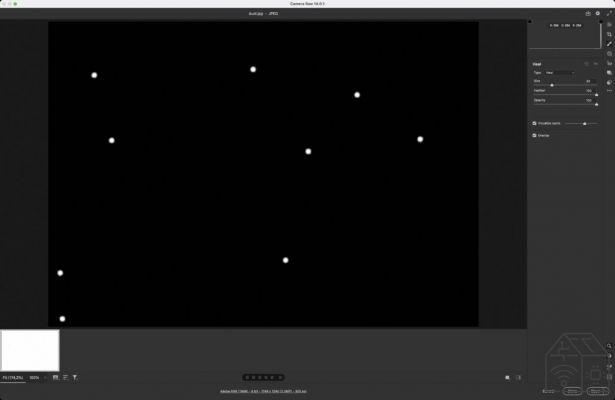
In this way we have a precise map of the level of dirt on the sensor. It will be important to evaluate our level of cleanliness. We close the software and reposition the memory in the camera for cleaning.
Cleaning the sensor with the special scoops
On the market there are several kits to clean the sensor, they all look a bit alike because in common they have plastic blades wrapped in a non-woven fabric that does not release hair. THE kits came according to the size of your sensor, we can have 5 sizes:
- Full Frame
- APS-C (Sony, Nikon….)
- APS-C solo Canon
- 4/3
- micro 4/3
In the kit is, as a rule, included the specific liquid for cleaning glass surfaces. Do not use other liquids! If we use a DSLR we must have the battery well charged otherwise the manual sensor cleaning function will not be available while for a mirrorless the question usually does not arise as the sensor is visible. Let's start this delicate phase:
- DSLR only: in the camera menu we look for the manual sensor cleaning function
- only mirrorless: Turn off the camera
- remove the lens from the camera
- we open a sealed scoop
- we moisten the final part with 4-5 drops per side
- we lean the paddle against one of the short sides of the sensor
- we apply pressure so that the paddle bends a little
- we drag the paddle towards the other short side and keep the pressure on the surface
- without detaching the paddle from the sensor we return to the starting side
- we remove the paddle from the sensor and throw it away
- let's reassemble the optics
Good! We have done our cleaning; it's time to repeat the control test. If there are still some dirty spots, repeat the operation with a new palette. Used scoops contain dust particles and are no longer useful for cleaning.
When there are sensor points with stubborn dirt put 1-2 drops on a new scoop and increase the pressure on the glass; remember that you only have to go back and forth and avoid cleaning the sensor only locally.
Field emergencies when the sensor cannot be cleaned
What to do when we don't have any cleaning kit with us? We can always get help from the camera with a little trick. On Canon cameras there is a function called “dust mapping”. It is a particular shot that records the points of the sensor that have dirt on them. This data will be used by the software Canon Digital Photo Professional to apply an automatic correction of our images.
Nikon you use the function Dust-Off and then corrects it with Capture NX.
Another technique, useful for all brands, is to photograph something very homogeneous and neutral, like the empty text for the dirt proof just seen. This image can be used by the program Capture One and its function "LCC“, Which allows the correction of optical colors and dust on the sensor.
 Photo Solutions Sensor Cleaning Swabs Type 2 Pack 12...
- Easy as one and done
- One-step cleaning process
- Travel safe


