


After several years you have finally decided to change your old smartphone, because it is no longer updated and has also become very slow to use. For this reason you have decided to switch to one of the modern smartphones on the market, in order to have an updated, fast device and also with a better camera.
Your old smartphone still had the possibility to remove the back cover, for example to remove the battery and insert SIM and / or microSD, but your new smartphone is completely different, because it no longer allows the removal of the back cover. Faced with this novelty, you feel a bit confused and you don't know well how to insert the SIM inside your new smartphone.
Do not worry. Nobody is born with all the knowledge in their pocket, so don't be ashamed of having doubts that for other people can be trivial. On the contrary, let me be the one to give you a hand and make you reach your goal without asking for help from relatives or friends. Below you will find detailed instructions on how to insert the SIM on all the most popular models of smartphones and tablets. You just have to locate the one in your possession and follow my directions. You will be amazed at how simple it is.
Index
How to insert the SIM in the phone
On the market there are really many smartphones of different brands, but more or less the indications regarding how to insert the SIM in the phone they are similar. In some cases, however, the position of the SIM tray may change and some models also have the possibility of using two at the same time. Here are all the details.
How to insert the Xiaomi SIM
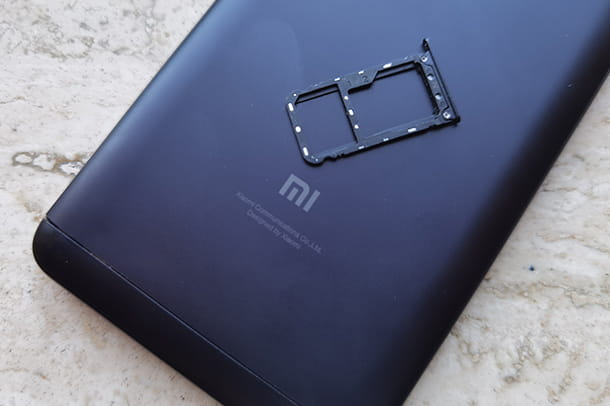
As a new smartphone you have decided to opt for a model of Xiaomi, because they offer models with a high quality / price ratio or simply you have been struck by a particular model. To start using it, however, you must first understand how to insert Xiaomi SIM. First thing I recommend you do is to turn off your smartphone, in case you have already turned it on. Then take the metal paper clip to open the SIM compartment inside the smartphone package. Well, now you need to check the side frame of your Xiaomi and locate the location of the SIM compartment.
In this case I'll show you how to insert the SIM in the Redmi Note 9, but the procedure is practically the same for most of the models of the Xiaomi brand. In the case of the Redmi Note 9, the SIM tray is on the left side. Once identified, insert the metal paper clip present in the package inside the hole present in the SIM compartment and apply a slight pressure. In a few moments you will see that the SIM trolley it will come out slightly and you can take it out. Now you just have to insert your SIM inside the trolley that has just been extracted into the special housings, respecting the direction of insertion.
Now put the SIM tray back inside the smartphone, pressing lightly if necessary. To check that you have inserted the SIM correctly, turn on your smartphone and wait for the system to ask you for the PIN of your SIM, if present. If it is not active, all you have to do is check that the SIM icon is active in the status bar.
How to insert Samsung SIM
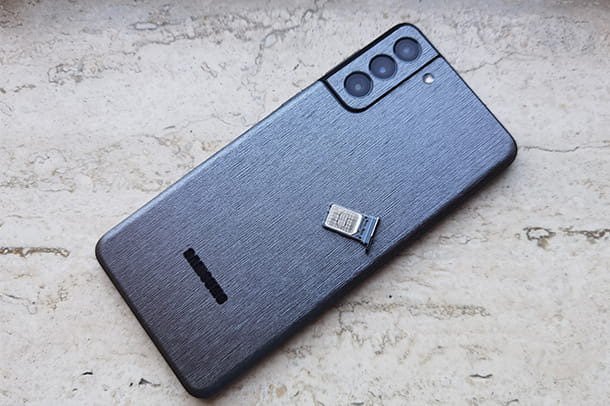
You've spent hours and hours looking for your new smartphone, but in the end you decided to play it safe and opt for a model from Samsung, because you prefer to have the confidence of an established brand or you simply liked a particular model of Samsung. To start using it, however, you must first understand how to insert samsung sim. First thing I recommend you do is to turn off your smartphone, in case you have already turned it on. Then take the metal paper clip to open the SIM compartment inside the smartphone package. Now you need to check the side frame of your Samsung and locate the position of the SIM compartment.
In this case I'll show you how to insert SIM in Galaxy S21 + 5G but the procedure is practically the same for most of the models of the Samsung brand. In the case of the Galaxy S21 + 5G, the SIM compartment is located on the underside, next to the USB Type-C port. Once located, all you have to do is insert the metal paper clip present in the package inside the hole of the SIM compartment and press lightly. Well now the SIM trolley it will come out slightly and you can take it out easily. Take your SIM and insert it into the special slots, respecting the direction of insertion. Once done, put the SIM tray back in the smartphone.
To check if you have inserted the SIM correctly turn on your smartphone and wait for the system to ask you for the PIN of your SIM, if present. If it is not active, all you have to do is check that the SIM icon is active in the status bar.
For more details on how to insert the SIM on a Samsung smartphone you can take a look at my tutorial.
How to insert SIM HUAWEI

Your previous smartphone was HUAWEI brand, you found yourself very well and for this reason you decided to buy a new smartphone of the brand. Your new model, however, is really very different from the previous one and you still don't understand how to insert SIM HUAWEI. Don't worry, that's what I'm here for.
The first thing I recommend you do is to turn off your smartphone, in case you have already turned it on. Then take the metal paper clip to open the SIM compartment inside the smartphone package. Well now check the side frame of your new HUAWEI and locate the location of the SIM compartment.
Com practical example, I'll show you how to insert SIM in HUAWEI P40 Pro, but the procedure is practically the same for most of the models of the HUAWEI brand. In the case of the HUAWEI P40 Pro, the SIM tray is located on the underside, next to the USB Type-C port. Once located, all you have to do is insert the metal paper clip present in the package inside the hole of the SIM compartment and apply light pressure. You will see that immediately the SIM trolley it will come out and you can take it out easily. Here we are: take your SIM, insert it inside the trolley in the special slots, respecting the direction of insertion and put it back in the smartphone. If necessary, apply light pressure to close it.
To check that you have inserted the SIM correctly, turn on your new HUAWEI and wait for the system to request the insertion of the PIN of your SIM, if present. If it is not active, all you have to do is check that the SIM icon is active in the status bar.
For more details on how to insert the SIM on a HUAWEI smartphone you can take a look at my tutorial.
How to insert SIM OPPO
You were fascinated by the new smartphone models presented by the brand OPPO, so you have decided to buy a new smartphone from the brand. Your new model, however, is really very different from your old smartphone, so you still struggle to understand how to insert SIM OPPO. Don't panic, here are some tips that will come in handy.
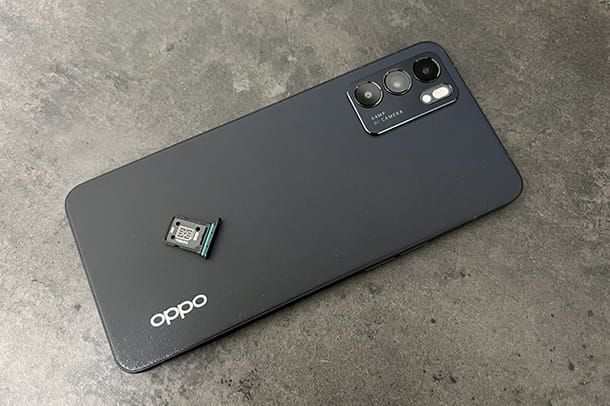
To start I recommend you turn off your smartphone, in case you have already turned it on. To open the SIM compartment, take the metal paper clip that you find inside the smartphone package. Well, now check the side frame of your new OPPO and locate the location of the SIM compartment.
In this case I'll show you how to insert the SIM in the OPPO Reno 6, but the procedure is practically the same for most models of the OPPO brand. In the case of the Reno 6, the SIM tray is located on the underside, next to the USB Type-C port. Once located, all you have to do is insert the metal paper clip present in the package inside the hole of the SIM compartment. By applying a slight pressure you will see that the SIM tray will come out and you can easily extract it. Now all you have to do is take your SIM, insert it into the special slots, respecting the direction of insertion and put the trolley back inside the smartphone.
To check that you have inserted the SIM correctly, turn on your new OPPO smartphone and wait for the system to request the insertion of the PIN of your SIM, if present. If it is not active, all you have to do is check that the SIM icon is active in the status bar.
How to insert the SIM in the Brondi Amico Mio
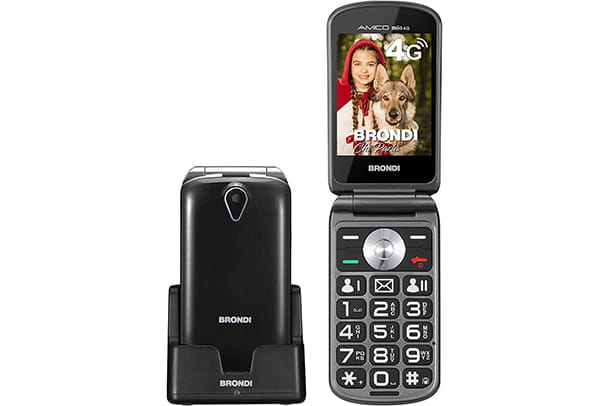
You have recently purchased a new phone for your grandfather or for your parents who have now become elderly, so to make things easier you have opted for a Brondi Amico Mio, a phone designed to be easy to use. Before you can deliver it, though, you need to understand how to insert the SIM in the Brondi Amico Mio, but for now you have not been successful.
Don't worry, inserting the SIM into this phone is easier than you think. Unlike new smartphones, you just need to insert the SIM or access the battery remove the cover placed in the back, usually by applying a slight upward or downward pressure. Once the lid is removed you can remove the battery and you will also notice the presence of a slot dedicated to the insertion of the SIM, as in the phones of several years ago. Well, all you have to do is insert the SIM into the slot, put the battery back in its place and close the cover.
To verify that you have inserted the SIM correctly, you will only need to turn on the phone and wait for the request to enter the SIM PIN. If the latter is not active, just wait for the SIM icon to appear in the status bar at the top and be careful that there is no icon of the "X" on it. If the icon appears "X", you have probably inserted the SIM incorrectly, so you just have to check, trying to be careful of the direction of insertion.
How to insert the SIM in the iPhone
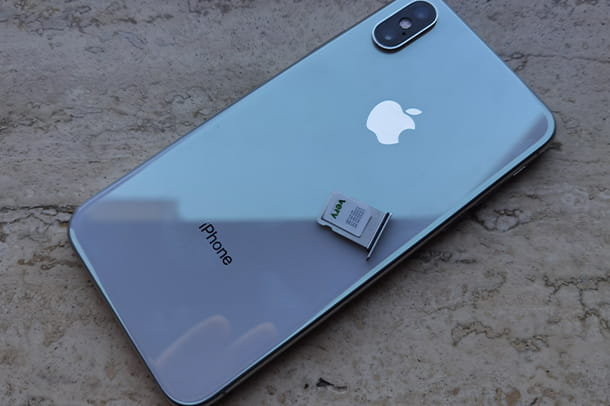
After so many years with an old Android smartphone you have finally decided to switch to an iPhone, to try a completely new user experience. You like your new iPhone a lot, but there is a small problem: how to insert SIM in iPhone 12? Don't worry, it's easier than you think.
In the case of the iPhone 12, the SIM tray is located on the underside, next to the Lightning port. Once located, all you have to do is insert the metal paper clip present in the package inside the hole of the SIM compartment. Now apply a little pressure and you will see that the SIM trolley it will come out and you can take it out easily. Now insert your SIM inside the trolley, in the only slot present and put it back inside the iPhone.
To check if you have inserted the SIM correctly turn on your new iPhone and wait for the system to ask you to enter the SIM PIN, if present. If it is not active, all you have to do is check that the SIM icon is active in the status bar.
How do you say? You want to know how to insert SIM in iPhone 11? No problem, the tutorial is also valid for iPhone 11, only in the case of this model the SIM compartment is located on the right side of the device.
For more details on how to insert the SIM on iPhone you can take a look at my tutorial.
How to insert the SIM in the tablet
After some time you have finally decided to buy a tablets and you have decided to opt directly for a model also equipped with cellular connectivity, so that you can insert the SIM and always have a connected device, even when you are away from home. If you have come this far, however, it is because you are wondering how to insert the SIM in the tablet, real? This is a more than legitimate question, so in the next few paragraphs I will show you how to deal with the main models.
How to insert the SIM in the iPad
Before you see how to insert SIM into iPad you must check that you have a model with cellular connectivity in hand. If you don't know, iPads are also available in the Wi-Fi-only version, on which no SIM can be inserted. To immediately understand if you have a model with SIM support, just check if there is a compartment dedicated to inserting the SIM. It is usually located on the right side of the iPad.
Once identified, all you have to do is remove the SIM tray using the metal paper clip attached to the sales package of the device. Once removed, insert the SIM into the slot and put the trolley back inside the iPad. It wasn't difficult was it?
For more details on how to insert the SIM on iPad you can take a look at my tutorial.
How to insert the SIM in the Samsung tablet
Just like Apple too Samsung produces tablets with cellular connectivity on which it is possible to insert a SIM, so as to be able to surf even when not connected to a Wi-Fi network.Moreover, unlike iPads, many Samsung tablets equipped with a SIM can be used also to make calls, just as if they were smartphones.
The Samsung tablets on the market are really many, but the procedure for inserting the SIM is almost the same for everyone. In this case I will show you in detail how to insert SIM into Samsung Tab 2 tablet. First of all you need to identify the location of the SIM compartment, in this case it is located on the right side of the tablet. To extract it, all you have to do is insert the inside of the hole metal paper clip present in the package and exert a slight pressure. In a few seconds you will see that the SIM tray will come out and you can easily extract it. Now take your SIM and insert it inside the special housing and put the trolley back inside the tablet.
To check that everything went well, turn on the tablet and wait for the request to enter the SIM PIN, if active. Otherwise, just check that the SIM icon is active in the status bar at the top.
For more details on how to insert the SIM on a Samsung tablet you can take a look at my tutorial.
How to insert the SIM into the Lenovo tablet
Another very active company in the tablet sector is Lenovo, which produces different models for all price ranges and some of them come with support for the cellular connectivity. How do you say? You recently bought a new Lenovo tablet but still don't get it how to insert SIM into Lenovo tablet? Don't worry, that's what I'm here for.
The recommendations are practically always the same, so the first thing you need to do is identify where the SIM compartment is, recognizable by a small hole or a real door that can be easily opened. As a practical example I will show you how to insert SIM into Lenovo Tab 10 tablet, but the procedure is practically the same for the others as well. Well then, after identifying the position of the SIM compartment, in this case on the right side, open the door and remove the SIM tray. Now all you have to do is insert your SIM into the special housing of the trolley and insert the trolley back into the tablet.
To check that everything went well, turn on the Lenovo tablet and wait for the request to insert the SIM PIN. If the PIN is not active, just check that the SIM icon is active in the status bar at the top.
For more details on how to insert the SIM on a Lenovo tablet you can take a look at my tutorial.
How to enter the eSIM
Some latest generation smartphones, especially the high-end models, have introduced the possibility of using one eSIM, in addition to the normal SIM. The eSIM is one digital SIM which allows you to activate a cellular plan with your mobile operator without having to use a physical SIM. In this way it is also possible to enable dual SIM support on devices that do not have it, such as iPhone. How do you say? You would like to know more about how to insert the eSIM on your new smartphone?
Of course, that's what I'm here for. Below I will show you how to insert the eSIM on Android and iPhone smartphones that support this technology.
How to enter the eSIM on Android
You have recently purchased a new Android smartphone and you have noticed that within the software there is an entry regarding the possibility of inserting an eSIM. There are not many Android smartphones that support eSIM, among these we find the Google Pixel, all the latest top of the range Samsung, HUAWEI P40/P40 Pro and Motorola Razr.
You have one of these models and you want to understand how to insert the eSIM on Android? Well, this is a very simple process. If you have an Android smartphone such as Google Pixel or Motorola, go to the Settings, easily recognizable by the gear icon.
Now, among the various items present, tap on Rete and Internet and subsequently on Mobile network. On the next screen, tap the button + placed at the top right or, if it appears, on the banner that reads "Do you want to download an eSIM?". Well, now the system will open a window with the camera, all you have to do is point it at the QRCode of your eSIM. Once the eSIM is recognized, tap the button Confirmation and then on the button Attiva.
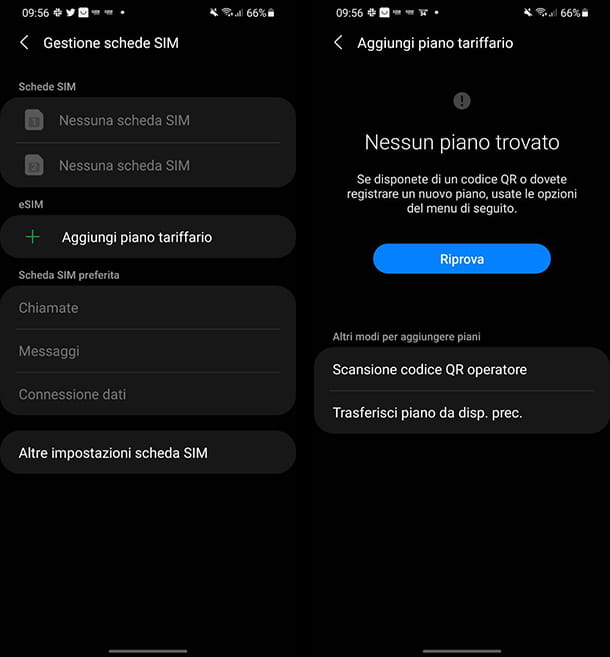
If you are using a smartphone instead Samsung, the process is slightly different. Go to the Settings, easily recognizable by the gear icon. Now, among the various items present, tap on the item Connections and subsequently on SIM card management. To add an eSIM, just tap on the item Add rate plan and subsequently on Operator QR Code Scan. Now you will have to proceed exactly as indicated above, scanning the QR code of your eSIM and in a few seconds it will be active.
How to insert the eSIM on the iPhone

You have an iPhone and would like to use an eSIM inside it in order to enable the dual SIM support. Nothing simpler, but first to show you how to insert eSIM on iPhone a clarification must be made: eSIM support is only available on iPhone XS / XR and later models. If you have one of these models you can proceed without fear.
On the iPhone, you can activate an eSIM using its QR code or entering the data manually. Grab your iPhone and open the app Settings, easily recognizable by the gear icon.
Now, tap on the item Mobile phone and next on Add cellular plan. In a few seconds a screen will open through which you can frame the QR code provided by the operator via the camera. If you want to proceed manually, for example if you have problems with the camera, tap on the item Enter the data manually, placed at the bottom.
On the next screen you will have to enter all the required data, that is SM-DP + address, Activation code e Confirmation code. Once entered, tap the button NEXT and then on the button Attiva.
Mission accomplished, you can now use your eSIM inside your iPhone. It wasn't difficult was it?


![[Review] Samsung Powerbot VR7000: the robot vacuum cleaner from Star Wars](/images/posts/6bc44de38605b5c0fa12661febb1f8af-0.jpg)


