


You travel often and, as you have seen other friends of yours do, you would like to be able to indicate the position in which you are currently also in the biography of Instagram. Or you have a company, you would like to be able to enter the address of the office in the biography of your Instagram profile but you do not know if it is possible to do so and, if so, how to do this.
No problem: if these are some of the questions you are asking yourself and, therefore, you would like to know how to place the place in the instagram bio, don't worry, because you just came across the right tutorial at the right time! The social network owned by the Meta group, in fact, offers some options relating to what you requested and in this guide of mine I will talk about them in detail, indicating all the steps to take to make the most of them.
If, therefore, you are now curious to know more and you can't wait to start, make yourself comfortable and just take a few minutes of free time, carefully follow the procedures I am about to show you and you will see that you will succeed easily and quickly in the intent. that you proposed. At this point, there is nothing left for me to do but wish you a good read and, above all, a good time!
Index
How to put the position in the Instagram bio
If you wonder how to place the place in the instagram bio, you must first know that, as regards the biography of the profile, Instagram does not provide a native tool useful for adding a specific position, as it is possible to do in the stories of the social network (using the appropriate sticker).
However, at the time of writing this guide, one of the possible solutions to this need is to manually write the name of the position in which you are, modifying the section of the Biography of your Instagram profile.
You can easily do this both from mobile, using the Instagram app for Android (also downloadable from alternative stores) and iPhone, and from PC, by connecting to the Web version of the social network or using its application for Windows. Let's see together how.
Android / iOS
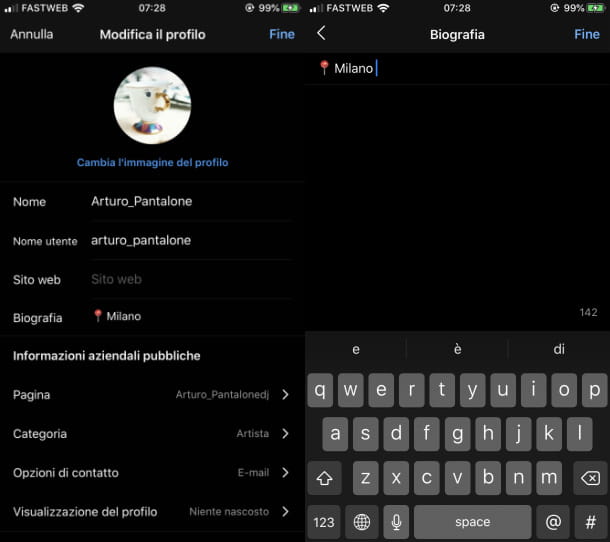
To put the position in the Instagram bio from a smartphone, start the Instagram app, and log in to your account (if the login is not automatic). Then press on thumbnail of your profile, to go to the latter.
Once this is done, press the button Edit profile and refer to the box Biography, in which you can write a personalized sentence that, as I have also explained to you in this other tutorial of mine dedicated to the topic, must summarize your interests and the reasons why people should start following you.
Once this is done, type the place name you want to add and, if you wish, you can accompany this position you wrote (for example ) with emojis. On Instagram some of the most used to indicate a place are the flags emojis or theworld emoji,plane o that of the stylus.
However, these are just a few examples: you can insert the emoji you prefer, choosing it from the emoji keyboard of your device. If you have any problems, refer to my tutorial where I explain how to type smileys using the keyboard.
Once you have finished customizing your profile, confirm the changes made by pressing the icon √. You can repeat this operation as often as you wish, as there are no limits to editing the biography of your Instagram profile.
In case of doubts or problems, refer to my tutorial dedicated to the topic.
PC
Do you want to change the biography of your Instagram profile from PC, to write the place where are you currently? Nothing could be simpler: now I'll explain how to do it.
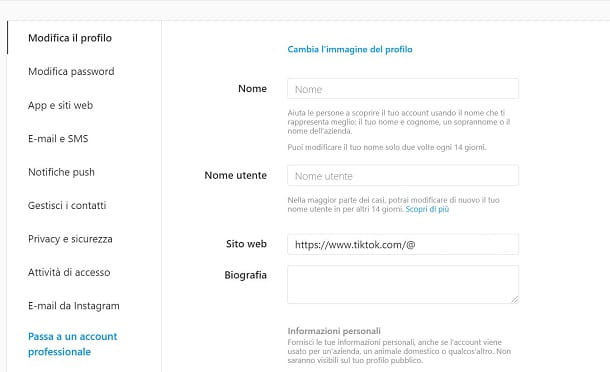
To start, connect to the official website of the social network using a browser to browse the Internet, or start the previously installed Windows application.
Once this is done, log into your Instagram account, if you haven't done so yet, press on your del icon Profile and then click on the entry Profile, to go to the latter.
Adesso, premium pulsating Edit profile and, in the text field Biography, enter all the information concerning your profile in the social network, including the place where you are.
Also, in case, you can embellish the caption by adding emojis via your computer keyboard. At the end of the changes, confirm the changes made by pressing the key end.
How to put a place in the Instagram bio
An alternative solution for put the place in the Instagram bio is to switch to an Instagram account for professionals, in order to be able to enter a precise geographical address in the latter, using the specific native functionality relating to the addition of an address relating to one's workplace.
Usually, in fact, this feature is designed for companies that need to be reached by customers in their physical location, but nothing prevents it from being used even by those who do not own a company with its geographical address.
In order to do this, you must first have made the switch to a Instagram account for professionals. This operation is completely free and brings with it several advantages, including the ability to access the tool Insights Instagram, thanks to which you can view the statistics of your account.
The transition to a Instagram account for professionals it is also reversible and the activation / deactivation and configuration procedure can be carried out using both an app and a PC: here's how.
Android / iOS
put a place in the Instagram bio, by switching to a professional account, log in to Instagram through the app you downloaded on your device.
Once this is done, go to the menu Settings> Accounts and press on the item Switch to a professional account. Now, select the category describing your account and, in choosing the type of business account to activate (Creator o Company), choose the option Company since making the switch to an account Creator it is not possible to insert an address in the biography of your Instagram profile.
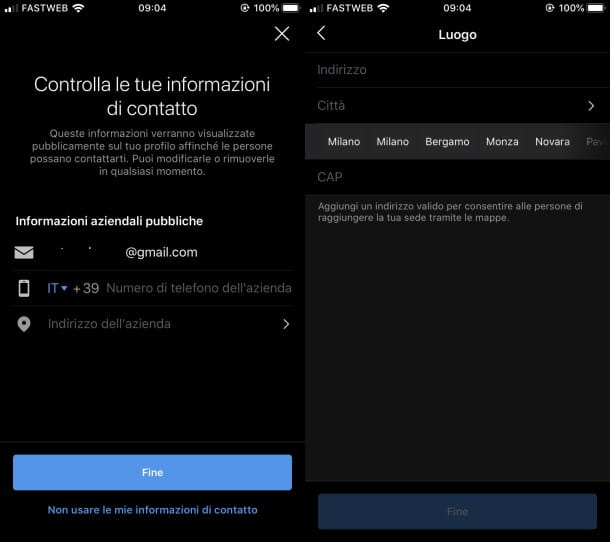
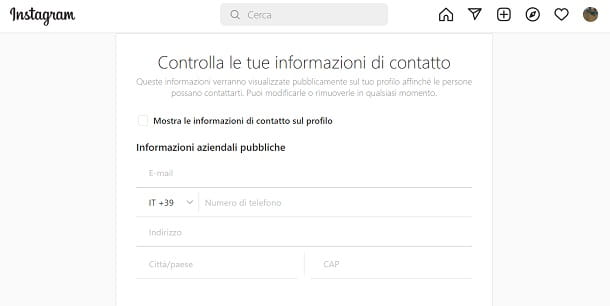
Then continue with the configuration of your Instagram account and, when prompted, use the text field Company address, to type the place you want to insert.
You can write a precise address, complete with city e POSTAL CODE or just type the city. Also, make sure the option Show contact information is enabled. Once the customization is complete, click on the button NEXT and optionally connect yours Facebook page ..
Once the configuration is complete, the address you set will be visible on your profile screen, in the section dedicated to Biography.
Also keep in mind that you can change theaddress or the city that you have entered at any time. To do this, tap on the item Edit profile in correspondence with your profile, then, in the next screen that is shown to you, tap on the item Contact options.
Finally, press onaddress or on place previously entered by you, to modify it. To confirm the changes made, click on the button √.
If you have any doubts or problems, refer to my tutorial where I tell you more in detail about how to make a bio on Instagram.
PC
To switch to a corporate account from PC, first log into your Instagram account from the web or application and click on the your profile, in order to go to the section Settings.
Once this is done, click on the item Switch to a professional account e scegli l'opzione Company, in order to add a place to your profile.
Continue by pressing the button NEXT and customize your profile by choosing one category among those proposed. Then press the button end and type in the contact information, including a address and / or one city in the appropriate text fields.
Also, be sure to check the item Show contact information, to ensure that what has been entered is visible on your profile. Finally, press on the buttons Save e end.
If you encounter any problems relating to the transition to the corporate Instagram account, read my tutorial dedicated more specifically to this operation.


