


La digital signature it is a tool through which professionals, companies, private citizens and public administrations can attribute legal value to electronic documents. It is a form of qualified electronic signature and is based on some fundamental principles: authenticity, integrity, not repudiation e legal validity, as the signed documents are intact - in the sense that they have not undergone changes after signing -, they can be traced back to a specific person who cannot repudiate their paternity and enjoy legal value (recognized in 2022 and throughout the European Union) equal to that of the handwritten signature, with a further guarantee on the provenance and invariability of the information contained in the signed documents.
To obtain the digital signature you need to purchase a special "package" from a certification body which, operating in compliance with the current legislation on Digital Signature and the technical rules issued by AgID (the Agency for Digital 2022), guarantees the identity of the subjects who use the digital signature. The digital signature is generally provided through a kit consisting of a hardware device (for example a USB key or a smart card reader) to be connected to the PC, a digital signature certificate (generally provided via smart card and with a validity of three years ) and by software that allows you to apply a signature to electronic documents. The software can be supplied “as standard” with the kit or can be available for download on the website of the certifying body. Alternatively there are the services of remote digital signature, in which the signature certificates are hosted on the secure servers of the certifying body and therefore it becomes possible to affix or verify the signature on electronic documents (even from smartphones and tablets) without using a physical smart card or hardware devices to be connected to the PC. In these cases, the signature is applied instead of via the smart card PIN, via an OTP code to be generated via the app or via a physical OTP device.
You can apply digital signature to any file: ranging from classic PDFs to Word documents. Another important thing to know is that to use a digital signature kit you must verify your identity (through a specific procedure in accordance with the law) and you must activate the kit through the website of the certifying body. I know, it sounds like a very complicated operation, but in reality I assure you that things are different: everything is much simpler than it seems. If you don't believe it, take five minutes of free time and find out how to digitally sign thanks to the indications of this per darti.
Index
- What is the digital signature
- In digital firm kits
- How to obtain the digital signature
- How to use the digital signature
What is the digital signature
Before we get to the heart of the tutorial and see it in detail how to digitally sign, it is good to clarify the technical definition of this tool and its difference with the electronic signature. Wanting to get straight to the gist of the matter, we can say that the digital signature is an electronic signature that has a certain legal value, but it is better to be more precise and emphasize the differences between the various types of electronic signature.
- Electronic signature - it is the simplest type of signature and has no intrinsic legal value (as it does not require the use of tools capable of guaranteeing the authenticity and integrity of the signed documents). It is up to a judge to assess, on a case-by-case basis, the authenticity of a document signed with a simple electronic signature.
- Advanced electronic signature - it is an electronic signature generated by means that allow to demonstrate the integrity of the document, over which the signer has direct and exclusive control (eg a tablet owned by the signatory). The terms of use and limits of use are described and agreed from time to time between the parties involved.
- Qualified electronic signature or digital signature - is the most advanced form of electronic signature. It is applied with qualified tools, such as the signature kits that are purchased from certification bodies, so it has full legal value and certifies both the originality and integrity of the signed documents. The digital signature involves the use of asymmetric cryptographic systems, i.e. cryptographic systems in which a pair of keys (one public and one private) is used to verify the integrity and originality of the signed documents. It has full legal value.
The digital signature can therefore serve both companies and private citizens and PAs. You can use it to sign contracts, invoices, communications with the PA, budgets, purchase orders and more. It also allows you to check the validity and integrity of the documents received.
It then favors the dematerialization, that is, the set of activities that make it possible to reduce paper consumption (with positive implications also in ecological terms) and save both money and time at the same time; just think of the queues avoided in physical offices and the lack of need to search / reorder paper documents in your archive. Furthermore, electronic documents are much easier to consult and share, for example via email or via messaging systems such as WhatsApp.
La digital signature is also mandatory for public funding or tenders: its failure to affix on documents is in fact cause of exclusion.
Speaking of mandatory: many digital signature kits also include the National Service Card (CNS): a certificate that allows you to verify your identity when accessing the portals of the Public Administration, for example on the Revenue Agency website, and which is mandatory for some types of professionals, such as lawyers, to access reference portals (e.g. the Justice Portal).
Finally, one thing I really care about: the digital signature should not be confused with the PEC, which does not allow you to sign individual documents, but rather gives legal value to the messages that are exchanged via e-mail. I told you about it in more detail in my tutorial on what PEC is and how it works.
In digital firm kits
As mentioned at the beginning of the post, to use the digital signature you need to purchase a special kit. There are various types of kits and their prices generally vary between 30 and 60 euros.
The simplest kits to use are those in USB format, which can be divided into token USB e key all-in-one: the former allow the use of smart cards in SIM format with small readers similar to USB sticks and provide for the download of the signature software separately; the all-in-one keys, on the other hand, act as USB tokens and include both the smart card with the signature certificate and the software for applying the latter.
Alternatively, there are the more traditional kits which consist of a credit card-sized smart card with the signature certificate and a smart card reader table. In both cases, the signature certificate has an average validity of 3 years, which must be renewed near the expiry date.
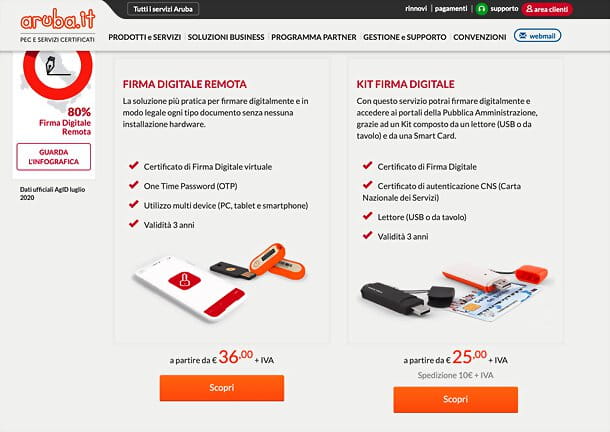
For example, I'll point out i kit di Firma Digital Aruba, certainly among the most complete and interesting of the moment, which involve the use of such devices.
- Aruba Key (61 euros + VAT; 10 euros + VAT for shipping) - is a USB key with smart card in SIM format that connects to the computer and already includes both drivers and software for signing / verifying documents. Also includes the CNS authentication certificate. More info here.
- USB token (42 euros + VAT; 10 euros + VAT for shipping) - it is a USB key which, in this case, requires the prior installation of the drivers and the ArubaSign signature software. Includes smart cards in SIM and CNS format. More info here.
- Smart card + reader (40 euros + VAT; 10 euros + VAT for shipping) - includes a classic USB smart card reader and a credit card-sized smart card. Includes CNS. More info here.
There are also systems of remote digital signature that allow you to sign documents from any device, without using specific hardware components. In these cases, the signature certificate does not reside on a physical smart card, but on the secure servers of the certifying body, and this allows you to sign / verify documents, including smartphones and tablets, without using specific hardware devices and without having to carry with them. itself a smart card. To sign - instead of the smart card PIN - an OTP code generated by a smartphone app or by a special OTP device must be used.
Among the most interesting remote digital signature solutions is definitely the Remote Digital Signature of Aruba OTP Mobile which, for 36 euros + VAT (there are no shipping costs, as it does not require the sending of physical devices), allows you to have a digital signature certificate that can be used on PCs, smartphones and tablets and to generate OTP codes via the app Aruba OTP for Android or iOS / iPadOS. Alternatively, by adding 7 euros + VAT for shipping, you can request a Physical OTP device with integrated display or a USB physical OTP device to be connected to the PC for the generation of OTP codes.
How to obtain the digital signature

To purchase a digital signature kit, you need to connect to a certification body and choose the product that seems to you best suited to your needs.
Typically, the most expensive products are digital signature kits which include all-in-one USB sticks, while the cheapest ones are remote digital signature kits. If you already have a smart card reader or a USB token, you can also purchase the digital signature certificate only.
Among the most popular certification bodies, I would like to point out Aruba, which I already told you about, which offers excellent solutions for digital signature at affordable prices, but there are also other companies you could turn to: find the complete list on the website of the Agency for Digital 2022. And if you are the owner of a business, know that you can also request a digital signature kit from the Chamber of Commerce of your city. The steps necessary for purchase and activate a digital signature kit there are basically three.
- Purchase of the kit - as already mentioned, the first step you must take is to connect to the website of a certification body and purchase the kit of your interest. To complete the operation you will need to create an account on the website of the certifying body and provide all your personal data plus a valid payment method (card, PayPal, bank transfer or bulletin). In the case of Aruba, for example, just connect to the official website of the certifying body, select the product of your interest, create or access your account, verify your data, indicate the details of a valid identity document, choose a method of recognition, indicate the shipping address (if you are purchasing a physical kit), accept the contractual terms and make the payment.
- Verification of identity - to activate the digital signature it is necessary, by law, to verify one's identity. There are various ways to do this. In the case of Aruba, for example, it is possible to carry out the recognition via webcam or mobile app for Android and iOS / iPadOS, in person at a municipal office, or remotely via CIE (electronic identity card) or CNS / CNS Health Card ( Carta Nazionale dei Servizi) using a smart card reader to be connected to the PC.
- Activating the signature - after having provided all the necessary documentation and having verified your identity, you must connect again to the website of the certifying body and activate the signature, providing the serial number of the smart card, the social security number and other data obtained following the verification of the identity . In the case of the remote digital signature, on the other hand, it is necessary to enter the details of the document used in the identity verification phase and a secret code that is received via SMS.
For more detailed information on all three steps listed above, check out my guide on how to get a digital signature.
How to use the digital signature
After verifying your identity and activating your digital signature, you can start signing and verifying your documents. To do this, however, you may need to download the driver and signature software from the website of the certification body.
Downloading of drivers and signing software is required for smart card readers and USB tokens, but not for all-in-one USB sticks, which already include signing software and do not need drivers to function . As for the remote digital signature services, however, only the signature software and apps are needed.
Let's take a practical example with the Company Digital Aruba. If you have purchased an Aruba Digital Signature kit with ArubaKey, you do not need to install anything, as everything is already included in the key. If, on the other hand, you have purchased a kit with a USB token or smart card reader, you need to download the driver readers from the Aruba site and install them on Windows, MacOS o Linux, starting theexecutable obtained and following the instructions on the screen.
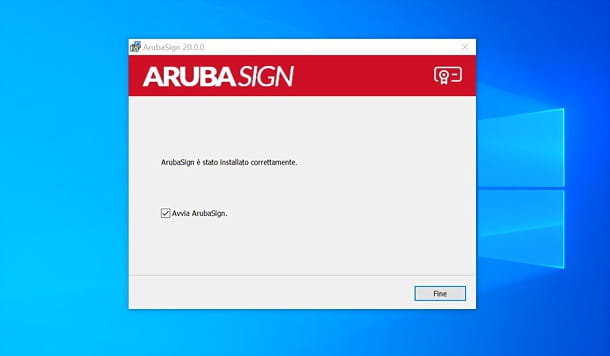
If you have an Aruba Digital Signature kit with USB token / smart card reader or have opted for the Aruba Remote Digital Signature, you must download the signature / verification software ArubaSign, available for both Windows (also in version for the visually impaired) and for MacOS e Linux. You can always find it on the Aruba website. To install it on Windows, start theexecutable obtained and click on the buttons and end.
Always if you have the Remote Digital Signature of Aruba OTP Mobile, you need to install the app Aruba OTP for Android or iOS / iPadOS (essential to generate the OTP codes needed to sign documents, after entering your username in the settings) and the app Aruba company for signing and verifying documents directly from Android and iOS / iPadOS devices and the signature software ArubaSign, to use the signature service on a PC.
Sign and verify a document
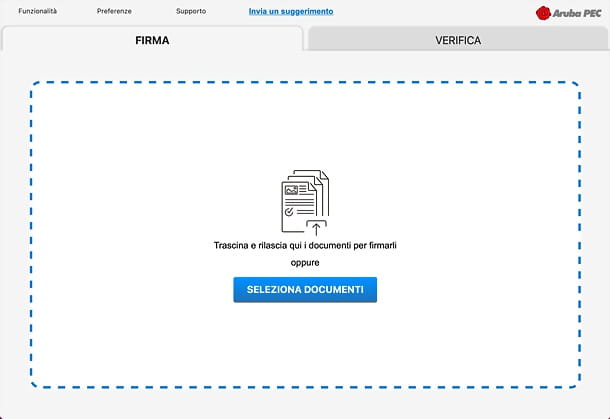
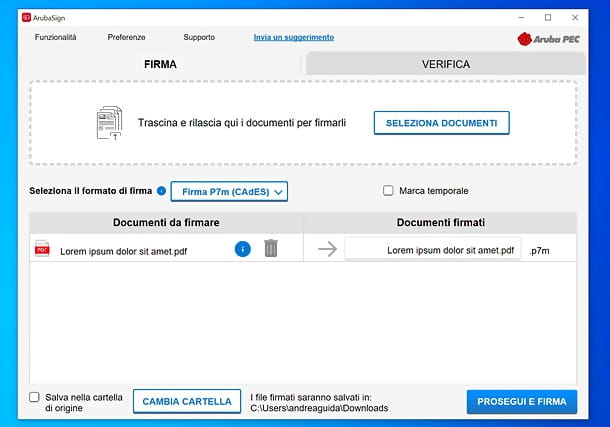
When you are ready to sign an electronic document, start the signature software included in your kit or that you downloaded separately from the certifying body's website (eg. ArubaSign), go to the tab Company and select the files to be digitally signed by dragging them into the program window or by clicking on the button Select documents.
At this point, select the signature format you want to use (eg. CADES, Pads o ASiC-S) from the appropriate drop-down menu and, using the appropriate box, choose whether to apply one time stamp to the document. The timestamp is a certification that allows you to verify the date and time in which a document was signed, extending the legal value of the latter and keeping it valid even in the event of the signature certificate expiring. More info here.
Then click on the button Go ahead and sign and, in the window that opens, indicate what type of signature to use between remote signature e signature with device; enter the relevant information in the fields below (username, Password e OTP code for remote signature or the PIN for the signature device), click on the button Continue and you will get your signed file.
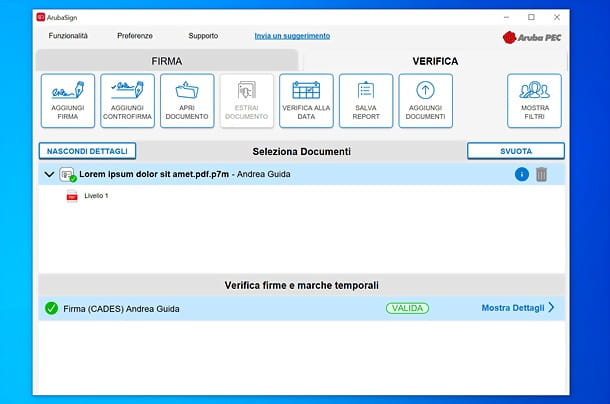
for verification of one or more documents already signed it is necessary to perform equally simple operations: in the case of ArubaSign, for example, just access the card Verifica and drag the documents into it (or press the button Select documents and select them "manually").
In a few seconds the data on the validity of the signature,trustworthiness of the certificate used and the legal validity of the latter.
Another thing you will be interested in knowing is that by going to the menu Pref Renze and selecting the item Functionality from the left sidebar you can choose whether to also display the tabs to activate the functions Figure, decipher e Time stamp.
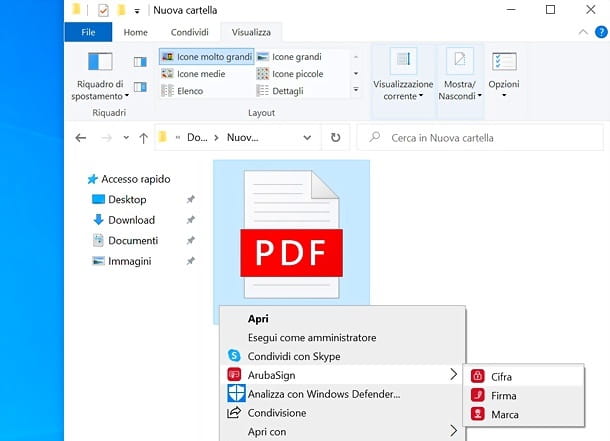
Finally, I would like to point out that ArubaSign it is also accessible from Windows context menu: just right click on a file to find shortcuts to functions Figure, Company e Brand of the program. All features offered completely free of charge, whereas many other similar solutions provide them only for a fee.
If you have an Aruba OTP Mobile Remote Digital Signature, you can sign and verify documents from the app Aruba company, available for both Android and iOS / iPadOS, simply by entering yours username in the field Username/IDLogin of the settings and going to the tab To sign.
From here, click on the button capacitor positive (+) lead, select the file of your interest, tap on his name and choose if sign it o verify it. In the first case, you can select the type of signature to use (eg. CADES, Pads o ASiC-S), activate the time stamp request and you can complete it by entering the first Password of your signature account and then the OTP code generated via app or physical OTP device.
In the second, you will automatically be shown all the information about the signature and the certificate used to authenticate the document directly in the app.

If you want more information on how the signature kit you have purchased works, I strongly recommend that you take a “leap” to the website of the certifying body: there you will surely find detailed documentation that illustrates all the software features. In the case of ArubaSign, for example, you can consult the official Aruba guide or my guide on how the Aruba Digital Signature works.
Use the signing certificate in third-party applications
USB key format digital signature kits, those that work without drivers and also include signature software, work in HID (Human Interface Device) mode but if necessary you can convert them to CCID devices, i.e. in common smart card readers that allow you to sign documents with alternative software to those included in the kit, such as Adobe Acrobat, LibreOffice o Microsoft Office.
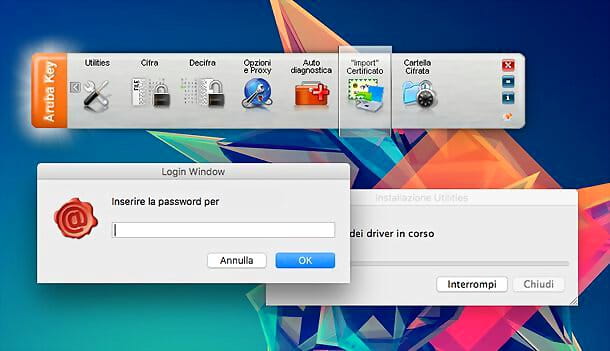
If you want to convert a USB signature kit into a CCID device, you must start the management software of the latter and call up the appropriate option. For example, if you are using an Aruba USB key you have to click on the item Utilities and select the option "Import" Certificate from the screen that opens, while if you use a Postecert signature kit you have to go to Chip management and select the icon HIDCCID. After selecting the option to convert the signature kit into a CCID device, you must follow the instructions on the screen and the operation will be completed within a few clicks.
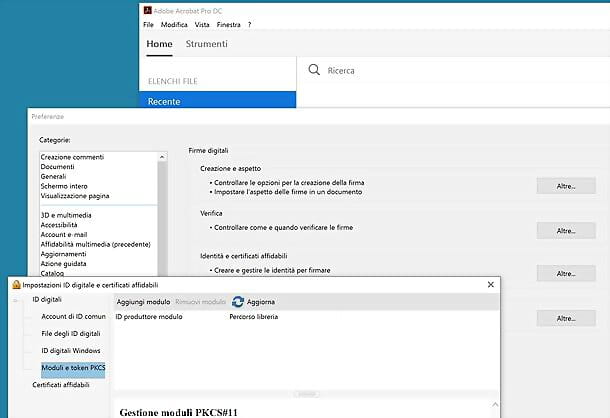
Now you need to configure the digital signature certificate in the "alternative" software with which you intend to sign your documents. If you want to use Adobe Acrobat, open the latter, go to the menu Edit> Preferences and select the item Firm from the side bar of the sinistra.
Next, click the button Other… which is in the field Trusted identities and certificates, expand the item Digital IDsi went his Moduli e token PKCS, pigia sul pulsating Add module and select the file for using the signature kit in CCID mode (called PKCS module): depending on the kit in your possession, it should be X: WindowsSystem32bit4ipki.dll, X: WindowsSystem32 bit4opki.dll or X: SystemFirma4NG_WindowsFirma4.
Finally, select the PKCS form from the field Moduli e token PKCS, make the login by entering the PIN of your signature certificate and signing your documents using the appropriate Acrobat function. More info here.
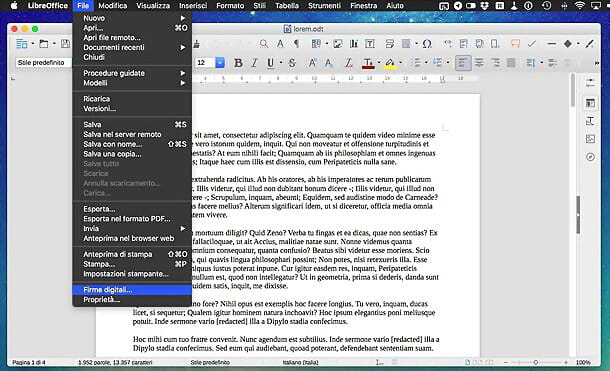
If you prefer to use LibreOffice o OpenOffice, you can call up the function dedicated to digital signatures on the menu Fillet (top left), while if you want to use Microsoft Word you have to go to the menu Fillet and you have to select the item Add digital signature from the menu Protect document.
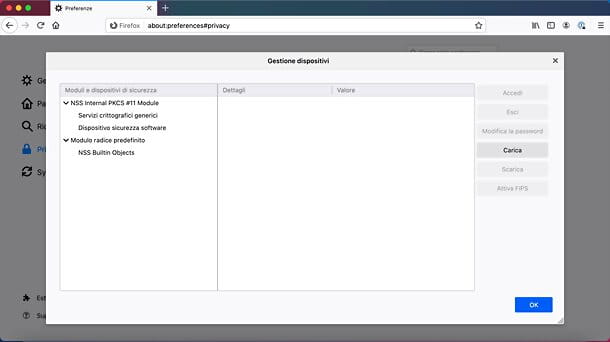
To use digitally signed certificates in applications such as LibreOffice, OpenOffice, and Microsoft Office, you may need to import them into web browsers first; an operation which among other things also enables the signing of online forms.
To import a certificate into Firefox, click on the ≡ button located at the top right, select the item Options / Preferences from the menu that appears and go up Privacy and security, then click on the button Safety devices (at the bottom of the menu). From here, click on the button Charge. For more information, see the Aruba Official Guide.
When you're done signing your documents with Acrobat, LibreOffice, or Microsoft Office, remove the digitally signed USB stick from your computer and the kit should work again in HID mode the next time you use it. If this is not the case, go to the Windows control panel or macOS application menu and delete the software that was installed when you activated the CCID mode of the kit (eg. And Switcher for Aruba sticks).
If at this point of the tutorial you are not yet able to digitally sign, try contacting the technical support of the certifying body. There could be problems with your kit or configuration errors that you left out when installing the device or certificate.
Article created in collaboration with Aruba.


![[Review] Samsung Powerbot VR7000: the robot vacuum cleaner from Star Wars](/images/posts/6bc44de38605b5c0fa12661febb1f8af-0.jpg)


