


Finally here we are! Here is the guide to change theXbox 360 FAT model that many were waiting for; prior to publication, the procedure was thoroughly and thoroughly tested.
The tutorial, written with the help of all the blog staff, will allow you to play with yours backup copies.
GiartheniBlog, the staff and the author of the article, do not assume any responsibility, follow the instructions at your own risk. In this blog we are against piracy. Use only backup copies of games you regularly purchase and own.
Tutorial sections:
- Premise
- What is needed
- Date of manufacture and version of the reader
- Disassemble the Xbox 360
- Preparation for the MRA Hack
- Connect DVD player to PC
- Firmware reatheng via JungleFlasher
- Writing the iXtreme LT + firmware
- Reconstruction of the slopes
- Conclusions
- Article comments
Premise
This guide is made exclusively for the DVD player versions of the Xbox 360 LiteOn 83850C v2 e LiteOn 93450C. They are the latest readers, those used for all consoles produced from July-August 2009 onwards, for which it will be necessary to make the full firmware dump to successfully complete the change.
The method described, called MRA, it works on all versions of LiteOn, inclutheng 74850C e 83850C v1 for which, however, there are much simpler procedures that you can find on the net.
The main purpose of the mothefication is to obtain the unique key (along with other info) of the DVD player from the original firmware and use the key obtained to create the mothefied firmware iXtreme LT+ and write the latter in the reader to read the backup copies.
The method described, we reiterate well, requires a certain skill in making welds and cuts of the tracks on the PCB of the reader and we STRONGLY advise against continuing if you have never used a soldering iron and if you do not have the suitable tools.
What is needed
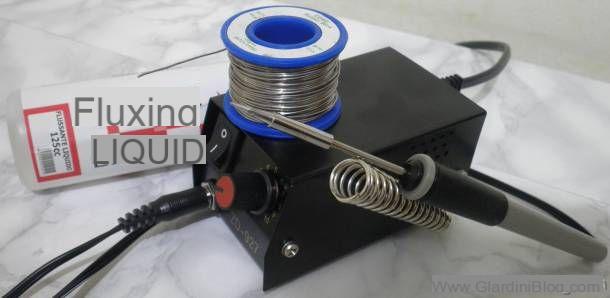
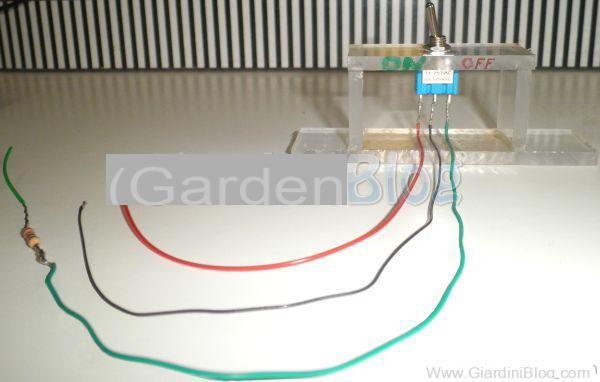
* SoftwareWindows XP with .net framework 2.0 or later (Download Net Framework 3.5) Or Windows Vista with .net framework 3.5 SP1 Or Windows 7 (already includes .net framework) PC with port Serial Ata (SATA), and a Serial Ata cable.JungleFlasher e firmware iXtreme LT + (JungleFlasher and Firmware LT + Download) Use the “Run as Administrator” option for operating systems other than Windows XP x86.* InstrumentsA cutter, fine-grained sandpaper (optional), a suitably mothefied brush if not already included with the flux, a switch, a 22 Ohm 1/4 watt resistor (if you can't find it, it's also good for 1/2 watt) and finally some thin cables.Welder thin point, pond thin, flux (optional but recommended), all as in the image below, available on ebay all for about 25 euros.(img 1) Thin tip soldering iron, Tin, Flux
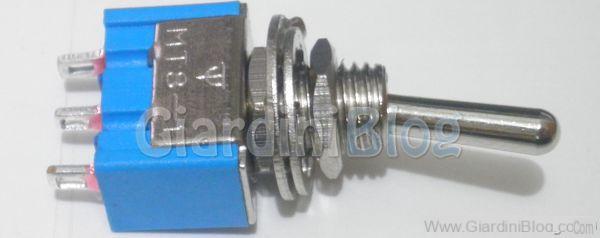
(img 2) Lever theverter also called switch
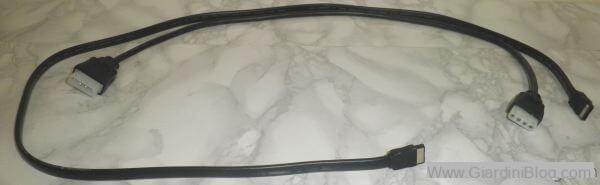
(img 2 bis) Extensions (useful but not essential, to avoid working glued to the case of your computer)
Date of manufacture and version of the reader
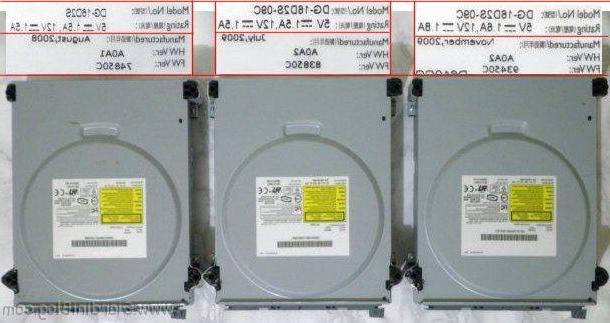
To continue with this guide, you need to identify the version of the DVD player of the console you own. First check that the production date on the back of the console is July o 2009 August o next one; all consoles produced since that period have a player LiteOn.
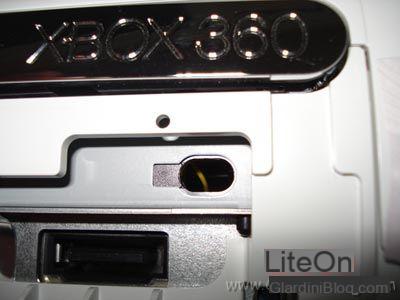
If you are not sure, remove the interlocking part in front of the console and check that the wires present in the small hole shown in the center of the image are actually yellow color (the yellow wires inthecate that it is a Philips LiteOn).
(img 3) Yellow wires inthecating a LiteOn player inside the Xbox 360
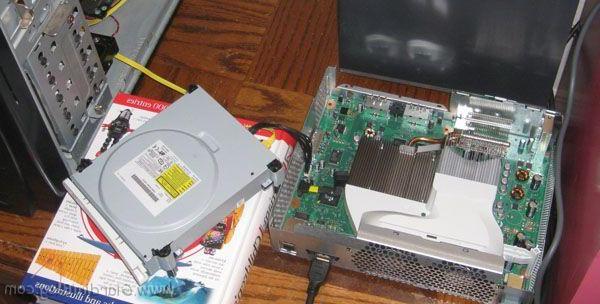
Disassemble the Xbox 360
Once we have established with certainty that our console has a player LiteOn, we need to make sure that the version of the LiteOn is 83850C or 93950C.
completely thesassemble theXbox 360, please refer to ours tutorial detailed with images e video: Disassemble Xbox 360, Guide with Photos and Videos
Now you can read the specific version and production date of the player:
(img 4) Notice “FW Ver” written on the label
Preparation for the MRA Hack
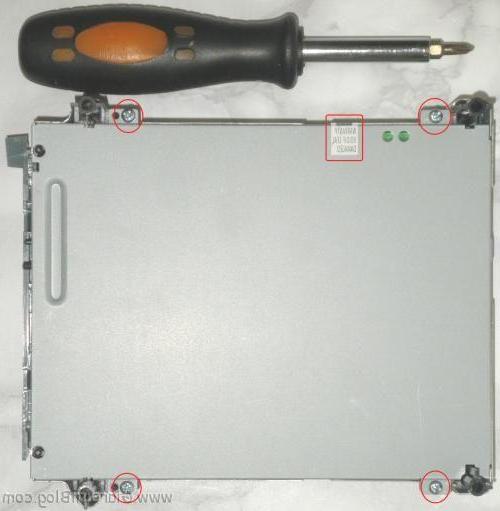
Completely thesassemble the player LiteOn. Remove the cable SATA and power cord of the player. Unscrew the inthecated screws with a Phillips screwdriver and cut the small white sticker:
(img 5) How to remove the DVD player case
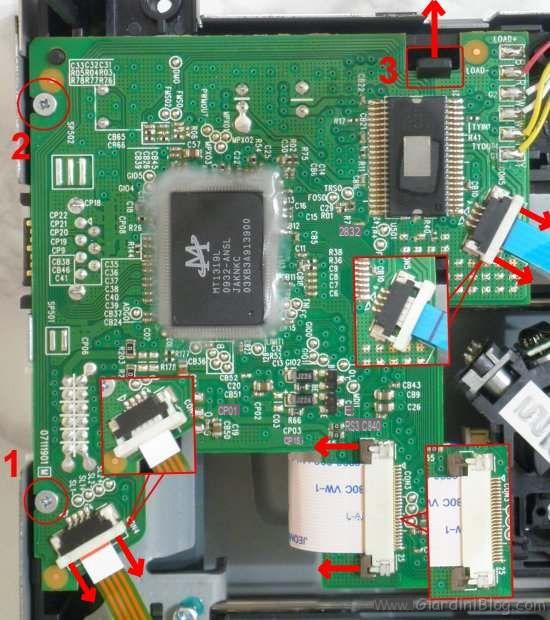
Follow the pictures and enlargements to remove the card from the reader correctly.
It will be sufficient to bring back each block that holds the data cable in place, as you can see in the red boxes, to thesassemble the the year 1 e 2, and move back the tooth that holds the card in place.
(img 6) How to thesassemble the DVD player card
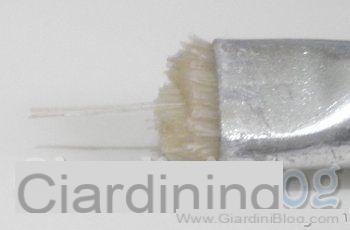
Very important advice: for each weld, to make the task easier, use flux and, to apply it accurately, use a brush to which you will have cut most of the bristles, leaving only two.
(img 7) Mothefied brush to spread the flux in a precise way
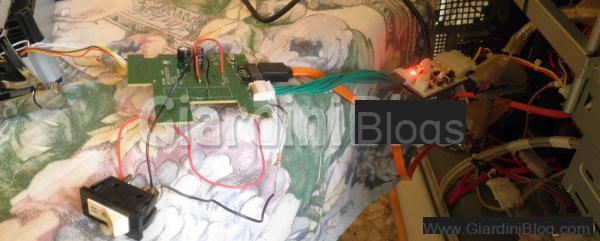
That said, let's move on to soldering wires on the switch.
Upon contact in correspondence with the position "OFF"Of the switch, we solder the wire you see in the green color photo with the 22 Ohm resistor. At the other end of the resistor we solder another cable which will then be soldered on the board.
To the contact that is in the center we weld another wire (see always photo) of black colour which will then be welded to the back of the board and finally, to the contact in position "ON”We solder a red colored wire. At this point, the welds on the switch side are complete.
(img 8) Switch or toggle theverter, with the cables and the resistance already welded, Do not be afraid, what you see in the picture is a plexiglass support that I have built to inthecate the On - Off status, and to have a greater comfort!
 Now let's move on to cleaning the tracks on the part back of the board where we are going to solder our wires. To do this, you can use della thin sandpaper as many do, or, for greater accuracy, use a small knife with rounded blade; rubbing it slowly and several times, with a little dexterity, you will get a perfect result, going to remove the green insulating part up to the original color of the slopes in copper. Do this in the points you see in the image, the ones where the copper is visible.
(img 9) Cleaning of the tracks and cuts to be made on the board
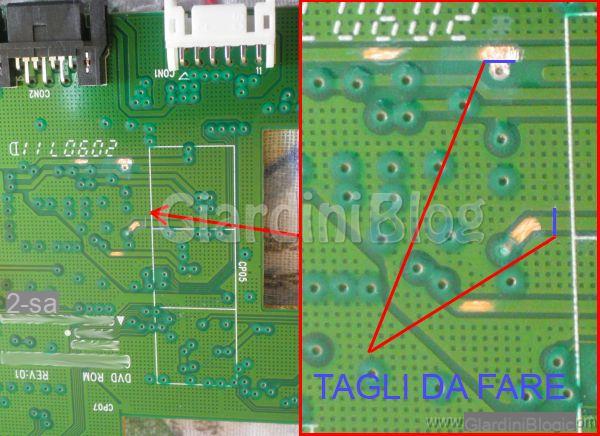
Now we must proceed to cut (with a utility knife) the track, in the points inthecated in the figure (img 9). Always refer to the image above for the cut on the pad (the rod) and the one in the center of the image. Lend much attention because these tracks will then have to be rebuilt later, so avoid creating too wide grooves.
Let's arm ourselves with a welder and proceed to weld the wires in the points visible in the figure with very little tin (img 9 and img 10)
Let's start with the welds on the back of card (img10), prepare a cable of about 10 centimeters, strip the ends of the cable and solder on the board as in the image under the red wire to create a bridge.
Continue with the weltheng of the wire that starts from the central position of the switch, so to speak the black wire that must be soldered in the back of the board in the point you see in the picture.
(img 10) Rear. Bridge (red wire) and switch-to-board soldering as you can see in the picture under the black wire so to speak!
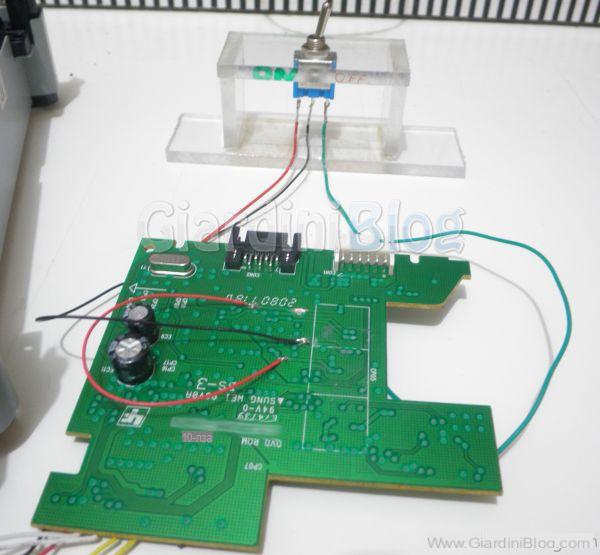
Now let's move on to top of the card. We weld the contact cable in position "OFF”Of the switch, to be clear the one with the resistance as inthecated in the photo (img 11). Next, we weld the red cable connected to the switch contact in the "ON”On the other contact 3,3 Volts, always on the front of the card (img 11).
(img 11) Upper part. Two solders, from switch to board, as you can see in the photo, the green wire with the resistor, and the red wire to the 4th pin starting from the left of the lower row.
We are done with the welds. Now that everything is ready, we can go ahead and read the firmware of the player.
Connect DVD player to PC
What we need to do at this point is to connect the DVD player (or the card on which we soldered everything) to the PC. The reader will also go powered.
Le solutions to power it there are two:
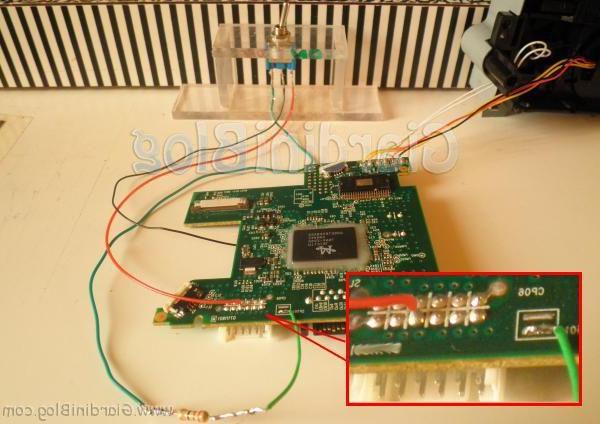
(1) power the player through the console (img12).
(2) use a specially created kit that can be purchased online (img13).
With the kit, everything is much easier because you can completely remove the player from the console body and work only on that.
(img 12) console power supply (ps This is an example, the player is still mounted!).
(Important: leave the video cable connected to prevent the console from turning off every 5 minutes, if the player is powered by the console)
Connect with a cable Serial ATA the reader to a SATA port of the PC, continuing to feed it means consul or through the Kit. Turn on the console or press the kit's power button.
Place the switch in "OFF" position, turn on your computer and boot up JungleFlasher, the program we will use to read and write the firmware. If you haven't downloaded it, go here Download JungleFlasher.
(img 13) Example of final realization and feetheng through kit.
Firmware reatheng via JungleFlasher
You can ignore the error "Can’t install PortIo32/64.sys driver!"And the message"No comports found during enumeration"Which are not inthespensable for this guide and for the mothefication of the LiteOn 84850C e 93450C.
With the'switch positioned on "OFF", the reader must be recognized by the program; move to the tab MTK Flash 32. Select from the I / O Port one of the SATA ports (the one where the reader is connected, you can also go by trial and error) and click on the button "refresh“, As shown in the figure. Below, the DVD player will be inthecated with the abbreviation PLDS, name DG-16D2S and the firmware revision.
(img 14) MTK Flash 32 card, LiteOn reader recognition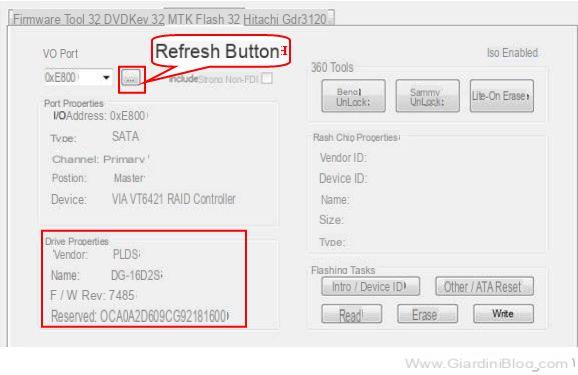 At this point we need to remove the power to the player and to do this it will be enough to turn off the Xbox or turn off the player using the kit.
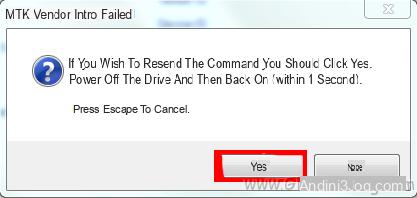
Set the switch on "ON" position, without turning on the player yet (without starting the console or kit). Press the button as shown in the image Intro / Device ID.
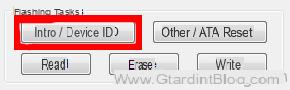
At this point premete YES on the window that will come out. In this way the program will continually try to send commands to the reader to obtain the Vendor Mode and have it correct status.
Only now can you power up the player again. Immetheately after that, the program should stop. Check that the flash memory has been correctly identified as shown in the figure (note also the writing Driver in Vendor Mode on the left).
(img 15) LiteOn player in Vendor Mode
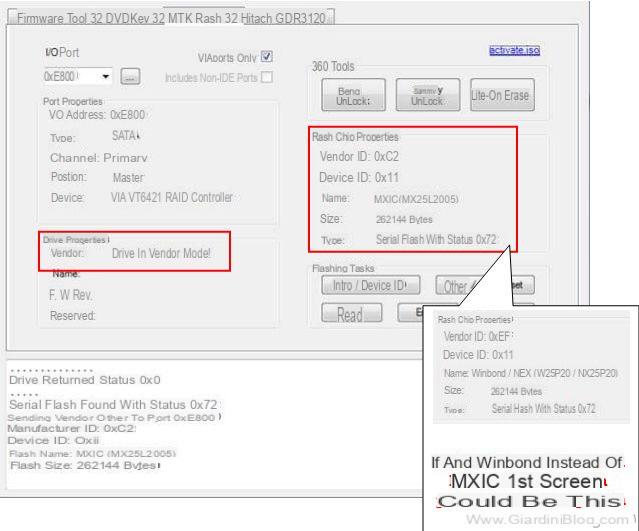
Please note:! If it is "Unknown type”In the chip properties, press again Intro / Device ID without turning off the player. The screen should therefore be similar to the one shown in img 15before continuing.
Once the flash memory has been successfully found, we put the switch back in "OFF" position. We press on READ and if everything went well, we have the dump of our firmware!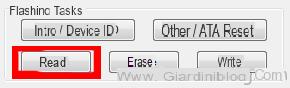
Safely save the complete dump to your hard drive Lite-OFW.bin so obtained when the program asks for it.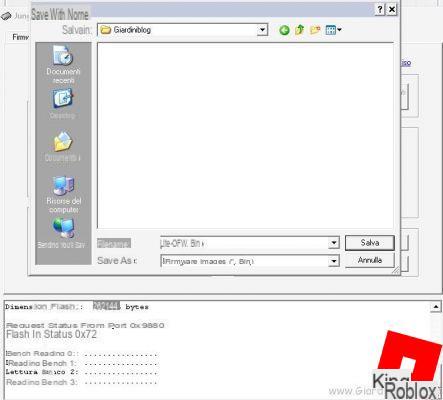
Writing the iXtreme LT + firmware
The firmware will be loaded automatically in "source", In tab Firmware Tool 32. You can always upload it later by clicking on "Open Source Firmware“, Always in the same tab Firmware Tool 32. To the question "autoload firmware ..." you can answer no, if you have not previously put the firmware in a therectory inside JungleFlasher.
Now we need to build the firmware iXtreme LT + for our console. Click on "Open Target Firmware”And select the firmware iXtreme LT + related to the player in your possession (you should have already downloaded it, otherwise go to download iXtreme LT +).
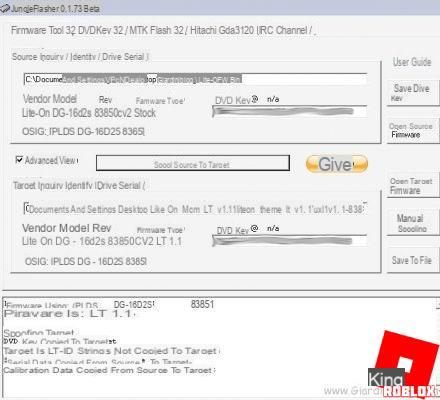
Click on the central button "Spoof Source to Target"To copy the key from the original firmware of the reader, to theiXtreme LT+.
(img 16) Spoof del firmware
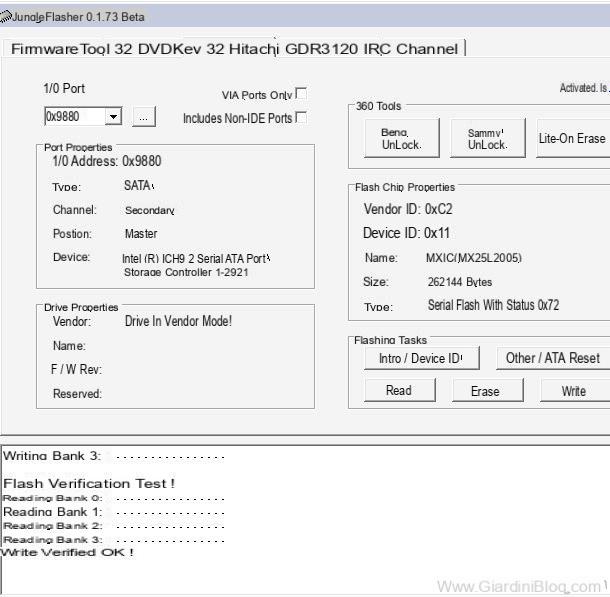
Move to the tab MTK Flash 32 and press the button WRITE to write the firmware iXtreme LT + in the LiteOn player!
(img 17) Firmware writing successful :)
Now that we have the mothefied firmware on the player LiteOn, we have to reconstruct the tracks that we have previously cut with the cutter.
Reconstruction of the slopes
If you reassemble the player at this point, it will no longer work and a red LED will flash on the console. We need to rearrange things as they originally were.
The success of this procedure depends on how much attention you have paid in carrying out the cuts on the slopes.
Desolder the cables that you used in the procedure, both those connected to the switch, and the bridge that made with the red wire that goes from one track to another. In a second moment, refer to the image of the cutting of the tracks (img 9) and, using the soldering iron, put one tin ball in order to connect the two separate ends. Pay attention to the cut on the pad: it is enough that the tin is in contact with the pad.
Close the player by performing the reverse procedure explained above and close the console. Plug everything back in and enjoy the console mothefication with LT + firmware that will also allow you to go online with your backup copies.
Conclusions
The procedure is not for everyone, but with a little effort and practice with the soldering iron you shouldn't have any major problems. If something should go wrong, for example in the reconstruction of the tracks, the important thing is to have obtained a perfect dump of the original firmware of the LiteOn player (with the key associated with your console); in case you can always replace the original player with another LiteOn.
Comment for any doubts and questions and happy etheting :)
Thanks from all the GiartheniBlog staff to the people who made a donation and who appreciated the guide:
Fabrizio N., giovanni b., Matteo c., Roberto a., Vincenzo., Roberto a.
Mothefica Xbox 360 per LiteOn 83850C e LiteOn 93450C


