Our video
Loading your video "FAQ: Windows 7 - User management"Configure your PC
As with Windows Vista, with Windows 7 you can benefit from a work environment all your own, as you have defined and personalized it. This configuration and adjustment work involves the use of user accounts. Their primary function is to allow different users to share the use of the same computer. This is particularly ideal for family use of the PC. But the user accounts are not only used for that since they make it possible to optimize the security of the computer by defining the rights which each one has, for example to install new software or modify certain sensitive files.
These security settings, along with those that allow Windows to function optimally, are grouped together in Action Center, which replaces the Security Center in Windows XP and Windows Vista. It gives quick access to all monitoring tools to ensure the best possible data integrity and prevent crashes.
USER ACCOUNTS
What if multiple Windows were installed on your computer? With user accounts, this is somewhat the case so that each person using it has their own environment. A user corresponds to an account and therefore a Desktop, a user folder and many personalized settings. Several people can easily share the same computer without disturbing others.
Windows 7 offers two main types of user accounts: administrator and standard user. With the first one, you have full rights to the computer, so you can access your own files as well as those of other users. With the second, these rights are more limited since it is impossible to modify or even consult the files of other users and you cannot necessarily install all the software you want. This last point is related to security and it is also what makes a standard user account better to protect against viruses and other malicious programs.
On a family computer, the ideal configuration might therefore look like a password-protected administrator account for parents, plus a standard user account for each child. A priori, this first administrator account was created when installing or starting Windows for the first time. It's the one you use every day, although it might not be password protected.
Create a user account
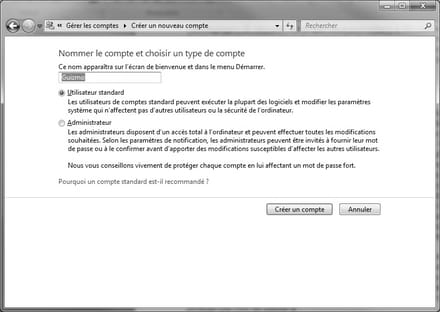
To create a new user account, click on the Start button and then on "Control Panel". In the "User accounts and protection" section, click "Add or remove user accounts". In the window that appears, choose "Create a new account". Name this account and select its type "Standard user" or "Administrator" before clicking on the "Create an account" button.
Modify a user account
The different accounts you have created appear in the "Manage accounts" window. They are all represented by a small colored sticker.
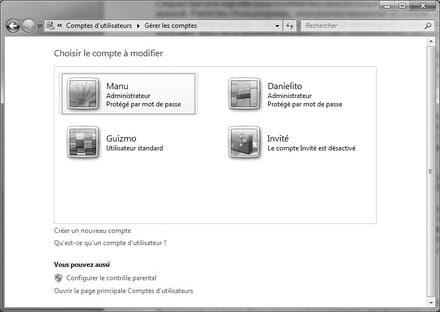
Click on a thumbnail to modify the characteristics of the account associated with it. Among the choices offered, you can rename the account, change its image and even its type. Click on the links provided to do so if you wish. But two things particularly require your attention: the password and parental controls.
Password
For data security, it is best if at least each administrator account is password protected. To do this, click on the "Create a password" link then, in the "New password" field where the mouse cursor is placed, enter your password. Confirm it in the "Confirm password" area and validate by clicking on the "Create a password" button.
Parental control
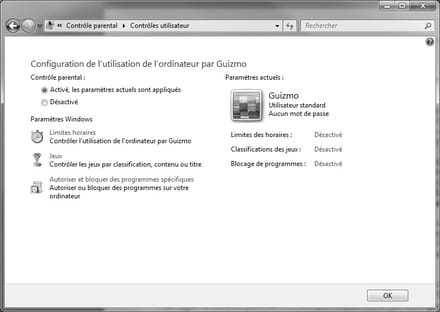
Particularly useful in the case of an account used by a child or a teenager, parental control makes it possible to define certain rules of use of the computer. You can thus limit the hours when your children are allowed to use it, prevent them from playing or using certain types of programs and finally set limits for Internet use.
For parental controls to be effective and its settings accessible, all administrator accounts must be password protected.
To set parental control for an account, click on the “Configure parental control” link then on the thumbnail of the account to be set. In the window that appears, first select "On, current settings are applied" then, in the "Windows settings" section, click on each of the links provided to make the appropriate settings. Click on “OK” to validate all these parameters and close the window by clicking on the red cross at the top right.
Start an account
If several user accounts have been defined, Windows when starting the computer offers you to choose which of them it will open. This welcome screen presents the different thumbnails representing the available accounts. Click on the one of the account you want to use, enter if necessary the password associated with it and click on the small arrow next to this field. Windows starts up on the desktop of the selected account.

Switch between accounts
To change the user account when the computer is in use, click on the Start button to display the Start menu and then on the small arrow at the bottom right, next to the “Shut down” button. In the menu that appears, choose "Change user".
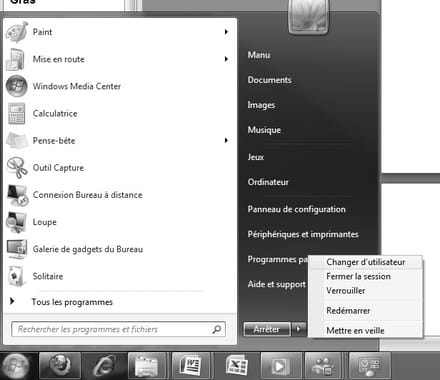
At this time, a new window appears, but the current user session is not terminated. Your programs and files remain open, even if you open a new account. To do this, click on the thumbnail of the user of your choice.
TO KNOW
Although convenient, this switch from one account to another affects the performance of the computer because the first account is not closed by opening the second and continues to consume RAM. To avoid this problem and close an account before opening another you can, instead of "Change user", choose "Log off".
Delete a user account
To delete a user account, click the Start button and then click Control Panel. In the "User accounts and protection" section, click "Add or remove user accounts". In the window that appears, click on the thumbnail of the account to be deleted and click on the “Delete account” link. Choose to “Delete files” or “Keep files” linked to this account and finally click on the “Delete account” button.

Change the setting of User Account Control
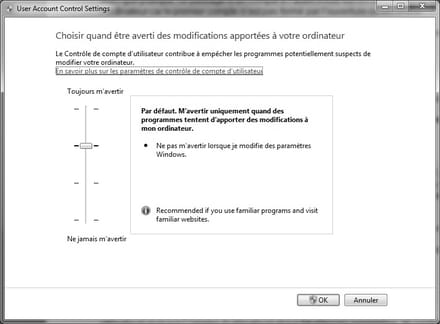
User Account Control is security software built into Windows 7 whose role is to prevent programs from modifying your system without your consent. Thus, it can warn you in the event of action on important files or settings of Windows, asking you what behavior to adopt. You can then choose to validate or invalidate these actions.
There are several levels of settings for User Account Control, more or less secure but also more or less annoying in the daily use of the computer. It's up to you to find the best compromise, knowing that the level proposed by default, "Warn me only when programs try to make changes to my computer", is sufficient for normal use.
To change this setting, you must first open an administrator account. Then, click on the Start button and then on Control Panel to open the latter. From there, click on "User accounts and protection" then on "User accounts" and on "Change user account control settings". In the window that appears, choose the level that suits you by moving the height cursor between “Always warn me” and “Never warn me”. Click on "OK" then on "Yes" to validate.