In short, it is a tool that you should have on your computer and that works much better than the option to capture a full screen using the key that we have available on the keyboard.
So let's see how to download and activate this interesting Windows feature. Although we will also recommend an app that performs the same function and has some additions that make it much more interesting.
What you should know when you disable and enable the Snipping Tool in Windows 10
When we deactivate this tool, what we really do is enable a policy that prevents it from running ; therefore, it will be quite normal to see an error window once you try to start the application. However, when you roll back the operation there will be no problems with activation or any error windows.
Disabling 'Snipping' is not a good idea a because of how useful it is. Screenshots with this key are more selective and customized than the 'ImpPt' key, so it is possible that replacing the tool with this key does not have the same results or may not meet our needs. A good reason to disable this feature would be to use a downloaded application that contains more features and is more complete.
Steps to activate the Snipping Tool in Windows 10 if it doesn't show up
In the same tutorial we will see how to disable or enable the Snipping Tool in Windows 10, since we have to do everything from the same place. This tool is a native feature of Windows 10, so it cannot be uninstalled, although it can be disabled if you wish.
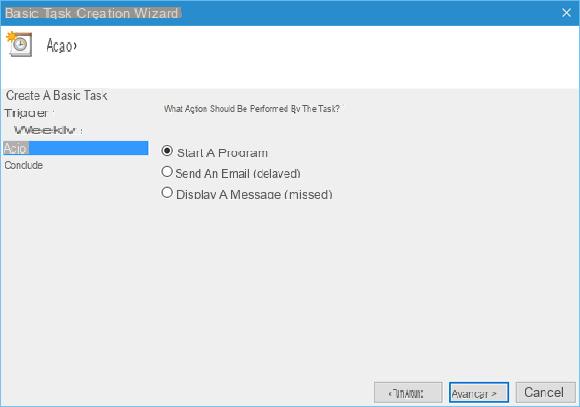
- The first thing we should do is type " regedit »After pressing» Start »Or the» button Windows »On our physical keyboard.
- Now we need to go to the following path from the left sidebar of the window: HKEY_LOCAL_MACHINE SOFTWARE Policies Microsoft.
- Here we will have to check if the key " tablet PC »Exists in the left sidebar. If it doesn't exist we have to create it. For this we will click with the right mouse button on » Microsoft «, Then we will go up New> Key and we will write " tablet PC «.
- Subsequently, we press on " tablet PC »And on the right side of the window we will have to create a new value. For this we simply right-click on an empty space and choose New> 32-bit DWORD value.
- The name we will assign is " DisableSnippingTool »And we create it.
- As soon as we create it, we will have to double click on it and here comes the magic.
- If we want the cropping tool to remain disabled, the value we have to enter is " 1 ". But if we want to keep it activated, it must be " 0 «
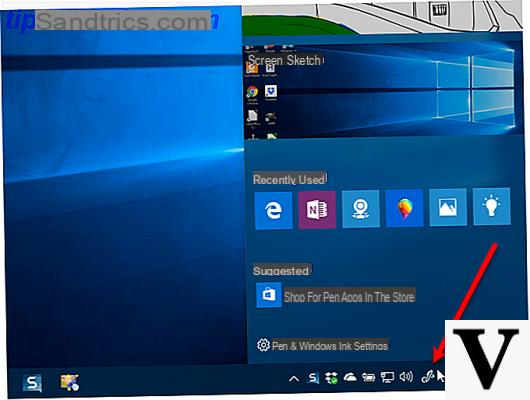
How to take a screenshot with the Snipping Tool in Windows
Let's go to the search bar and type «Snipping tool», this will appear in the applications section. Once opened, let's go up and click on the 'New' option ; In the next section we will find 'Mode' which refers to which parts of the screen the capture covers.
This window offers us several options such as the ' Hand cut free ', which allows us to select specifically with the mouse what we want to cut ; the 'Rectangular cutout', which allows you to cut into a rectangle; 'Window clipping', which selects the window to click; and finally, the «Full Screen Crop», which covers the entire screen.
Once we have determined what the cutout will look like, the capture will be made automatically, showing it on the blank sheet of the tool, as we will have it available in the clipboard.
Disable the Snipping Tool in Windows 10
To do this, yes recommends making a backup copy of the Windows registry. Once this is done, we can proceed to follow these steps:
- In the search bar of the main menu we enter 'gpedit.msc', where the common Microsoft console document will appear.
- When it opens, in the "Local Computer Policy" section, we will go to "Computer Configuration"> "Administrative Templates"> "Windows Components"> "Tablet PC"> "Accessories".
- We will find a list in the central panel and in the configuration 'Do not allow the snipping tool to run'.
By opening this window, we can view the configuration of this policy, to activate it, we will only have to mark the option 'Enabled', by clicking on 'Apply'. We press «Accept» to complete the process.
Things to consider when disabling or enabling the Snipping Tool in Windows 10
This tool can be very useful for making specific acquisitions of certain areas of the screen. It's not the same as using " Imp Pnt Pet Sis »Which is the button to take screenshots of everything that happens on our computer screen.
Likewise, in case you want to use a good cropping tool, we recommend that you disable the tool that comes by default in Windows and use Lightroom. This app is capable of taking screenshots in the same way as the Windows function, but with additions.
You can edit your captures before saving them by adding symbols, arrows, text, etc. Ideal for those who want to teach something specific, do tutorials, etc. Plus, you can configure any key on your keyboard or mouse to capture instantly.
It is a comprehensive application that makes things a lot easier for us when it comes to acquiring full screen captures or specific areas, available for both Windows and Mac users.
We hope you have no doubts about how to activate the Snipping Tool in Windows 10. If you still have questions, you can leave them in the comments area a little further down.