


Kodi is a powerful open source mediacenter available on many platforms, it allows us to easily manage our multimedia catalogs and even view streaming content. In particular, it has a catalog of extensions to make it richer in functionality. Let's take a quick tour of the application available on Android to see how it installs and works.
Before tackling the tutorial, let's see together what Kodi is and what it allows.
What is Kodi?
Kodi (Formerly XBMC) is a free media player. It was created for the first Xbox, it is the successor to the Xbox media player. But the development team then ported the software so that it could run natively under GNU / Linux, Mac OS X, Microsoft Windows, Android and iOS. As a media center, Kodi can play most audio and video file formats, and display images from any source. It also gives the possibility of play video streams or podcasts with the addition of addon.
Here is the list of formats that Kodi can play (and yes there are a lot of them):
- Support physique : CD, DVD, Video CD (including DVD-Video, VCD/SVCD and Audio-CD/CDDA)
- Formats d'extensions : AVI, MPEG, WMV, ASF, FLV, MKV, MOV, MP4, M4A, AAC, NUT, Ogg, OGM, RealMediaRAM/RM/RV/RA/RMVB, 3gp, VIVO, PVA, NUV, NSV, NSA, FLI, FLC, and DVR-MS (beta support)
- Video format : MPEG-1, MPEG-2, H.263, MPEG-4 SP et ASP, MPEG-4 AVC (H.264), HuffYUV, Indeo, MJPEG, RealVideo,QuickTime, Sorenson, WMV, Cinepak
- Audio formats : AIFF, WAV/WAVE, MP2, MP3, AAC, AACplus, AC3, DTS, ALAC, AMR, FLAC, Monkey's Audio (APE), RealAudio, SHN, WavPack, MPC/Musepack/Mpeg+,Speex, Vorbis and WMA.
- Formats photo/image : BMP, JPEG, GIF, PNG, TIFF, MNG, ICO, PCX and Targa/TGA
- Subtitle formats : AQTitle, ASS/SSA, CC, JACOsub, MicroDVD, MPsub, OGM, PJS, RT, SMI, SRT, SUB, VOBsub, VPlayer
However, Kodi is not the easiest software to use, which is why we are offering this tutorial to teach you the basics.
How to install Kodi on Android?
Nothing very complicated here, whether you use your Android smartphone, your tablet or your box, you just have to go to the Play Store and install the application. There is also a remote control application to manage Kodi from your smartphone if, for example, you use it on the computer.
There you have Kodi installed on your Android device, now let's move on to using it.
How to use Kodi to play video?
When you start the application for the first time, it is in English, here is the procedure to change the language.
- Press “cogwheel icon, System”, “interface seetings”
- Then go to “regional”, “language, French”. You will probably have to wait a few seconds then you will notice that the interface is now in French.
To play a video we can count on the huge variety of formats that can read Kodi. It is good to underline that not only one can play a video stored on the device but also remotely, SMB, FTP, etc ... It is a strong point of the application, moreover it will avoid you having to store your videos on your smartphone. However, streaming playback is ideal if you have a good bandwidth, especially in uploading (sending), and if you watch the videos stored on a NAS or a computer at home while you are moving.
- On the main menu: choose the genre of videos (films for example), then “add a source”.
- If it is local, ie on the smartphone, in “browse”
- You must select either “Root” or “External storage”.
- It is also through this that we can add a remote source such as a NAS or a computer for example.
- When you return to “films” you will have the source that will appear to view the available content.
- Here you have access to all your videos
Of course the manipulation will be the same for images and music. We are going to move on to the most interesting subject of Kodi which is the possibility of adding Addons or extensions. This allows a lot of things like adding themes, streaming directories, radios or podcasts, image banks or even youtube videos.
How to install extensions on Kodi?
- Go to “Extensions”
- Select one in the list then to install it click on it then “install”.
- The download will start automatically then you just have to wait.
- Note, you can also install a .zip extension manually, for that you have to go up the tree by clicking on “…”
- Then “Install from a Zip”. Make sure that in “system / extensions” the unknown source box is checked.
- Click on one of the downloaded extensions and Kodi will install the extension
If the extension is made to play streaming, you will find it under “Videos” then “Extensions”. For those concerning images or music it will be in the “Extensions” tab of the corresponding categories. The others, those concerning the appearance or the addition of the weather forecast, are found in “Programs” then “Extensions”.
To avoid having to download and install extensions one by one, you can also install one by one. repository or repository.
How to install a repository on Kodi?
The best known of all is SuperRepo which has no less than 2400 extensions, we will take it as an example. To install it, you need the address of the repository, here it is “".
- Go to “System” then “File Management”
- Press “Add a source”
- Add the address: http://srp.nu, where there is marked “none” write the name of the source here “SuperRepo”
- Press “OK”
- Now let's install the repository. Go to “System” then “Settings” and “Extensions”
- As before, click on “Install from a zip file”
- You will then find the file “SuperRepo” select it then choose “Krypton” the current version of Kodi
- Select the “All” file then the corresponding zip, the installation begins
- To access your extensions, go to “System”> ”Settings”> ”Extensions”> ”Install from repository”
- Select “SuperRepo All”, you now have access to all the extensions of the repository arranged by category
Here is now I leave you browse all extensions and take the ones you need. An example if a streaming extension interests you, you have to install it via the repository and then in the main menu in the “Videos” tab then “Extensions” you will find your extension. If you don't know what an extension is, I invite you to do a google search before installing it.
Kodi: connect to a NAS or computer
We were able to see how to recover files from your own Android smartphone or tablet. The handling is the same anyway on all media. We will take the case of a NAS, when we are connected to the local network, here is the procedure to follow.
- We will for example go to “TV Series”
- Then direction: “section files” then “add a source” and “browse”
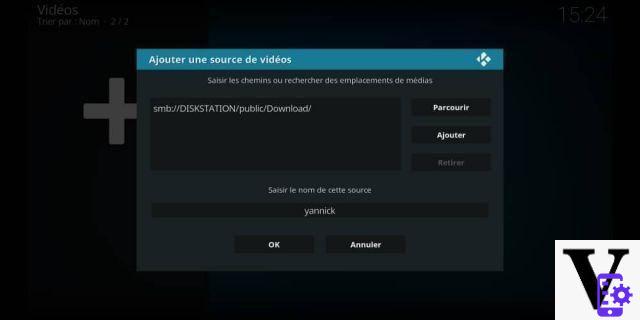
- The most classic way is to go through the local network, “Windows SMB” network, “select the right network”, “Diskstation” in my case for a Synology NAS. It is possible to envisage connecting to a computer in this way or any other device present on the network of course.
- Then, you have to select the directory where the videos are stored. Once selected, confirm by pressing “Ok” at the top right.
- We then find the screen where we can change the name of its source, it is also possible to add by clicking at the top right on “Add”, which will allow us to put other folders that will be used for the source.
- After validating, we find ourselves in new content and there a new chapter opens since we will retrieve the information of the content that we have on the NAS. By connecting to a database, type MovieDB.
Kodi: Scraper, to retrieve information and images from the content (films, series, etc.)
Seeing its content is good, but organizing it properly by allowing us to have all the information available is better. We will see how to connect to a database to retrieve all the information related to our media, that is to say summaries, pictures of illustrations, the names of the actors, etc. In order to organize the library as well as possible, which can be particularly important for some users.
If you have not followed the previous chapter, it does not matter since you can also go to the source and click on “Edit source” after having made a long press. Then validate by clicking on “Ok” at the bottom left. We then find ourselves on a page entitled “New content”.
- We go to “Folder Category”, in my example I will select “TV Series”.
- We see that we have an information provider, “The TVDB” which is selected by default. It is possible to change it, in my example, however, I will keep it. Then direction “Parameters”.
- It is possible to modify certain parameters, in my case I change the language “Fr” and I activate the “FanArts”. You must validate by pressing “Ok” at the top right. And again, hit “Ok” on the next window.
- Kodi will ask you if you want to change the Analysis mode, you will need to validate by selecting “Yes”.
You will probably have to wait a little while, depending on the size of your library the operation may take some time. Ultimately, all the information will be visible when you want to watch an episode of your favorite series or movie. The possibility will be offered to you to filter by genre, actors, directors, year… your different contents.
Conclusion
At first glance, Kodi can be relatively easy to use. However, to fully use the software, some essential configurations are required. We regret that the publisher did not provide a small configuration assistant at the beginning, even light at least to change the language for anglophobes. The Media Center is in any case very powerful and pleasant to use on a daily basis. For your part, do not hesitate to tell us about Kodi in the comments by sharing your experience.
- Share
- Tweet
- Share
- Envoyer à un ami


