


Photographing at night it can be an obstacle for many, but in the end it's always about thinking about composition, managing the light and lighting sources and obviously setting the camera in the right way. In words it is certainly easier than it is in fact, so much so that many enthusiasts prefer to take the last photograph at sunset and the next when the sun has returned to illuminate the day.
Almost all modern cameras offer what it takes to deal with this kind of photography and, even if in their own way, even many smartphones have a mode made for good results in the dark. And so if you can get good shots with a smartphone, think about what you could take home with a camera. Smartphone like Google Pixel 4 o iPhone 11 Pro they are today the most advanced tools from this point of view, in ways that can make us even capture the stars. How is it possible? Simple, the ISO sensitivity is automatically raised, more shots are made and then merged into a single file which, seen on a small display, will make us jump for the quality obtained even in the dark.
But photographing at night with an SLR or mirrorless camera is another matter. With a camera that is equipped with a manual mode we can create night images of different kinds: from the trails of light in an urban landscape to a sky in which the Milky Way stands out with all its strength. But to make this type of photographs it is good to keep in mind some important aspects and above all to have the right amount of patience.
How to organize a night shooting
Before thinking about shooting, however, we must also prepare ourselves for the night photography session to be ready for any eventuality. To begin it is necessary to study the place where we want to go to photograph at night, especially if the idea is to go to an isolated place away from the light pollution of the cities. To do this today we have many convenient tools available, such as apps to be installed on our smartphone that simplify the planning phase. Apps like Planit Pro: Photo Planner (which however costs € 10,99) or Stellarium Mobile Sky Map (costs about 3 euros) are important to get information on where to photograph and to know where any celestial body will be and at what time. If you don't want to spend money to have these tools always at hand, browsing the web you can still find the same information.

 Download
QR-Code
Planit Pro: Photo Planner
Developer:
JIDE Software, Inc.
Price:
9,99 €
Download
QR-Code
Planit Pro: Photo Planner
Developer:
JIDE Software, Inc.
Price:
9,99 €

 Download
QR-Code
Planit Pro: Photo Planner
Developer:
PlanIt Photo Inc.
Price:
10,99 €+
Download
QR-Code
Planit Pro: Photo Planner
Developer:
PlanIt Photo Inc.
Price:
10,99 €+

 Download
QR-Code
Stellarium Mobile Sky Map
Developer:
Noctua Software Ltd
Price:
3,49 €
Download
QR-Code
Stellarium Mobile Sky Map
Developer:
Noctua Software Ltd
Price:
3,49 €

 Download
QR-Code
Stellarium Mobile Sky Map
Developer:
Noctua Software
Price:
2,99 €
Download
QR-Code
Stellarium Mobile Sky Map
Developer:
Noctua Software
Price:
2,99 €
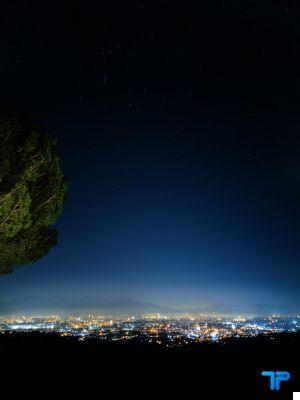
If, on the other hand, you prefer to test yourself on urban landscapes, the story changes. First of all, it is not necessary to prepare for long walks, perhaps in the cold, or to think about everything we need (and not only from the point of view of the equipment), but it is important to know the city we want to photograph well.
Whenever possible I suggest that you study the situation during the day, because clearly in the dark it becomes more difficult to work on the shot. With the sunlight you can choose the most suitable composition, taking advantage of buildings, structures and everything that can make the night scene captivating.
The necessary equipment for photographing at night
If planning is the first step, the second is to think about the equipment we need. Also in this case it is important to think about it first so as not to carry unnecessary weight on our shoulders.
Speaking of cameras it is easy to think that the ideal solution may be to choose the flagships of the various houses, equipped with full-frame sensors, as they can be Nikon D850 o Canon 5D Mark IV speaking of reflex, or perhaps the mirrorless Sony A7R IV. But I know very well that these are expensive cameras and therefore not affordable for all budgets. But today, fortunately, even the cheapest cameras have reached such a quality that they can work for our purpose. As I have already said, the important thing is that they are equipped with a manual shooting mode.
On the other hand, it hardly needs to be said that a tripod. If you don't already have one, I suggest you pay attention to two fundamental aspects to keep in mind before buying: lightness, so you can move easily, and stability. There may be wind at night, maybe not so violent as to drop the gear, but maybe enough to make the camera move just enough to ruin the shot. However, there are some small precautions to overcome this problem, such as attaching a weight, for example your photographic backpack, to the central column. And also pay attention to where their feet will go; absolutely avoid sandy or slippery ground.
Camera settings
Once the location and equipment issue is over, it's time to think about the camera settings. First we need to set the RAW format for our shots, in the editing phase we will be able to work on the dynamic range with more freedom and, if necessary, it will be possible to recover details in the highlights as well as in the shadows. Working with an uncompressed file also allows us to increase the non-apparent brightness of the stars of the Milky Way. All thanks to an adequate editing software.
Many cameras today have already set a night shooting mode, but it serves to work hand-held in low light, so let's forget about it and switch to manual mode to check each shooting parameter. For example, if you want to photograph at night in the city, remember to keep the sensitivity at low levels (no more than 800 ISO) and to work on the times and apertures. By raising the ISO level we would certainly get a brighter scene, but on the other hand we would lose a lot of details due to the noise that grows with increasing sensitivity. When photographing in the city, a fundamental accessory is a filtro Natural Night, thanks to which the frequencies of artificial lights are cut and light pollution is contained, thus obtaining images with vivid colors and eliminating the classic halo that would be created around light sources. Working at low sensitivities it will obviously be necessary to use longer shutter speeds and therefore it is important to use a remote control or set the timer to avoid any, even imperceptible, camera movement. Most cameras today are equipped with Wi-Fi and bluetooth connectivity to communicate with a smartphone and dedicated apps, thanks to which it is possible to remotely control the camera.
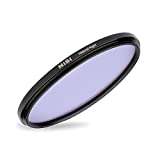 NiSi Circular Natural Night Filter (82mm) - Filter for ...
- Made of optical glass
- Technology used: Double-sided and multi-layer coating / Water repellent for easy cleaning / Nano coating / ...
- It reduces light pollution by cutting the frequencies of artificial lights
After setting the ISO let's see how to proceed. The opening of the diaphragm depends solely on your lens: use the widest aperture available. If you are fitting the standard lens of a normal mid-range SLR to your camera, you probably won't be able to open the aperture to more than f / 3,5, but if you have a brighter lens, make the most of it. This way as much light as possible will pass through the lens and we will be able to reduce shutter speeds. And speaking of shutter speeds, here we will definitely have to do some tests, I can not give you the perfect recipe. Each scene is different and has its own amount of light and so what I can suggest is to start with an exposure of about 10 seconds. If the scene is too dark we increase the exposure by a few more seconds, if instead it is too light we speed up the shutter speed by maybe going down to 8 seconds.

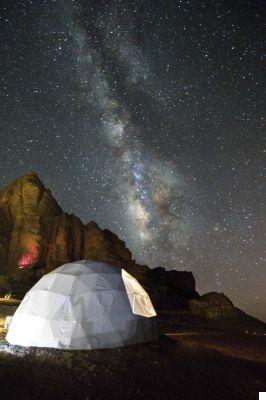
In open places, on the other hand, where light pollution is not present, or is in any case limited, you can then work at higher sensitivities, not being afraid to push yourself up to 6400 o 12800 ISO. There will certainly be some noise, but it's not the end of the world because there are several ways to contain it. The first is to use cameras that can work without difficulty at high sensitivities, but let's go back to the previous discussion on the cost of the equipment. The alternative is to let the camera manage noise reduction, a function now present in almost every camera so as to limit thermal noise and hot pixel which will appear during a long exposure. But know that shooting operations will be significantly slowed down. So the best solution is to work in post-production. Just take multiple photographs of the same scene, with the same exact settings, and merge them later to create a single file. This operation allows you to eliminate the noise or at least reduce it, because in the different shots it will never be in the same spot, therefore thanks to the technique of stacking (combination of multiple images) you will get a cleaner photograph.
But beware, it's not just the noise we need to worry about. Due to the Earth's rotation the stars could appear moved, if not with real trails. To get clear images of the celestial vault you can rely on what is called rule of 500. Some calculations will need to be done, but it's not complicated. With this technique you can establish what is the right exposure time depending on the focal length you are using. To do this, divide 500 by the focal length at which you want to shoot: with a 50mm on a full-frame camera 10 seconds is the ideal shutter speed. If, on the other hand, you work with a camera with an APS-C sensor, for example with a 1,6x multiplication factor, you will have to perform a slightly more complex operation: 500: (50 × 1,6) = 6,25. In this way the risk of having the stars moved should no longer haunt you.
When we photograph the celestial vault, another aspect to consider is that of focusing, which, however, can be easily resolved manually setting it to infinto. If you are not skilled in mathematics or in any case love comforts, know that there are devices that can make your life easier during night shots and that will allow you to obtain perfectly clear photos of stars. I'm talking about the star trackers, which allow the camera to follow the movement of the stars and allow you to use slower shutter speeds and lower ISO sensitivities. Using these tools, which are not even so cheap, however, there is one aspect to pay attention to: if in our frame there are static objects in the foreground we will have to merge two shots, one for the area of the starry sky captured thanks to the tracker. stellar and one for the foreground with static objects.

It is not mandatory to use long exposures for our night images; in fact, with fairly bright lenses (at least f / 2,8) we can try to capture the light in a different and more creative way, taking advantage of the ability of these lenses to manage the blur. We use elements that attract us behind which there are many lights: these, working with an open aperture and fast enough shutter speeds and being in the blurred area of the image, will result as bright and colored bubbles, creating pleasant effects.
Patience is everything to photograph at night and initially this photographic genre can be quite a challenge, but I am sure that when the results start to be satisfactory it could almost turn into an addiction. Being able to stay outside as much time as possible during the night will certainly raise the chances of capturing special moments, such as a comet for example.

And now that we are heading towards spring and the days are starting to warm up, it is the right time to devote yourself to night photography. Although often the best results are obtained in the cold and frost. So, in addition to patience and dedication, you will also need a good amount of clothing to keep warm.
The photographs in this article are by Eleonora Costi, you can find others on her Instagram profile.
Tagsaurora borealis city photographing at night stars photography tutorial How to photograph at night


![[Review] Samsung Powerbot VR7000: the robot vacuum cleaner from Star Wars](/images/posts/6bc44de38605b5c0fa12661febb1f8af-0.jpg)


