


Photoshop is one of the most advanced photo editing software in the world. Using it you can do real "magic". However, this does not mean that it cannot be used for even the simplest photo editing operations. Quite the contrary: thanks to its numerous features and the infinite customization possibilities it offers, Photoshop is also a winner in those areas where less complex - and less expensive - software may seem more adequate. An example above all? Image resizing.
Using Photoshop to resize photos gives you significant benefits. In fact, it is possible to act on parameters that allow you to precisely determine the appearance and quality of the final result. For example, it is possible to finely adjust the resampling techniques to be used for enlarging or reducing the image, you can set the aspect ratio, you can eliminate "useless" parts of photos without affecting the subjects and so on. You can even resize multiple images at the same time without distorting their content, but we'll talk about that later.
In short, I don't recommend buying Photoshop just to resize photos, but if you already have Photoshop installed on your computer and you need to resize images, take it seriously. I am convinced that Adobe's software will be able to amaze you again with its potential! If you want to test it, take a few minutes of free time, read the directions on how to resize an image with Photoshop that you find below and put them into practice.
Index
- Resize a photo with Photoshop
- Resize a photo with Photoshop while preserving its content
- Resize the canvas of an image with Photoshop
- Resize multiple images in batch with Photoshop
- Resize a pasted image in Photoshop
Resize a photo with Photoshop
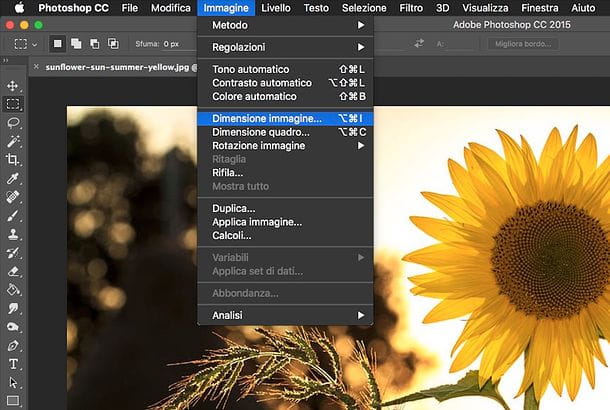
Let's start with the basics. If you want resize an image with Photoshop to decrease or increase its size, open the photo to be edited via the menu File> Open Adobe software and, when completed, select the item Image size from the menu Image.
In the window that opens, type the size of width e height you want the image to assume or select a predefined size from the drop-down menu Fit to (useful for example if you need to resize a photo to print it on an A4 or A6 sheet). The width and height dimensions can be specified in pixel or percentage depending on the option set in the appropriate drop-down menus.
After you have set the size of the image, you need to choose the method of resampling to be used to zoom in or out. To do this, make sure there is a check mark next to the drop-down menu Resample and select one of the voices available in it.
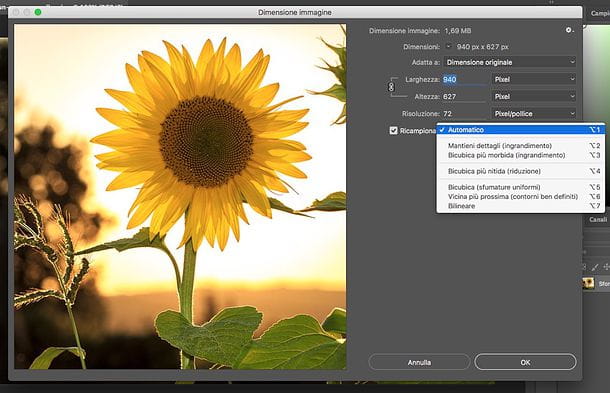
- Leaving the option active Automatic, you will leave it to Photoshop to choose a resampling method suitable for the image to be processed and for the operation to be performed (enlarge or reduce the photo).
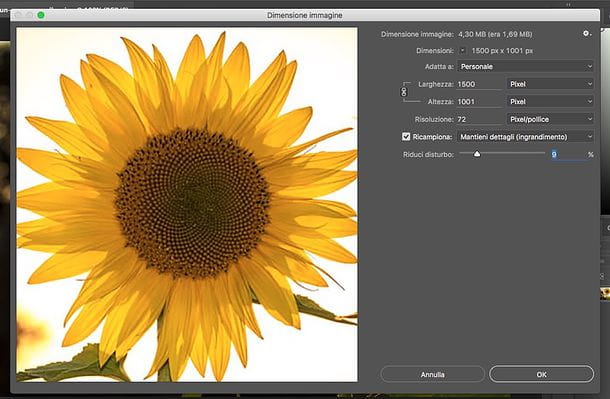
- By choosing the option Maintain details (zoom in) you can improve the quality of the enlarged images and laugh at the disturbances by using a special adjustment bar that will appear just below the drop-down menu.
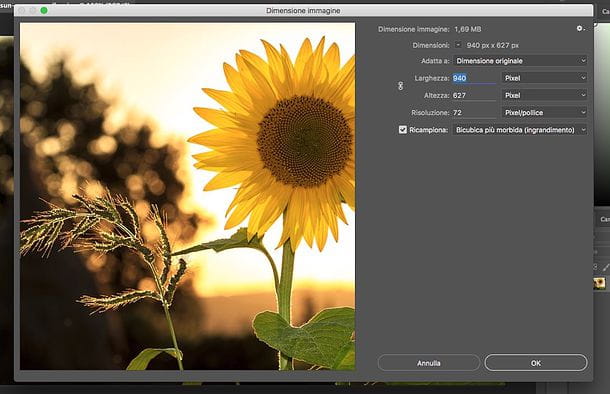
- By selecting the resampling option Softer bicubic (magnification) you can enlarge the images by "softening" their features.
- The option Sharper bicubic (reduction) allows you to reduce the size of an image while preserving its details, which will therefore be particularly contrasted.
- The option Bicubic (uniform shades) allows you to resize the photos very precisely (even if quite slow) by analyzing the values of each individual pixel and acting accordingly. It allows you to have results that are neither too soft nor too contrasty.
- By choosing the option Closest neighbor (well defined contours) you can resize images very quickly but less precisely than the bicubic option with smooth shades. Keeps edges well defined but can cause an annoying jagged effect.
- Finally, there is the resampling method Bilineare which adds pixels based on the average color values of surrounding pixels. It allows to obtain good quality results in a short time.
To choose the best resampling technique for your image, look carefully at thepreview image placed on the left. As for the aspect ratio of the photos- By default, Photoshop preserves the aspect ratio of the image and prevents it from being distorted. This means that if you change the width of the photo, the program automatically changes the height (or vice versa) so that the aspect ratio of the image is not distorted.
If you want to freely resize your image and prevent Photoshop from automatically correcting height or width, click the chain which is located between the fields Width e Height. When you are satisfied with the result, click on the button OK to save your settings and resize your images.
At this point, to save the resized photo, go to the menu File> Save with nome Photoshop and choose the name, output format and destination folder of your image. It wasn't difficult, was it?
Final report: if you are a fan of keyboard shortcuts, you can invoke the dialog for resizing images in Photoshop also by pressing the key combination CTRL + ALT + I on the PC keyboard (cmd + alt + i your Mac).
Resize a photo in Photoshop while preserving its contents
The most recent versions of Photoshop include a very useful feature that allows you to resize images based on content, that is, to resize a photo while preserving content deemed important by the user, such as people, animals, monuments or buildings. The recognition of the elements to be preserved can be done automatically (it doesn't always work very well though), or it can be improved by selecting "manually" the elements to be preserved.
To select an object, a building or a person to preserve when resizing a photo, select the element to preserve using one of the many tools provided by Photoshop (e.g. the magnetic loop rectangular selection quick mask and so on). Then activate the panel Channels located in the box located at the bottom right and click on the icon Save selection as channel (the rectangle with the circle inside) to save the selection as a channel.

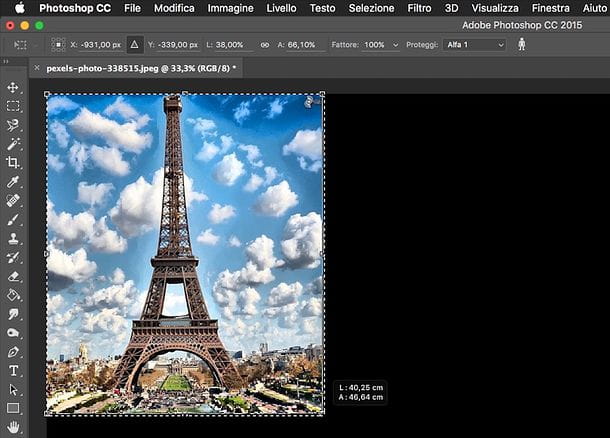
At this point, select the entire image to resize (recalling the item Tutto from the menu Selection Photoshop or by pressing the key combination Ctrl + A/cmd + a on the computer keyboard) and invokes the command Scale based on content from the menu Modification.
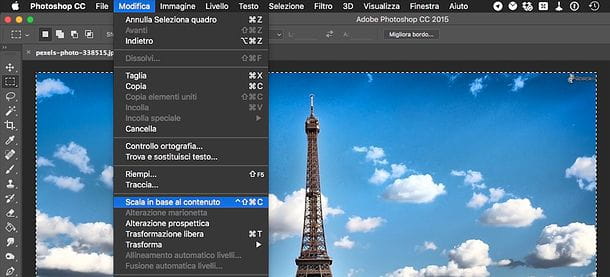
Finally, select the name of the item you have saved as a channel (ex. Alfa 1) from the drop-down menu Protect (in the toolbar at the top of the Photoshop window), resize your image using the indicators that appear along its edges and, when you are satisfied with the result, press Submit per salvare i Cambiomenti.
If there are people in the photo and you want to keep them, click on the icon of thelittle man which is at the top of the Photoshop window. To save the final result, go, as usual, to the menu File> Save with nome in Photoshop.
Resize the canvas of an image with Photoshop
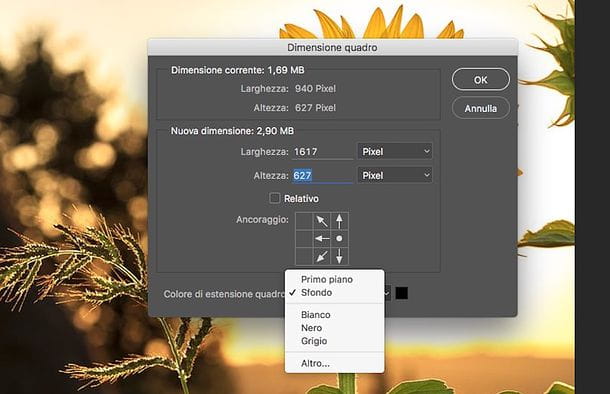
You can also resize an image with Photoshop without adapting its content to the specified resolution, i.e. by cutting the part of the photo that exceeds it. To do this, select the item Image> Canvas Sizefrom the Photoshop menu and, in the window that opens, indicate the new dimensions you want the image to assume in the fields Width ed Height.
Then click on one of the boxes next to the item Anchoring to decide the direction of the photo in which the “cropping” should be done, set the frame extension color (i.e. the color with which to fill any additional parts of the picture with respect to the original image) using the appropriate drop-down menu and click on the button OK per salvare i Cambiomenti.
Final report: As for keyboard shortcuts, this Photoshop function can be invoked by pressing the key combination CTRL + ALT + C (Or cmd + alt + c your Mac).
Resize multiple images in batch with Photoshop
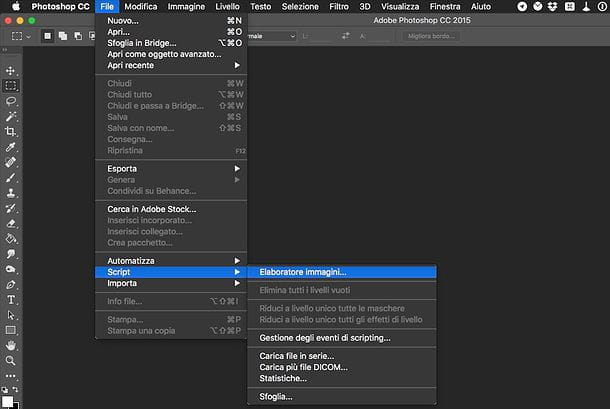
You need resize multiple images at the same time? No problem, Photoshop allows you to do this too. All you have to do is bring up the menu File> Scripts> Image Processor of the program and, in the window that opens, indicate the folder in which the photos to be resized are stored, by clicking on the first button Select folder. If the selected folder includes other folders and you want to resize the images contained in them, put the check mark next to the item Include all subfolders.
Next, you have to choose the folder in which to save the resized images by clicking on the second button Select folder (the one under the heading Select the location to save the processed images) and you have to put the check mark next to the entry for the file format you want to get as output. For example, if you want to save the resized images as JPEG, you have to put the check mark next to the item Save as JPEG.
After that you have to activate the option Resize and you have to use the fields L ed A to specify the width and height dimensions to apply to images (in pixels). But be careful, the resizing of the images will not be "exact": it will be carried out in such a way as to get as close as possible to the resolution specified by the user (ie by you) without distorting the original aspect ratio of the photos (so if, for example, you set a width of 600px, images of 590px, 595px, 600px and so on may come out). If you want to create web-optimized images, put the check mark next to the item as well Convert profile to sRGB.
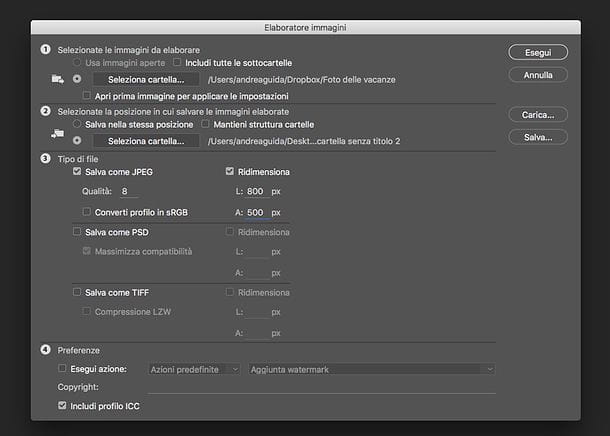
Once all preferences are set, click the button Run and the images are processed quickly sequentially by Photoshop. You will see them and they open quickly in the program, you will not have to do anything.
Resize a pasted image in Photoshop
Finally, let's see how to resize an image with Photoshop when you paste it on an already existing photo (or a new painting created for the circumstance), and then you need to adapt it perfectly to the new context in which it was inserted.
In this case, after pasting the image and selecting his level from the box at the bottom right, you have to select the item Edit> Transform> Scale from the Photoshop menu, click on the indicators that appear around the photo and press the button Submit on the PC keyboard to save the changes.
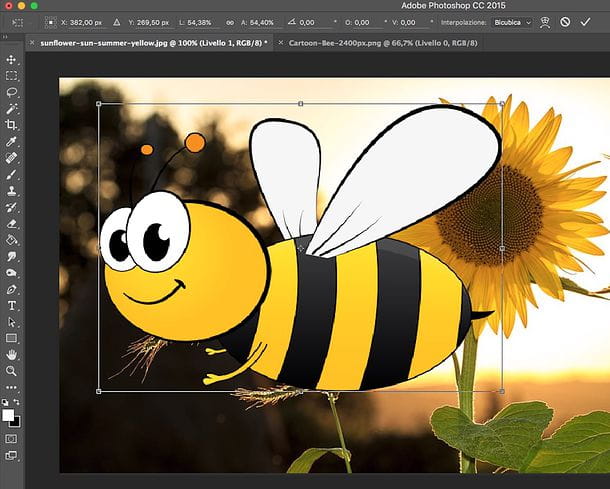
If you want to keep the aspect ratio of the image so as not to alter the ratio between height and width of the latter, while you resize the image with the mouse, hold down the key Shift on the computer keyboard. If, on the other hand, you do not want to keep the proportions of the image and, on the contrary, you want to freely distort it by also altering its perspective, click on the button Switch between free transform mode and warp mode and vice versa (the distorted grid at the top right).
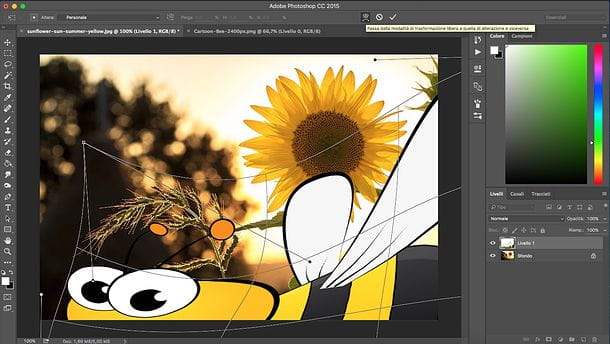
Regardless of the resizing method you choose, you can set the exact size for the resizing and / or the resampling method to use (ex. bicubica, bilinear etc.) by exploiting the toolbar that appears at the top of the Photoshop window.
At the end of the work, as usual, you can save the result as a new image by going to the menu Fillet di Photoshop and selecting the voice Save with name from the latter. Easy, right?


![[Review] Samsung Powerbot VR7000: the robot vacuum cleaner from Star Wars](/images/posts/6bc44de38605b5c0fa12661febb1f8af-0.jpg)


