


To keep up with the times, you too have decided to open a website and, before eventually contacting professionals in the sector, you would like to try to build your website independently with WordPress. WordPress is a free CMS (Content Management System) among the most used in the world that allows you to create websites, blogs and e-commerce and manage their contents with ease.
It is very simple to use and extremely customizable: this is why it is used not only by "experts" but also by those who do not know any programming language but need to build an Internet site from scratch. It can be implemented in a few clicks and supports add-ons of all kinds and for every need - both free and paid -, which allow you to model a site and its features according to your needs.
If you can't wait to learn more and start building your website, make yourself comfortable, take a few minutes of free time and let me explain. how to use WordPress in all possible and imaginable ways. It will then be up to you to deepen the question and set up your project online.
Index
How to use WordPress to create a site
There are several ways to go create a WordPress site, each of which more or less suited to their specific needs.
If you are a beginner and / or intend to create a site for purely personal purposes without commercial ambitions, you can opt for a free solution with WordPress already installed, with limited opportunities in terms of monetization and customization, but at no cost and with no need for manual CMS installations.
If you intend to monetize your site, you want the ability to customize it through plugins and themes but at the same time you don't want to waste too much time with manual configurations, you can buy an "all inclusive" package with domain, hosting and CMS already installed; alternatively, if you want full control over each component and are willing to "tweak" a bit, it's possible buy hosting and domain separately then install the CMS manually.
Finally, for testing purposes, there is the possibility of install WordPress locally and create sites that "run" only on your computer. Below you will find some more information and many links for further information on each of these possibilities.
How to use WordPress for free
If you want create a WordPress site completely free, you can contact the service WordPress.com, which offers several plans, including one completely free.
Obviously, being a no cost plan, you will have limitations compared to any premium subscription. One of the biggest disadvantages is that of not being able to use a personal domain, but only one that contains the WordPress ending. For example, if I wanted to create it with my name it would become something like salvatore.wordpress.com, which is certainly not ideal if you want to create a professional site.
Another problem with this option is that it is the possibility of inserting advertising banners is precluded (which prevents monetization through that channel), as well as the customization of plugins (what they are I will explain to you in a few lines), one of the most powerful tools of WordPress. The storage space on the server is then only 3 GB, very limiting compared to the 6 GB of the plan Personnel and the 200 GB of that Business.
This type of plan is perfect for amateur blogs or to start taking the first steps in building websites, without spending any money during the initial period. At any time it will still be possible to upgrade to a professional plan, so there is no contraindication in starting with the free account. If you want to know more about how to open a blog with WordPress, I leave you my dedicated guide.
How to use WordPress on Aruba

Aruba, a very famous 2022na company that has been operating for years in the sectors of online practices, Web hosting and the cloud allows create your own WordPress site as well as purchase custom domains without having to rely on third parties. To subscribe, all you have to do is connect to this page and, from the top menu, select the item WordPress.
At this point you are given the option to choose from a basic WordPress site for the cost of € 24,99 plus VAT for the first year, or choose a plan that guarantees you more assistance from the platform at a price that ranges from 29 to 119 Euros plus VAT for the first year.
Il cheapest plan offers the SSL certificate, 5 personalized mailboxes, unlimited server space and pre-installed WordPress, which means greater immediacy and simplicity for the creation of the site itself. To this must be added the possibility of registering your own domain, which is common to all plans together with the functions I have just mentioned.
Il managed service instead, it has on its side the fact of offering a direct assistance service to which it is possible to "commission" some more complex works such as site modification, restoration, diagnosis, management, optimization and installation itself in the in case you need to do it again.
This type of solution is perfect for those who have unfamiliar with WordPress and who want to devote as little time as possible to the technical aspect of the site itself. If you want to know in detail how to use WordPress on Aruba, I leave you to my tutorials on Aruba Managed Hosting and on how to install WordPress on Aruba.
How to use WordPress on Altervista
Altervista is a famous hosting service on which you can use WordPress in a few simple steps. All you have to do is connect to this page, click on the wording Hosting, at the top right, and choose which type of plan is best suited to your needs.
This type of host has the difference of being strongly advertising-oriented, in the sense that it immediately explains how it will place ads on customer pages and how they will be able to monetize through them. This may or may not be a point in favor of this platform, as many users may not want advertising on their site at all.
The pricing for a WordPress profile on Altervista starts from € 1,58 per month plus VAT, whether you choose the managed profile or the one with the file manager. The managed one is more suitable for those with less technical knowledge, while the file manager for those who know how to master the site and the code even at very deep levels.
Il managed profile offers (among other things) unlimited storage space, WordPress installed, the SSl certificate that is used for free HTTPS browsing, an "autopilot" for inserting banners for monetization and useful tools to improve traffic on your site.
Il easy with the file manager it cannot be defined as a better or worse option, but only a different one. While it lacks some features like autopilot for advertising, offers less storage space, and lacks traffic retention tools, it offers the ability to manipulate the foundations of the site itself to a truly great level for who knows how to program. If you want more details on how to create a WordPress blog with Altervista, I leave you to my dedicated article.
How to install WordPress with custom hosting and domain
In case you want full control over every component of your site, you'll need to purchase one first online space (hosting) on which to host the site and a domain; also you will need a FTP program which allows you to upload files to your space. Finally, you also need to secure a space in a database MySQL which allows you to archive site data. Once this is done you need to connect to the official WordPress site and download the WordPress version to be installed on your online space via the button Download WordPress that you find at the top right, which opens a page where you can download the current version using the button Download WordPress [version] (or you can access others Downloadable versions delCMS).
Once the download content has been extracted from the ZIP package, all you have to do is launch the FTP program that is used to upload the data to the server and proceed with the installation of WordPress on your online space. For all the details, check out my guide on how to install WordPress.
How to use WordPress locally
WordPress can also be used locally, in order to test your site or the changes to be made to it before sending it "into production" and uploading it online.
To do this, you can contact XAMPP, a free application for Windows, macOS and Linux that allows you to create a local server with components such as the Apache HTTP Web server, the MariaDB database system and the programming languages Perl, PHP and Python, on which you can then install the CMS WordPress.
At the end of the installation you will be able to activate the local server and log in to your WordPress site using an address like 127.0.0.1/wordpress/WordPress-login. For all the details, read my guide on how to install WordPress locally.
How WordPress works
Whatever solution you have decided to adopt (free or paid plan with WordPress already installed, manual installation of WordPress on space purchased separately or installation of WordPress locally), it is time to understand how to use WordPress in a practical way.
If your site is already live, then connect to its main page, locate the button Login and log in with your login credentials. If your site's theme doesn't include a button Login, to log in you will need to connect to the sitename.com/WordPress-login.php.
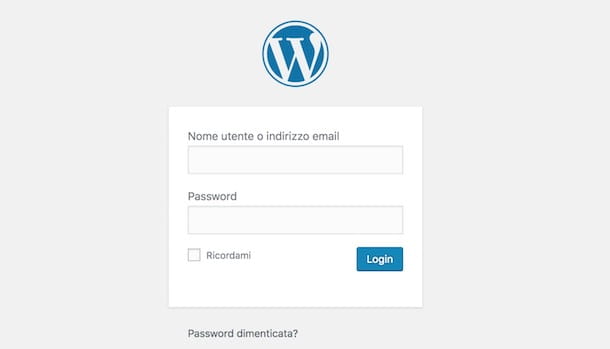
By entering your credentials in the fields Username or email address e Password e pigging your pulse Login a new page will open, called Dashboard di WordPress (o Dashboard), where you can view the latest WordPress news, use some quick commands and check the latest activity on your site. By clicking, instead, on one of the options visible in the sidebar on the left, you will be able to access the WordPress features.
- Dashboard: In addition to the information indicated above, in this section you can view any new updates of WordPress, plugins, themes and translations.
- Articles: to create new articles to publish on your site. It also allows you to manage categories and tags.
- Media: it is the archive that collects all the files (images, text documents, audio files, etc.) that are uploaded to the site.
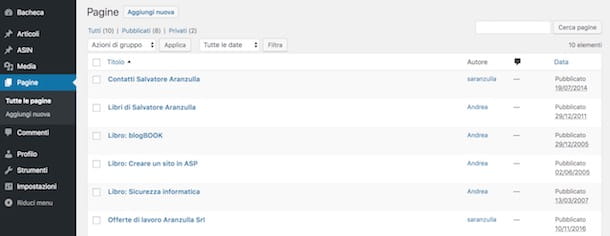
- Pages: to create the pages of your site.
- Post comments : is the section in which all the comments that readers post in the comments space of articles and pages are collected. The site administrator can choose to approve, trash or mark each individual comment as spam.
- Appearance: is the section that allows you to choose the graphic aspect of the site (by installing new graphic themes), to make changes and to manage the menus.
- Plugin: to install new tools that allow you to increase the functionality of WordPress. There are plugins of all kinds and for all needs, both free and paid.
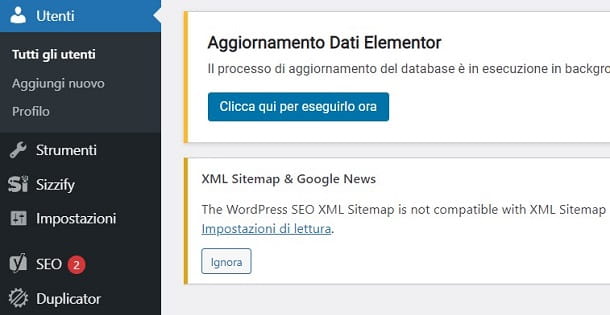
- users: is the section in which to manage users registered on the site, change their role (and therefore permissions) and to add new users manually.
- Instruments: to access basic WordPress features, such as importing or exporting files and deleting users' personal data.
- Settings: to set the site title and manage general WordPress settings, such as language, time zone, default categories and much more.
As I will show you in the next few paragraphs, installing new plugins may add new entries in the left sidebar.
Create pages and articles

One of the fundamental points for the success of a site is the creation and publication of new content. On WordPress this operation (which is usually daily) takes place via the creation of pages and articles.
Before I give you the walkthrough for posting new content, it's helpful to make a distinction between pages and articles.
- Pages: they are used to contain static information that will remain unchanged over time, such as pages about who we are, where we are, our history, etc. They can be primary pages (called Parent pages) or subpages, placed in a hierarchical order. The Biography page of this blog, in which I write my story, is indeed a page.
- Articles: are the posts that make up a site, i.e. those informative contents that have a publication date and a specific topic (Categories). What you are reading is a WordPress post.
Now that you understand the difference between WordPress pages and posts, you can move on to creating and publishing your content.
To create a new page, click on the entry Pages present in the left side menu and presses the button Add page. In the new screen that appears, type your page title in the field Enter the title here and insert its contents into the testo field present at center page.
Through the box Page attributes, you can choose the template to attribute to the created page (if required by the graphic theme installed) and set itssorting, useful for a possible positioning in the menus of your site. Also, via the drop-down menu Parent page, you can set the degree of the created page: by choosing Base page (set by default) the page created will be a parent page, while to set a sub-page you must select the one that should be the parent page from the drop-down menu.
Once you've created your page, locate the box Public and click sul pulsating Save draft to save the page without publishing it, otherwise press the button Public. By clicking on the option Pages present in the sidebar on the left, you can access the list of all the pages created (both those published and saved in draft) and, pausing with the mouse pointer on the title of the page of your interest, you can proceed with its modification (Modification), its fast modification (Quick edit) or its cancellation (Basket).
The procedure for creating and publishing an article is almost similar to what has just been described for the pages. Then click on the item Articles present in the sidebar on the left, press the button Add new and enter the title in the field Enter the title here. Then proceed with the writing of your article, then locate the box Featured image and click on the option Set featured image to upload an image or choose one already present in the archive Media to be used as a preview image of the article.
From this point forward there are a whole series of small and big things related to SEO to do, like choosing the category and adding the meta description, but they deserve to be covered separately in this article which explains SEO in detail.
Once the creation of your content is complete, press the button Public to immediately publish the article or on the button Save draft to save the changes made and postpone the publication. Again, to edit or delete an article, click on the item Articles, pause with the mouse pointer on the title of the article of your interest and select one of the items among Modification, Quick edit (to quickly change the title or category) e Basket that appear on the screen.
Change the look and feel

Change the look and feel it is an operation that allows both to completely change the graphics of your site and to modify individual elements, such as i menu or widget (the boxes, usually displayed in the sidebar of the site that may contain links to social networks, tag lists, counters, information from third party sites and more).
To choose a new graphic theme to install for free on your website, click on the entry Appearance present in the left sidebar and click the button Add new from the menu of Temi. Then choose the theme you prefer among those available in the WordPress library, click on it and press the button Install. If you want to apply it to your website right away, click on the button as well Attiva.
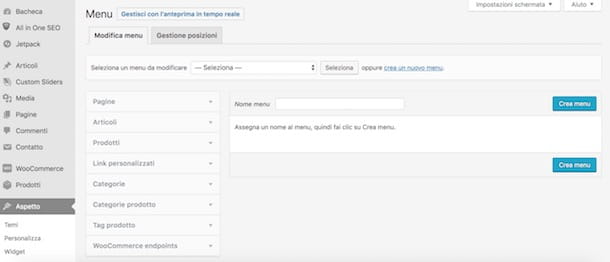
To start customizing the installed theme and, therefore, the look and feel of your website, click on the items Appearance e Customize. If, on the other hand, you want to create a new menu and make it visible on your pages, select the options Appearance e Menu and, in the new page that opened, click on the item Create a new menu. Then enter the name in the field Menu name e pulsing sul pulsating Create menu.
Now, choose the items that will make up your menu by placing the check mark next to pages, to Articles or alle category you want to insert in the menu you just created, then specify its position by placing the check mark next to one of the positions visible in the section Menu settings, next to the option Viewing position e pulsing sul pulsating Save menu.
You must know that, depending on how the graphic theme installed on your site is built, you could also manage the position of the menus through the section widget. Then click on the options Appearance e widget, locate the item Menu navigazione in the list of widgets available and drag the box in question into one of the boxes visible on the right (which vary according to the theme installed and identify the usable positions of your website). Then select the menu you are interested in using the drop-down menu Select the menu, enter the title in the appropriate field and press the button Save.
Install new plugins
One of the main strengths of WordPress are the Plugin, which allow you to modify and expand the functionality of a site in a very flexible way. For example, the WooCommerce plugin I told you about in the tutorial just linked allows you to transform a WordPress site into a perfect e-commerce. The important thing, in any case, is to check the reliability and stability of the plugins that are installed, as well as their compatibility with the version of WordPress in use on your site (otherwise you could run into more or less serious problems, even in terms of IT security).
To manage the plugins on your site, click on the entry Plugin present in the WordPress sidebar and presses the button Add new present at the top. In the new page that opens, write the keyword of the plugin you are looking for (if you already know the name of the plugin that's right for you, enter its name) in the field Searching for plugins and wait for the results of your search.
Once you have identified the plugin of your interest, click on the button Install now, wait for the installation to complete and press the button Attiva, to activate it on your website.
If, on the other hand, you have purchased a paid plugin or you have downloaded a free one from third-party sites and therefore it is now present on your computer in ZIP format, click on the items Plugin e Add new, pigia sul pulsating Upload plugin present at the top and, in the new page that opened, click on the button Choose file to load the plugin from your computer.
After installing a plugin, select the entry Plugin from the left sidebar to view the list of all plugins installed on your site and click on one of the available options: Attiva to activate and use the plugin; disable to deactivate the plugin without deleting it; Delete to delete the plugin from WordPress e Settings to access the plugin settings.
In the Plugin, you can also locate a plugin by accessing the categories Reported, Popular, recommended e Add to Favourite which lists a list of popular plugins recommended by the WordPress community. In this regard, below you will find a list of plugins that might be right for you.
- jetpack: it can be considered an all-in-one plugin since it allows you to take advantage of numerous features, such as the ability to view site statistics, implement related articles, prevent spam and much more. Registration is required.
- Google XML Sitemaps: one of the best tools to automatically generate a sitemap of your WordPress site and submit it to search engines.
- Contact modulo 7: to create contact forms by customizing every aspect.
- MailPoet: allows you to create a newsletter, using both ready-to-use templates and creating new ones from scratch. Furthermore, it allows you to manage subscribed users, create lists and schedule the sending of the newsletter. All within your site. In this regard, my guide on how to create newsletters.
- Broken Link Checker- On sites consisting of numerous pages and articles, a tool that continually scans your website for broken links is useful.
- Google Analytics by MonsterInsights: the useful tool for those who need to monitor the progress of their website but want to avoid having to deal with the PHP code of WordPress. With this plugin you can connect your site with Google Analytics and view statistics, such as daily accesses, pages viewed, active users, etc. To know how to use Google Analytics you can read my tutorial on the topic.
- WordPress Super Cache: is a plugin that allows you to create a cached copy of the pages of a site in order to increase the loading speed.
- Yoast SEO: a plugin that allows you to frame articles within the main SEO rules, giving simple warnings on what to do to improve the ability to let Google discover them.
- Elementor: this is a plugin that offers the possibility to customize the appearance of the site beyond the classic limits imposed by WordPress itself, by adding elements such as boxes, separators and a whole series of very useful graphic elements. To discover how to use Elementor WordPress, I refer you to the official documentation or to the many tutorials available on the Net.
- Divi: also here it is a tool to modify, even in a profound way, the theme and the graphic aspect of the site in every detail. To discover how to use Divi WordPress, you can easily rely on the official documentation or the many tutorials available online.
- Duplicator: a simple migration plugin, which allows you to transfer your site from one host to another without losing valuable data or having to reset the appearance. If you want to know how to use WordPress Duplicator, you just need to read the official documentation or the many tutorials you can find on the Net.
User settings and management
As mentioned in the opening paragraphs of this guide, turning on to settings of WordPress you can set some information, such as Site title, motto, Email address, Site language, Time zone and so on. Also, by clicking on the item Setting and choosing one of the options available from Reading, Discussion, Writing e Media, you can access more WordPress-specific options, such as the default for posts or standard image sizes.
If you're already worrying about the work to be done, know that all of these settings are most likely already set just right by default. However, I recommend that you take a quick look, check that all the options are set according to your needs and make the changes you think are most useful.
Finally, let me also tell you how to manage WordPress users. First, you need to figure out if your website offers any additional functionality for subscribed users. If not, I advise you to block the registrations by accessing the sections Settings e Generali and unchecking the option Anyone can register.
You can still add new users manually by clicking on the item users present in the sidebar on the left and pressing the button Add user. On the page for adding a new user, in addition to his personal data, you must know that you can also set his role, choosing one of the options among Subscriber (has read-only permissions), Collaborator, Author, Editor e CEO (I advise you to make administrators only trustworthy and competent people). If you have collaborators who help you with posting content on your website, you can choose one of the roles from Collaborator, Author ed Editor which differ from each other for a few write permissions, such as the ability to delete and modify the contents of other users (Publisher).


