


Are you bothered by the permission requests that Windows displays when you install certain software? You can remove them by disabling User Account Control. But beware of your safety!
You have probably already noticed: when you perform certain "sensitive" operations on your PC - installing new software, for example - Windows displays a warning window indicating that this action will lead to changes and asks your permission to continue. This alert comes from user account control, also called UAC (for User Account Control), a protection mechanism built into Windows since Vista, and therefore present in Windows 7, Windows 8 and Windows 10.
What is User Account Control used for?
Enabled by default and constantly working in the background, User Account Control acts as a security barrier. Its role is to prevent certain actions - and in particular those originating from applications - from affecting sensitive functions of the system. Technically, the operation of UAC is based on the notion of access rights - also known as privileges - associated with user accounts. It is the level of rights granted that allows or prohibits access to certain functions - installing applications, deleting files, launching processes, saving in system folders, etc.
Under Windows, only administrator type accounts have the highest rights that allow them to do everything - logical! -, the others, of standard type, having only limited rights. By default, applications launch with limited rights, even when used with an administrator account. And when they need more rights, to perform certain operations, they ask the system. This is precisely where UAC manifests itself, displaying an alert asking the administrator for permission to grant rights to the app. This warning is designed to prevent unknown, potentially malicious software from covertly granting itself access rights to the system. To take an image, the UAC plays in a way the role of a security guard who filters the customers of an establishment by making sure that none enter the back room without the explicit authorization of the boss!
As valuable as it is, however, this check can be annoying in the long run, especially when the warning appears several times a day. This is why some users prefer to deactivate it. The operation is simple, but really not recommended, for obvious security reasons. Clearly, only deactivate UAC if you really know what you are doing on your PC and if you have a perfect knowledge of the software you are doing!
How do I turn off User Account Control through Control Panel?
The easiest way to turn off UAC is through Control Panel, which is present in all versions of Windows since Vista, including Windows 10.
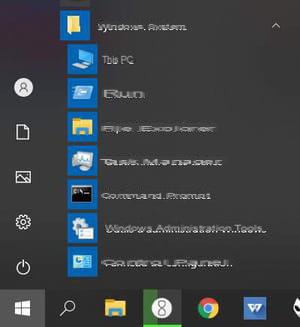
- Click on the menu Startedr, scroll through the list of apps, open the folder Windows system, then click Control panel.
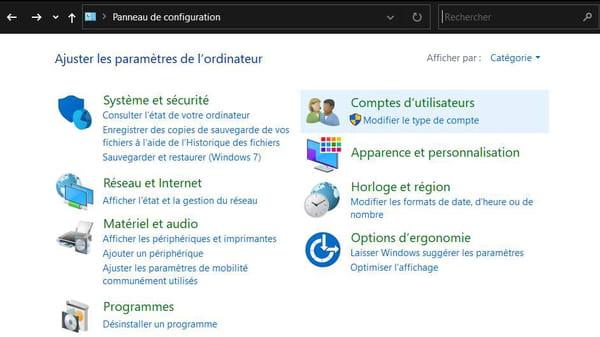
- In the main Control Panel window, click on the item User accounts.
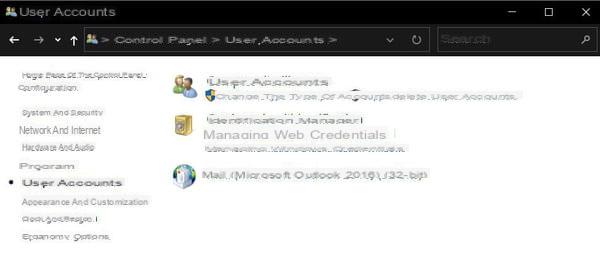
- In the next window, click again on User accounts.
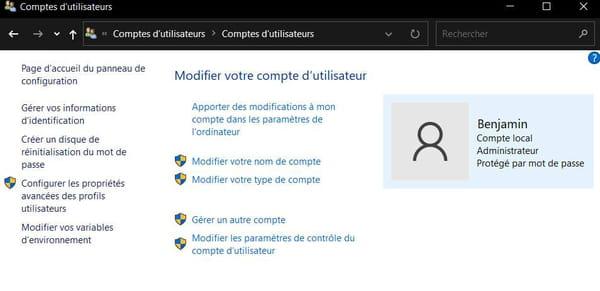
- In the Change your user account section, click Change User Account Control settings.
- The User Account Control Settings window appears. A gauge indicates the degree of security currently set on your computer.
- Set the gauge to the lowest to turn UAC off completely, then click OK.
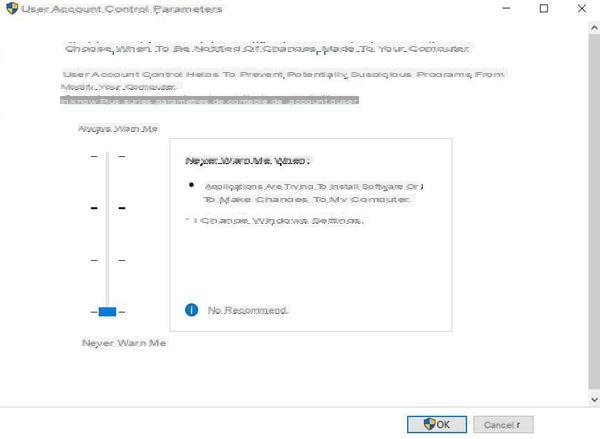
- To reactivate user account control, all you have to do is repeat the same operation and reassemble the gauge to the desired level of security.
How do I turn off UAC with Registry Editor?
The other way to turn off UAC is to edit the Windows registry. Here again, the manipulation is valid for all versions of the system since Vista, but it is more delicate, the registry being a very sensitive element. Before any modification, make a backup of the register (see our practical sheet).
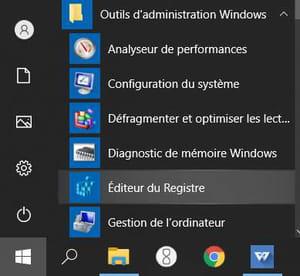
- In the start menu, go to the Windows Administrative Tools section, and then click the Registry Editor shortcut.
- Browse the following path in the left menu tree: HKEY_LOCAL_MACHINESOFTWAREMicrosoftWindowsCurrentVersionpoliciesSystem. You can also paste this path directly into the editor's address bar.
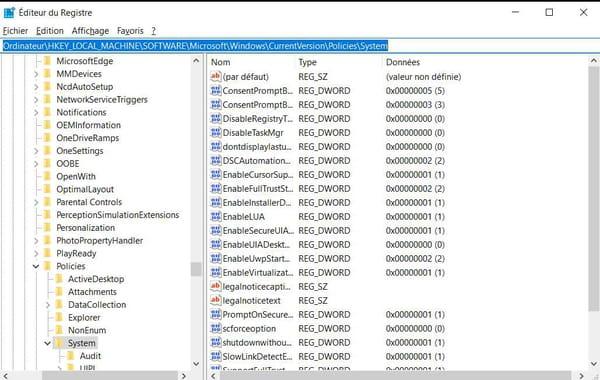
- In the right part of the window, identify the EnableLUA value. Right click on it, then click Modifier… in the context menu.
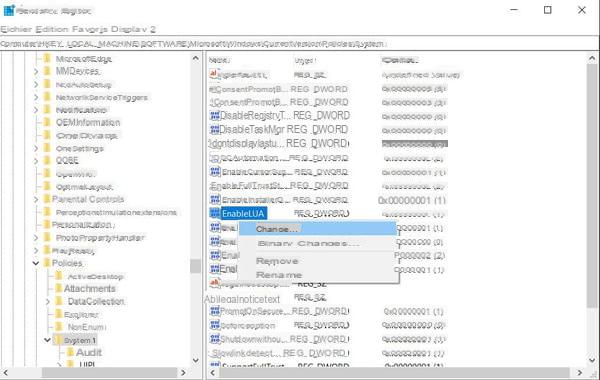
- In the edit value window, enter 0 in the Value data field, then click OK to validate.

- Restart your computer for the deactivation to take effect.
- To reactivate user account control, repeat the same operation and enter 1 in the Value data field.
Contents What is User Account Control used for? Disable UAC via Control Panel Disable UAC via Registry Editor You have probably already noticed: when you perform ...


![[Review] Samsung Powerbot VR7000: the robot vacuum cleaner from Star Wars](/images/posts/6bc44de38605b5c0fa12661febb1f8af-0.jpg)


