


Your boss handed you a piece of paper Excel containing very important data: you would like to automate some operations on them and have the possibility to sort them, but unfortunately you don't know how to do it. Do not worry. It is an absolutely feasible thing, however there is a need to start from a very precise data "structure" offered natively by the program: tables.
Using Excel tables, it is possible to carry out precise operations, even complex ones, on data, rows and columns, within a couple of clicks: a possibility that intrigues you, and not a little, but right now you don't have the faintest idea. Of how to make a table in excel, real? Well, this is just the right place to start: below I will provide you with all the information you need on how to enclose the data of an Excel sheet in a table, so that you can manage and organize them in the best possible way, thus optimizing your work.
Ready to go? Perfect! Start your copy of Excel and read carefully what I am about to tell you. The indications I will give you are valid for all versions of the famous Microsoft program, both for Windows and for macOS, even if personally I will use 2022 (which is the most recent at the time of writing). I am sure you will be surprised by the results you will be able to obtain. Having said that, I just have to wish you good reading and good work!
Index
- How to create a table in Excel
- How to make a table in Excel Online
- How to make a table in Excel for smartphones and tablets
- How to make a pivot table in Excel
How to create a table in Excel

Before continuing, it is good that you have a very specific aspect in mind: even if a classic Excel worksheet looks like a "table" (that is, a graph organized in rows and columns), in reality the its basic content is defined data range.
A table, understood in the strict sense of the term (as well as what we are going to consider in this guide), is made up of organized data, closely linked to each other, which can be ordered, arranged and manipulated according to very specific rules. In other words, a table is an Excel entity that you can create manually, but that is not present by default in a new worksheet or a basic worksheet.
Without these necessary premises, if you want to know how to make a data table in excel, it's time to take action: start Excel (or open the spreadsheet you want to manage) and follow the instructions below to create a table from scratch or fill in existing data.
Create a new table
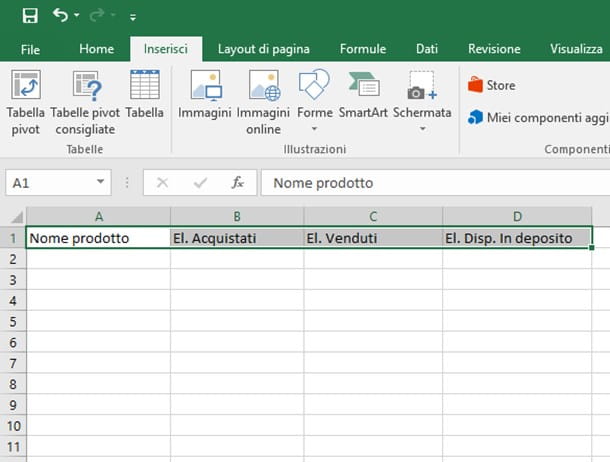
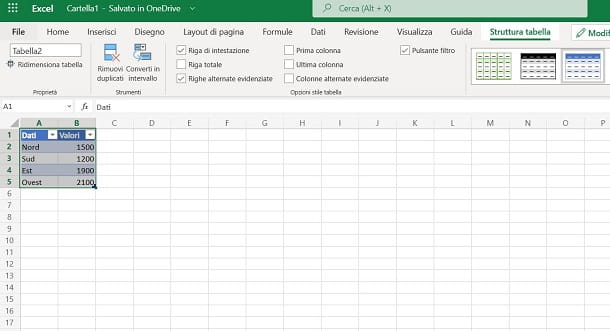
To start with, once you open Excel (and after clicking on the option Blank workbook, if you intend to start from a document with no data), let's start immediately by seeing how to make table header in excel: start typing on riga 1 le Labels to be assigned to the various data columns. So assuming you intend to create an inventory management table, you could organize it as follows.
- Cell A1 (and column A) - label Product name.
- Cell B1 (and column B) - label He. purchased.
- Cell C1 (and column C) - label El. Sold.
- Cell D1 (and column D) - label El. In storage.
The chosen label does not fit into the cell as it is too long and is truncated? Don't worry, you can adapt the cell size according to its content by consulting my dedicated guide.
At this point, you can create your table before you even start entering data: click on the first cell of the table (in this case A1), press the button Shift of the keyboard and then presses onlast cell of the table (in this example example D1), then click on the entry Inserisci and icon Table. Alternatively, you can select the table cells by clicking on the first of them and "scrolling" the mouse until you reach the last one.
Once this operation is completed, in the new window that appears, check the box Table with headers and click on OK: after a few seconds, the selected columns will turn blue and you will see arrows appear next to each header, useful for sorting the data. If you wish, you can protect the cells containing the headers from accidental changes (which could alter their name without you realizing it), by following my tutorial on how to protect Excel cells.
Final report: if you don't want to create labels / headings right away, you can skip this step and avoid putting the check mark on Table with headers: in this case, "generic" headers of the type are created 1 column, 2 column, 3 column... Column X, which you can modify later at will, simply by clicking on the relevant cells and assigning the desired name.
The game is practically done: you have created a table of two rows, one containing the header and the other containing data. If you want, you can expand the table by "grabbing" the small one oblique dart placed on the last cell at the bottom right of the table and dragging it to the desired final cell.
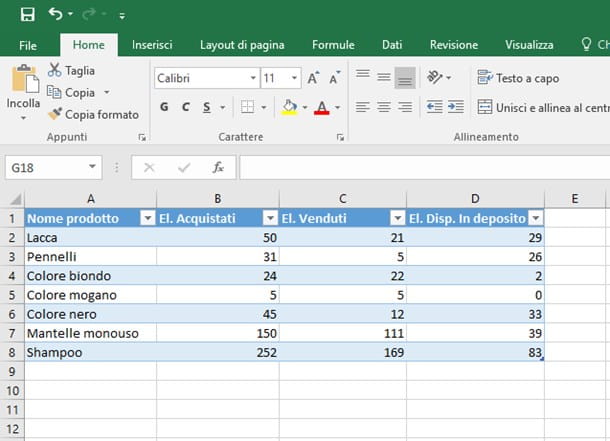
Once you have set the size you need, all you have to do is start to fill the table with the data you need, starting with riga 2 (also colored blue). If you want, you can insert automatic operations to be carried out between the various cells / columns: in my example, I set the table so that the column D, containing the residual elements in storage, was the difference between the number of items purchased (column B) and the number of items sold (column C).
How do you say? Are you unable to set Excel to do things automatically? You can take advantage of the instructions I have already given you in my specific guides on the topics, which I list below.
- How to sum in Excel
- How to subtract with Excel
- How to multiply in Excel
- How to square and how to power in Excel
- How to calculate the percentage in Excel (excellent guide for automatic VAT calculation).
- How to subtract the percentage in Excel
- How to sum the hours in Excel (useful, for example, if you need a worksheet that manages staff hours).
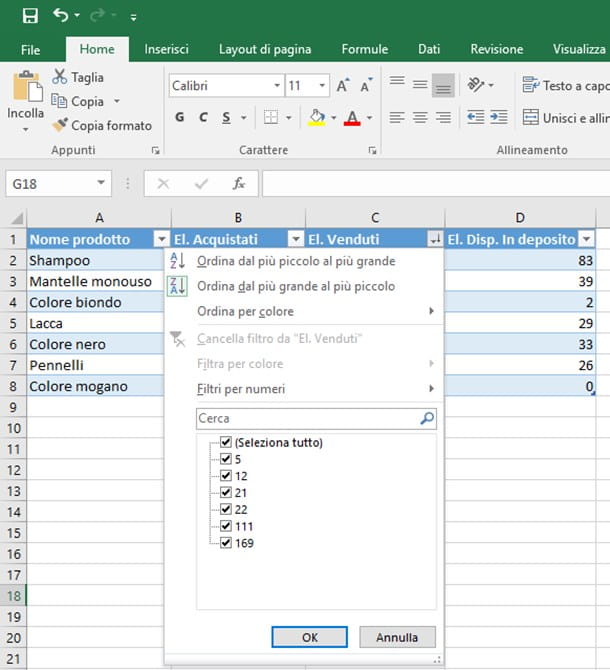
Also, as I already mentioned, the arrows next to each header allow you to make automatic sorting within the table: therefore, by clicking on a small arrow, you will have the possibility to order the elements of the table in order growing, descending, color e custom, based on the data in the selected column.
If you want, you can apply exclusion filters or avoid sorting only for cells containing specific values.
Insert data that already exists in a table
Do you have a worksheet with already existing data and want to organize them in a practical table that you can easily organize, manage and manipulate? This is a really simple operation that you can complete in just a couple of clicks.
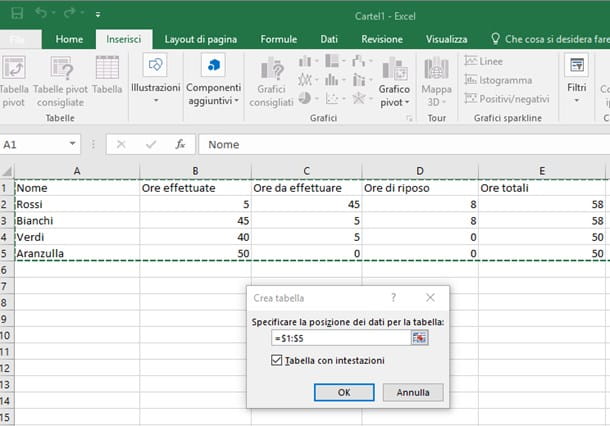
To get started, hover your mouse over the first one upper left cell which contains the elements to be enclosed in the table, then drag the mouse to the last one lower right cell of the data you are interested in: make sure that all the data belongs to the selection (marked with gray shading), then click on the item Inserisci and then on the icon Table.
At this point, pigia sul pulsating OK making sure to check the box Table with headers if the first selected row contains labels. Once the creation operation is complete, you can manage the table exactly as I explained in the previous section: it wasn't difficult, was it?
Starting with a predefined template
Have they passed you a spreadsheet full of data, however you cannot enclose it in a table because they are messy and would need to be rearranged manually?
What I advise you to do is to transfer them within one of the predefined templates Excel: in fact, the Microsoft program offers the possibility to load ready-made templates, available both on the computer and online, containing operations, orders and other characteristics already set. In doing so, all you have to do is fill them with the data you have available and customize it later as you please.
Among the most useful templates available online, for example, the one for creating and printing invoices stands out: thanks to a series of pre-organized worksheets containing beautiful and ready tables, you can keep track of the invoices issued and get a template ready for printing.
To create a new worksheet from a predefined template, click on the menu Fillet, select the voice New and choose a preset template among those available below, or make one online search typing the keyword (eg invoices) in the box provided and pressing the key Submit.
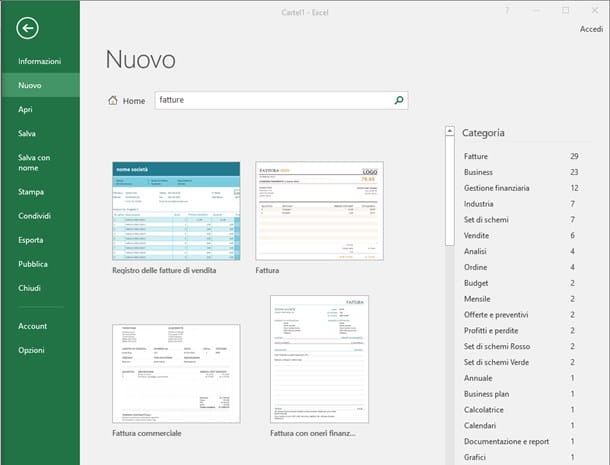
The results are further divided into categories, which you can view using the appropriate side navigation bar: once you have chosen the model you prefer, just make a Double-click on its preview to open a new one workbook based on it.
If you wish, you can create your custom model starting from an empty workbook and save it, and then use it later as a starting point: I have explained to you in detail how to proceed in my specific tutorial on the subject.
How to customize a table

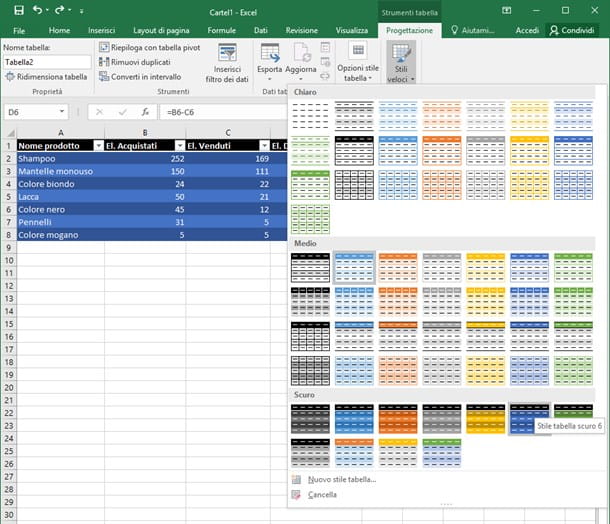
By default, tables created by Microsoft Excel are based on shades of blue, with alternating lines highlighted and a "special" formatting for the header row. But if you don't like this style and you want to know how to make a beautiful table in excel, the program gives you the opportunity to perform customizations.
To proceed, select one any cell of the table, click on the entry Planning placed at the top and take a look at the available items: first, press the button Table style options and, in the proposed panel, put the check mark on one or more boxes. Each of them has a very specific function, which I will explain in detail below.
- Header line - shows or hides the row containing the labels.
- Total row - shows or hides the row containing the total sum of the various columns (in case of numerical values).
- Alternate rows / columns highlighted - highlights even rows / columns or odd rows / columns with a darker tone.
- First / last column - applies bold to the data in the first or last column.
- Filter button - shows or hides the “arrow” for filters and sorts next to each of the headings.
You can name your table by typing it in the box Table name, located at the top left. To intervene on the colors, however, you have to press the button Fast styles: from there you can choose the color combination that best suits you by clicking on the preview you prefer, or create a custom style (by acting on the various elements of the table) by clicking on the item New table style .... Finally, you can completely eliminate the entire formatting of the table by pressing the button Clear.
As usual, you can customize the formatting of the data within the table by selecting the rows, columns or single cells that interest you (you can help with the button Shift or with the keys Ctrl / cmd keyboard) and using the formatting tools (font, size, character style, color, alignment, data type, etc.) in the section Home.
How to delete a table
If you have a spreadsheet and no longer need tables, you can really delete them in seconds. First, however, it is necessary to make a distinction: by deleting a table, you will go to delete both the table itself and the data contained within it.
If, on the other hand, you wish to return the data to the "initial state" (ie to a range of values), eliminating only the “table schema - and therefore the possibility of using the dedicated tools -, you must instead make one conversion. These are two extremely simple operations to perform, which I am going to detail in the lines below.
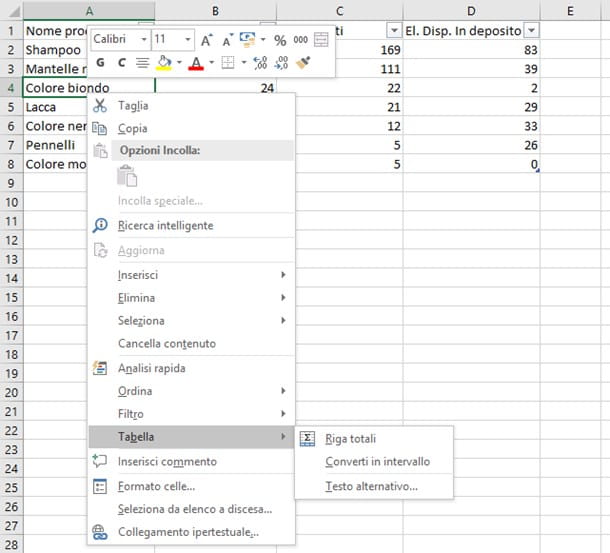
- Delete a table - if you intend to completely delete the table and the data inside it, all you have to do is select it with the mouse (by dragging from the first cell at the top left to the last cell at the bottom right) and press the button Canc keyboard (or backspace, your Mac).
- Convert table to range of values - before proceeding, I suggest you delete the table formatting to get rid of the preset colors, as I explained to you in the section on table customization. Once this is done, do it click destroy on one of the cells belonging to the table, then select the item Table> Convert to Range from the proposed menu and presses the button Yes located in the panel that appears immediately after.
If you have come this far, it means that you have fully learned the fundamental operations to create and manage data tables in Excel: before leaving, however, I want to remind you that Excel is an extremely powerful program that allows you to perform a large number of operations .
Just to give you some examples, you can create histograms and superimpose them on graphs for data evaluation, create real worksheets to carry out draws, password protect the files created, make a calendar table with Excel and much more: In short, knowing perfectly how to use Excel can help you on numerous occasions!
How to make a table in Excel Online
If you don't have Microsoft Excel on your PC and use instead Excel Online, know that you can create a table in the same way as seen in the previous chapter dedicated to the desktop version of this calculation software.
Just to summarize what to do, after opening your work document, highlight the range of cells you want to transform into a table and then move to the tab Inserisci up. At this point, press the button Table and put a check mark in the box Table with headers, if there are any headers.
At this point, you will get a table with an Excel default style. By clicking on it, the tab will be available Table structure at the top, with which you can customize the style of the table, changing the colors of the rows and applying some formatting elements. To clear the table, press the key Convert to range that you find in the card Table structure.
How to make a table in Excel for smartphones and tablets
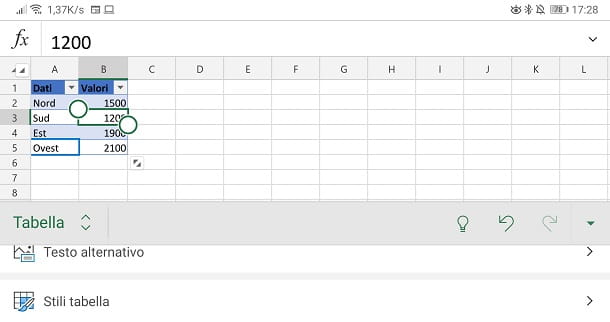
If you want to act as a smartphone and tablet to create a table in Excel, know that the appropriate app of this famous calculation software is available on Android (also on alternative stores) and iOS / iPadOS. While it's free, a paid Microsoft 10.1 subscription is required for screens over 365 "in size.
That said, the procedures to create a table are exactly the same as those already seen in the previous chapters: therefore you can also take into consideration the steps just seen in the chapter on Excel Online (which in general is more similar to the mobile app, compared to the desktop counterpart).
You just have to take into account that the Excel app interface is different based on the screen on which it is reproduced: in tablets the tabs are at the top, while on smartphones you find the toolbar at the bottom, accessible via a special drop-down menu.
How to make a pivot table in Excel
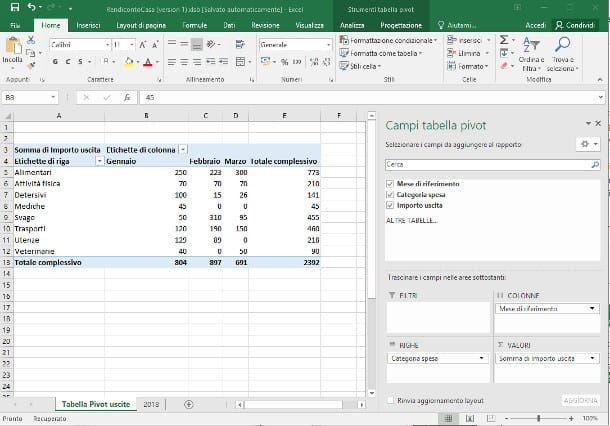
It may also be useful to create tables that allow you to analyze or present data, without having to act on the source because it may contain a lot of data that are not so important for the visualization intent that you have proposed. In this case, the table pivot they are the best solution.
In this regard, if you want to know how to create one, my advice is to carefully read all the procedures that I have explained to you in detail in this tutorial of mine: inside you will find several tips on how to best create a pivot table to analyze your data.
However, I also want to warn you of a fairly important question about this type of tables: their major limitation is that of having a rigid interval from which they draw for the display of data. In case you need to add new rows or columns, the pivot table must be deleted or modified to acquire the new data.
In this regard it is worth knowing how to create an Excel dynamic table, that is, a pivot table with a dynamic data source. The first step is to consider the function WASTE(…) which has the purpose of returning a reference to a range shifted, with respect to a cell, by a specified number of rows and columns.
However, reading my tutorial on pivot tables, which I mentioned in some previous paragraphs, the source of the data that you can set on this type of table cannot be a formula. Therefore, you will wonder what you can do with a function that you cannot use to make a pivot table.
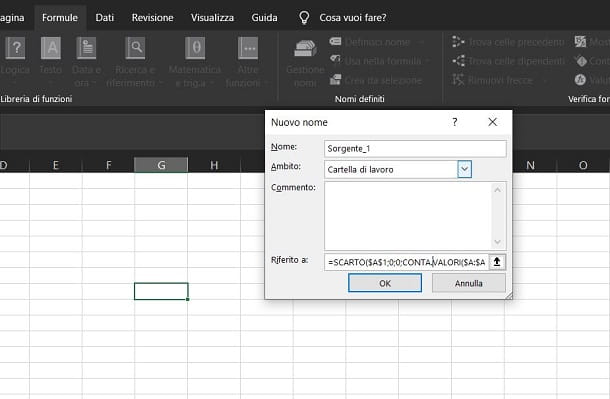
In reality, the PivotTable creation panel can acquire both a range of cells and a name. But let's take it easy, so as not to create confusion. Let us return to the function WASTE(…) I told you about earlier. This requires some arguments that, for convenience, I will show you with the example of the formula = REJECT ($ A $ 1; 0; 0; COUNT VALUES ($ A: $ A); COUNT VALUES ($ 1: $ 1)).
The first argument is $ A $ 1, i.e. the cell A1 locked which pertains to the beginning of the data cell range. Of course, if your table was built on a different range, you will need to replace this value with the correct cell references. The next two arguments are set with the value 0This is because you don't want to specify how many rows and columns the range should shift.
The fourth argument is indicated with ACCOUNT.VALUE($A:$A): this requires the height dimension of the data source, ie of the table; as the height cannot be defined, as you could add new lines at any time, you will use the function VALUE COUNTER (...), which will count the number of rows in column A, discarding the empty ones.
The fifth argument has the same principle as the one indicated in the previous paragraph: since the width of the table is required which is also not well defined (you could add new columns), you will use the function COUNT ($ 1: $ 1), to count the number of columns in the first row.
Clarified the meaning of the function WASTE(…), go to the tab Formulas and premium tasto Name management. Press the button New and, in the screen that is shown to you, indicate a name of your choice. In the box Refering to, type the formula = REJECT ($ A $ 1; 0; 0; COUNT VALUES ($ A: $ A); COUNT VALUES ($ 1: $ 1)) and then confirm by using the key OK.
Well: now, following the instructions in my tutorial on how to create a pivot table, in the box Table / Range, type the name you just defined. In this way, the PivotTable will acquire the data source and will be expanded every time you add new rows or columns. Interesting, right?


![[Review] Samsung Powerbot VR7000: the robot vacuum cleaner from Star Wars](/images/posts/6bc44de38605b5c0fa12661febb1f8af-0.jpg)


