


You are practicing in the art of video editing, and to do this, you have decided to rely on one of the most popular editing software, namely VEGAS from MAGIX (formerly known as Sony VEGAS). Now, therefore, only one question remains: how do you use this software? If you are looking for an answer, then you have come to the right place. In this tutorial, in fact, I'll show you how to use Sony VEGAS, or rather, MAGIX VEGAS at its best to create your projects and edit your videos as you wish.
Thanks to this guide, you will learn all the basics you need to get started VEGAS (the program is no longer produced by Sony from 2022) and make videos of all sorts. Also because this editing software is among the most advanced on the market; you can really do everything with it: the only limit, perhaps, is the imagination!
It seems to me that we have chatted enough. Now is the time to learn how to use the program. So make yourself comfortable and be prepared to store all the information I am about to provide you, so that you can learn as much as possible about the first steps to take in VEGAS. Happy reading but, above all, have fun!
Index
Minimum requirements and prices

Before going to see how to use Sony VEGAS, it is good to be aware of the systems on which it is available and the prices.
At the moment, VEGAS is only available on the operating system Windows, so if you have macOS or Linux installed on your computer, you won't be able to use the software (but there are some great alternative free video editing programs). That said, here is the minimum requirements to use VEGAS.
- Operating system: Windows 10 a 64 bit.
- Processor: at least 2,5 GHz and 4 Cores.
- RAM: 8GB (16GB recommended for 4K video processing).
- Spazio his album: 1.5 GB.
- Sgraphic card: NVIDIA, AMD/ATI or Intel.
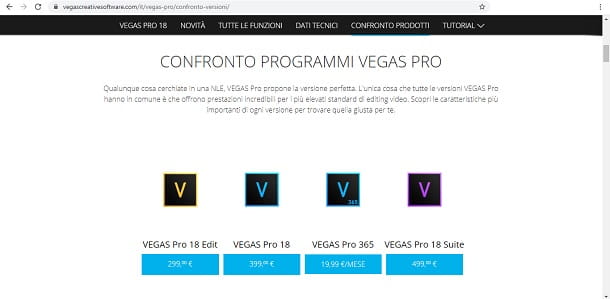
As regards the prices, the choice is up to you. The official VEGAS website offers four versions of the software at different prices: I'll list them below.
- VEGAS Pro Edit (299€) - basic version that offers all the essential features.
- VEGAS Pro (399€) - standard version that also includes some more features than the basic version, such as digital media asset management.
- VEGAS Pro Suite (499€) - advanced version that offers various additional features, especially in terms of FX effects, useful for more professional video editing.
- VEGAS Pro 365 - has the same features as VEGAS Pro, plus the ability to upload project saves to a dedicated cloud, for a maximum of 100GB. The price may vary depending on the offer chosen: from € 19,99 per month a € 20,99 per month with a 12-month subscription, a 239,88 € per year (equivalent to € 19,99 per month).
In any case, keep in mind that each of these versions is available for one month free trial, then you can test which one is best for you based on what you are looking for. For more information about each version, I refer you to the official website.
How to use VEGAS

Using VEGAS is really easy, as it is a very simple software to understand. It is only necessary to get a little familiar with it, after which it all comes by itself. Whether you are a beginner or an editing professional, this software I am about to tell you about will surely satisfy you with its many features.
Before learning how to master the program, however, you obviously need to know its basic mechanics: this is what I will focus on, in fact, in the course of this guide. Enjoy the reading!
Download and install the program
The first step you need to take is, of course, to install VEGAS on your PC. If you already have purchased a license of VEGAS, connected to the official website of the program and create a new account. To do this, once you have opened the Web page that I have proposed to you, press the button PROCEED. At this point, fill in the fields you see on the screen with the required information (Title, Name, Surname, Country, Email, Password e Confirm password). Once that's done, scroll down and click the button CONCLUDE.
Now you have to click on the option Create activation code and enter, in the field Serial number, the activation code of the product you purchased. Then click on the button PROCEED.
If you want to download one instead trial version of VEGAS, you have to go to this other page of the official VEGAS website, scroll down to the section VEGAS PRO - FREE TRIAL VERSION and click on the button TRY FREE FOR 30 DAYS. From here another page will open: click on the box I'm not a robot (if necessary, solve the captcha following the instructions on the screen) and then on the button Start download.
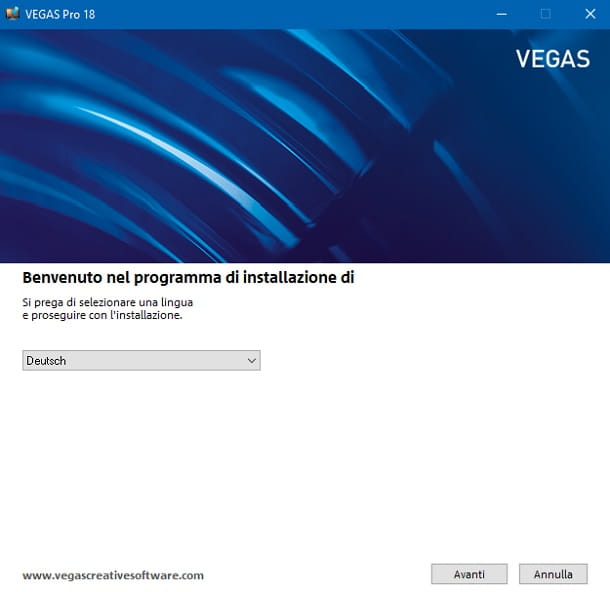
When the download is complete, open the executable file you downloaded, and click on Yes to confirm the installation. At this point, choose English from the drop-down menu to select the language (2022no is not available), and then press the button NEXT.
Then put the check mark on the box I have read the End User License Agreement and the Privacy Policy and agree to their terms and finish the setup by clicking on the buttons Next e install and closing the window at the end of the whole procedure. VEGAS is now correctly installed on your PC.
Create projects
Now is the time to create a project in VEGAS. This is an essential step to make a video, as the project will contain all the elements that will make up the final video. To create a new project, just start VEGAS (or select the appropriate item from the menu Fillet, top left).
If, on the other hand, you want to open an existing project, click on the menu File> Open (top left) and select the project to open. By doing so, all the information and files present in the project will be automatically imported into VEGAS, so that they can be viewed or modified.
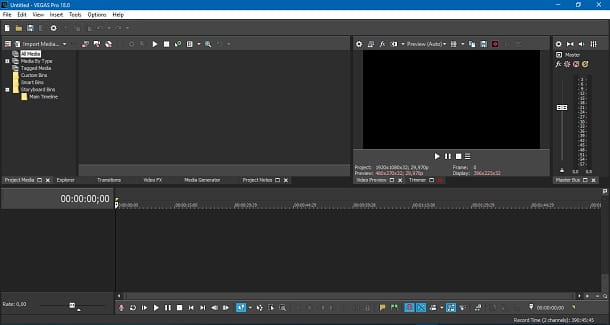
At this point you need to familiarize yourself with the VEGAS user interface, which is mainly divided into three panes.
The first box, which takes the upper left part of the screen, is dedicated to all effects and changes that you can affix to the video. Each effect you select appears, in fact, in that box, allowing you to have a preview of the changes you want to make to the movie, before making them effective. It is also where all the items in the current project are collected.
The second box, the one at the top right, on the other hand, is dedicated tovideo preview that you are working on in that particular project. All materials that you work on while within VEGAS appear here. The box is, of course, essential, as it allows users to view the product they are producing in real time. Thanks to this space, the work is certainly made easier, since you can check every single change that is made to the movie (being able to choose the display quality, using the appropriate drop-down menu located at the top; clearly, a minor quality will require less computing power on the part of the PC).
The third and last box, which is the one that occupies the entire lower half of the screen, is the most important part. I am speaking, in fact, of the section where the whole process takes place video editing. This part of the interface is mainly composed of the timeline, into which you can import the files you want to work on. Whether it is aural or visual material, everything can be inserted into VEGAS, to then work with it and transform the material into a unique video through editing.
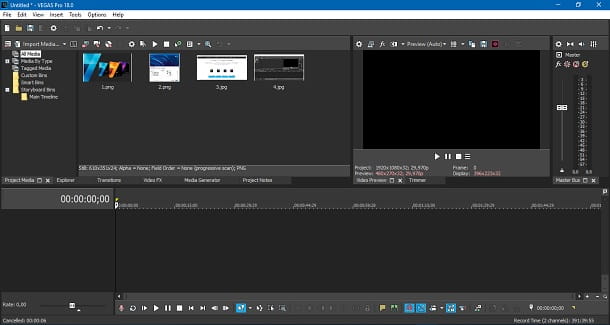
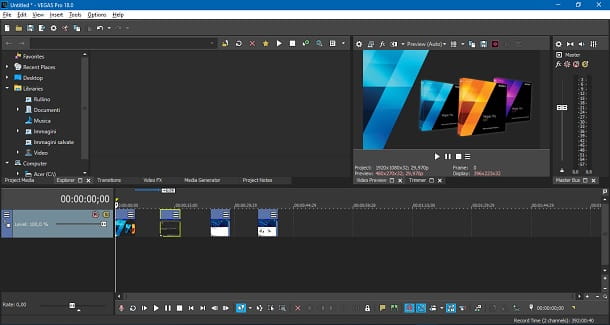
To create a video on VEGAS, the first thing to do is to import the files to work on within the software. The first thing to do, therefore, is to choose the elements to be used to create the movie, using the navigation panel on the left or by dragging them into the program window with the mouse, precisely in the box to the left of the video preview. By doing this, you will have all the elements you need to build the video at your fingertips.
VEGAS supports all major audio, image and video formats. Specifically, those videos are MOV, MP4, WMV, XAVC / XAVC S 4K, XDCAMEX, XDCAM Optical, DV, HDV, AVCHD ed NXCAM; audio ones WAV, FLAC, AAC, MP3, OGG e WMA; the graphical ones BMP, PNG, JPEG, TIFF, DPX, EXR e WDP.
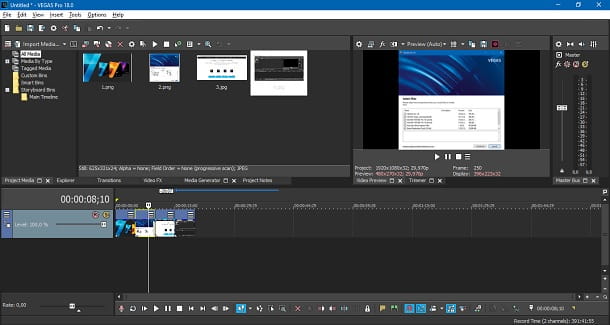
Now, therefore, you have to move the elements within the timeline, in the order you prefer, so that you can work on them. To do this, simply drag them, from the left pane of the video preview pane, within the timeline.
Of course, there is also the option of save a project, so you can close it without losing the progress made and resume it later. To do this, you can select the item Save from the menu Fillet and then choose the folder in which to save it. Once done, click on Save, and the project will be saved in the path you have chosen.
Edit video
Once you have imported the files to work on in VEGAS (as explained in the previous chapter), it is time to edit them.
First, you need to know how change the duration of a content. To do this, just select the right or left end, and at this point you can shrink or expand it, depending on your needs. You can do this with any type of file.
If you want cut a content, you need to click on the exact spot where you want the cut to take place. Once this is done, right-click with the mouse, and from the menu that is proposed to you, select the item Split. The file will then be split into two parts.
If you imported a file containing both visual and auditory material, and you want to split the two, the process is very simple. You must, therefore, right-click on the file, and from the menu that appears you must first click on the option GROUP and then on the button Remove From. By doing this, you will be able to check both visual and auditory content individually.
delete a content that you entered by mistake or that you no longer need, instead, just right click on it, and select the option Delete give the menu check if you press.
Within VEGAS, you can add any type of multimedia content - that is entirely up to you. In fact, you can safely work on a single audio file containing any recording, narration or song. In addition, you can also combine images or videos, so as to accompany the auditory element with the visual one, and make everything more interesting.
Apply transitions, effects and texts
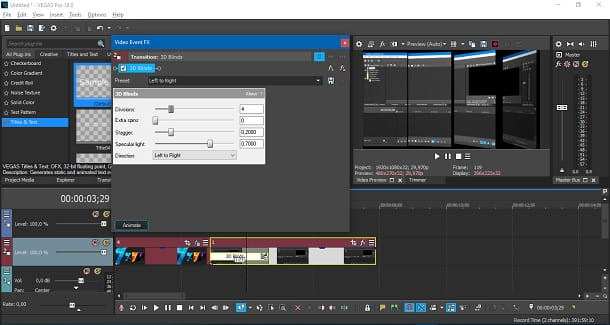
Now that you know the basics of editing a video, you could add some effects to make it even more interesting. For example, you can apply one transition. To do this, the first step is to overlap the two elements on which you want the transition to be applied. Nothing could be simpler: drag one of the two files on top of the other, as if to interpenetrate them. This will automatically add a simple fade transition.
To have a different transition, click on the window Transitions located above the timeline: this will open a menu, from which you can choose different transition types available on VEGAS. Choose the one you prefer, and drag it above the files where you want the effect to be applied. In case you want remove it then click ontransition icon to the right of its name, and then press the key with thefx icon flanked by a red cross.
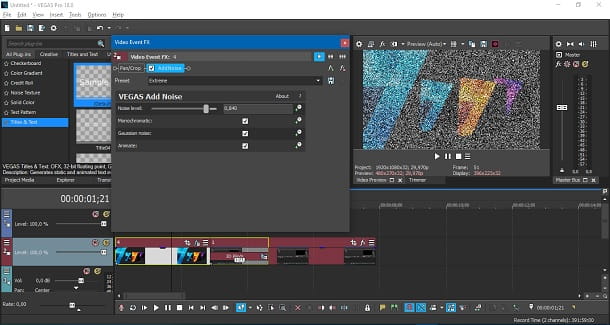
If, on the other hand, you want to add a effect to the video, also in this case VEGAS offers a vast quantity. To access the effects library, click on the window Video-FX located above the timeline, and all the available effects will appear.
Again, to add one to the video, drag it above the element you want the effect to be applied to. To remove it, click on the icon f verde located at the top right of the element on which the effect has been added, then press the key with thefx icon flanked by a red cross.
Obviously, there are many other types of effects that you can add to your videos, for example the most popular one, namely the green screen. This, in fact, allows you to remove the background of a certain visual content, so that it can be superimposed on other videos without including the background. In this regard, I refer you to my guide, in which I explain how to use the green screen with VEGAS.
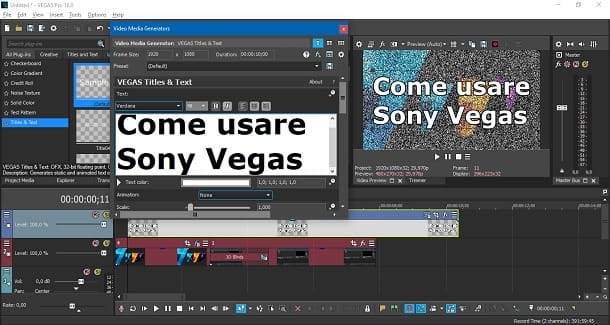
You need to add some text to your video? Nothing easier. First, click on the window Media Generator above the timeline and, from the menu that appears, press the key Titles & Text. From here you will be able to see various types of text, with numerous effects. Select the one that suits you best and then drag it into the timeline.
To edit the text, click on theicona fx to the right of the text element you just entered, and doing so will open a menu, from which you can edit text, font, size, color and so on. Then enter the text you want, deleting the text present by default, that is Sample Text, and typing what you want to appear in the video.
Remember to keep the text element above the visual elements in the timeline, otherwise everything you write will be covered by the visual elements, and will not be displayed in the video.
Other cool features
The functionalities of VEGAS certainly do not end there. With this software, in fact, it is possible to create a myriad of different contents, thanks to the tools it provides to its users.
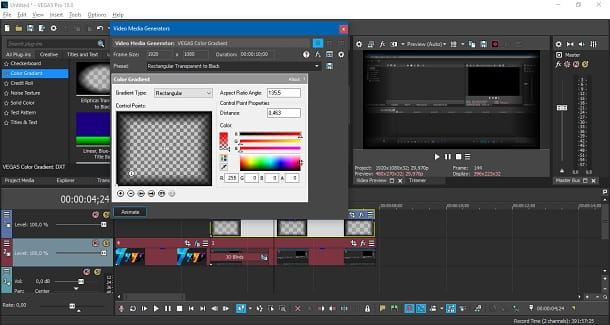
An interesting thing about VEGAS, which might come in handy when editing, is the ability to add one cornice to the video. To do this, you have to click on the window Media Generator located above the timeline, and then, from the menu that appears, tap on the option Color Gradient. Here you will find a list of frames provided by VEGAS. To apply them to the video, simply drag them within the timeline.
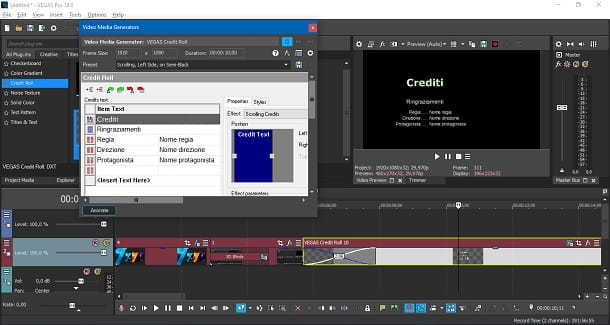
Another feature not to be missed is that of credits. In fact, if you need to close the video you are making, you can safely use the samples available on VEGAS. To do this, click on the window once again Media Generator located above the timeline, and then, from the menu that appears, click on the option Credit Roll.
From here you can see all the types of writing that you can use to create the closure of a video. Then select the one you prefer, and drag it within the timeline.

A very useful thing in video editing is it zoom at certain points in an image or video. Of course it can also be done within VEGAS.
To apply this effect, the first thing to do is to select the element to act on. If you want this to only fire during part of the clip, that's enough isolate the latter by cutting the sequence.
Once you have chosen the sequence on which to zoom, click on third key at the top right, starting from the left, of the clip. At this point you are in front of the panel from which you can set the zoom.
Now, above the image of the clip you have selected is a F, which corresponds to the focus, that is the goal. To decide how much zoom to take, simply drag the points at the ends of the box containing the F as you like. When you are satisfied with the result, click on the icon floppy disk, top right, and then close the panel by pressing on X top right. Here the zoom will be applied correctly to the clip.
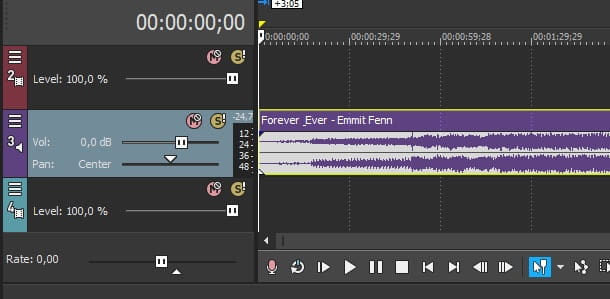
You can also apply changes to the audio elements within VEGAS. One of the simplest things you can do is change the panning, which is the direction of the sound. You can then decide whether to send it more to the left or to the right. Obviously, the effect can only be heard with headphones, or speakers.
To change this parameter, you need to head to the left of the audio element you imported into the Timeline. Here you will see the inscription Bread, which, in fact, corresponds to panning. Immediately to the right, there is its slider: if you move the white triangle a right, the sound will go to the right, while if you move it to left, the sound will shift to the left.
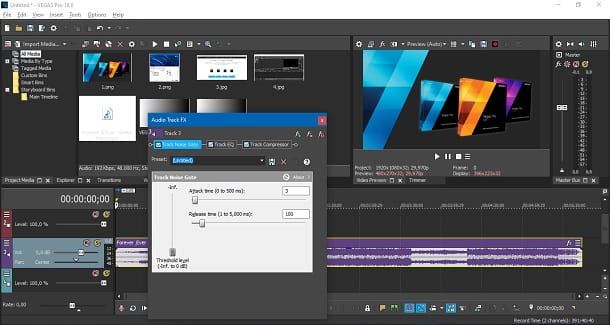
If, on the other hand, you want to apply more advanced changes to an audio file, know that VEGAS also offers this possibility. To do this, you need to head back to the left of the audio element you imported into the Timeline. At this point, click onthree lines icon, and from the menu that is proposed to you, select the item Track FX.
From the panel that appears, you can modify in detail the audio track you have added to your project. For example, you can decide the attack and release time of the track, via the window Track Noise Gate; or you can equalize the sound to your liking with the built-in equalizer in VEGAS, accessible from the window Track EQ. Finally, you can add a compressor to the audio and modify all its parameters to make it suitable for the type of sound you are looking for, via the window Track Compressor.
When you have decided what effects to bring to your audio track, you have to click on the icon of floppy disk, top right, so as to save the settings.
Export the video
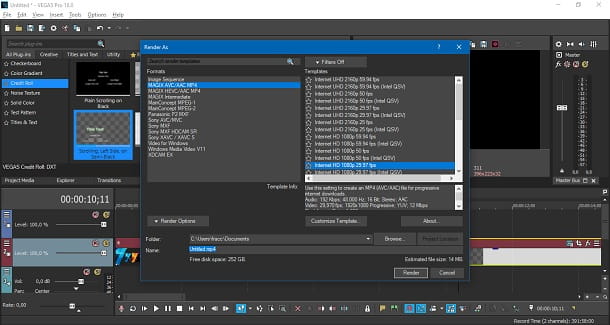
Once you are done editing the video on VEGAS, you are ready to export it. First, go to the menu File > Render As, top left.
In the window that opens, you can decide how to export the video. On the left you can select the format (Eg. MP4, WMA e WMV), while on the right you can choose the quality of the video to be obtained. Then choose the settings you want.
The video, by default, is saved in the folder Documents. If you want to change the destination folder of the movie, click on the button KATEGORIEN and choose the path where you want the video to be saved. Select it, then, and then click on the button Save.
When everything is ready for export, click on the button render, bottom right. By doing so, the export process will begin, the duration of which may vary depending on the size of the video and, of course, the power of the PC at your disposal. When the rendering is done, you can find the video you made inside the destination folder of your choice.
VEGAS is one of the most used editing software: it goes without saying, therefore, that the Web is chock full of tutorials containing valuable tips to make the most of it. In this regard, now that you have finished reading my tutorial, I refer you to the official VEGAS website, where you can find even more detailed guides about the program, to help you better understand how to use it.


![[Review] Samsung Powerbot VR7000: the robot vacuum cleaner from Star Wars](/images/posts/6bc44de38605b5c0fa12661febb1f8af-0.jpg)


