


Thanks to DHCP technology, the routers we use to network all our devices automatically assign a different IP address to each of them. This is undoubtedly a very useful mechanism, which however can create problems when you need to perform advanced configurations. In cases like these, in fact, it is a good idea assign a static IP (i.e. it never changes) to all the devices on your local network, so you can always identify them uniquely and not have to review your configuration from time to time.
How do you say? The question interests you but you are not very experienced in the IT field? Are you afraid that the procedure to be put into practice could be excessively long and complicated? But no, you don't have to worry! Contrary to what you might think, assigning a static IP is actually a fairly simple procedure to perform and that can be carried out without any kind of problem both by the so-called "geeks" and by those who, a bit like you, are not very practical in terms of computers, Internet connections and so on.
So if you are actually interested in finding out what needs to be done to assign a static IP to PC, smartphone, tablet, console etc. I suggest you take a few minutes of free time and concentrate on reading the information I am about to give you. So follow my guide and, in a little while, you will be able to configure your network without major problems. What do you say, shall we bet?
Index
- Preliminary operation
- How to assign static IP to PC
- How to assign static IP to the printer
- How to assign static IP to PS4
- How to assign static IP to Raspberry
- How to assign static IP from router
Preliminary operation
Before getting to the heart of this guide and explaining, in practice, how to assign static IP to the devices of your interest, you must be well aware of what you are going to do.
To begin with, you need to know that a IPv4 address (which is the type of IP that we are going to deal with in this guide) is made up of four triplets of numbers, including 1 e 255; private IP addresses, in particular, almost always start with sequences 192.168 or 10.0, depending on the type of network configured and the IP address family managed by the router.
It goes without saying that, before doing anything, it is essential to take note of theIP address of the router through which the local network is generated. You can find this information easily, on both Windows and macOS, as follows.
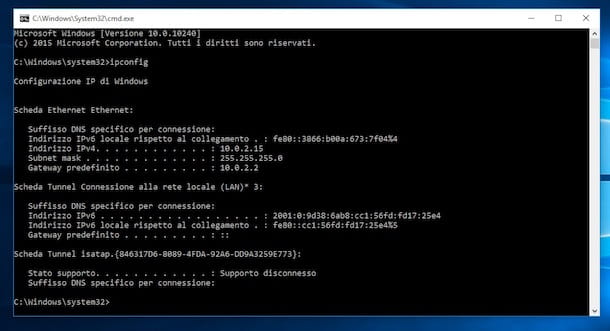
- Windows - open the Command Prompt or a PowerShell window, type the ipconfig statement and press the key Submit keyboard. The address you are looking for is placed in correspondence with the wording Default gateway.
- MacOS - open the terminal recalling it from Launchpad, type the command ipconfig getifaddr en0, if you are using an Ethernet network, or ipconfig getifaddr en1, if you are using Wi-Fi. Then press the Enter key and wait for the information to appear on the screen.
If you need an extra hand in doing this, feel free to take a look at my guide on how to find the IP address of the router.
Once you have obtained the necessary information (which will also be useful later on), it is now time to understand how to "construct" the local IP address to be assigned: the first three triplets must be identical to those of the router address, while the fourth must take a value from 1 to 253, excluding the one in use by the router (otherwise you could cause conflicts and malfunctions).
So if the router's IP is 192.168.1.1, you can safely use static IPs 192.168.1.2, 192.168.1.3, 192.168.1.150 and so on. Also, remember to never use the same local IP for two different devices belonging to the same network, otherwise you would end up causing an IP address conflict and the malfunction of both devices.
How to assign static IP to PC
The steps to take for assign static IP to PC they are really very simple: below I'll explain how to proceed on the Windows 10 and macOS operating systems.
How to assign static IP Windows 10
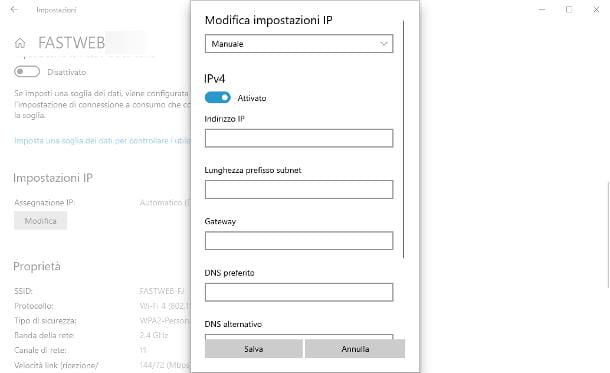
To assign a static IP to the computer Windows 10, do this: first, click on the icon network located near the clock (the one with the cleats or depicting a computer), locate the name of the network you are connected to in the proposed panel and click on the item Property, located in its correspondence.
Once in the new window, locate the box IP settings, premium pulsating Modification resident immediately below and set the drop-down menu that appears later on Manual. Now, move up ON the switch corresponding to the wording IPv4 and fill out the form that appears on the screen, entering the following information.
- IP address: type the IP you want to assign to the computer, referring to that of the router (eg. 192.168.1.X, replacing X with a number between 2 and 253).
- Subnet prefix length: type the address 255.255.255.0.
- Gateway e Preferred DNS: type the same IP address of the router.
- Alternative DNS: leave blank.
When you are done, click on the button Save to apply the changes made and, if necessary, disconnect and reconnect to the network again.
How to assign static IP to Mac
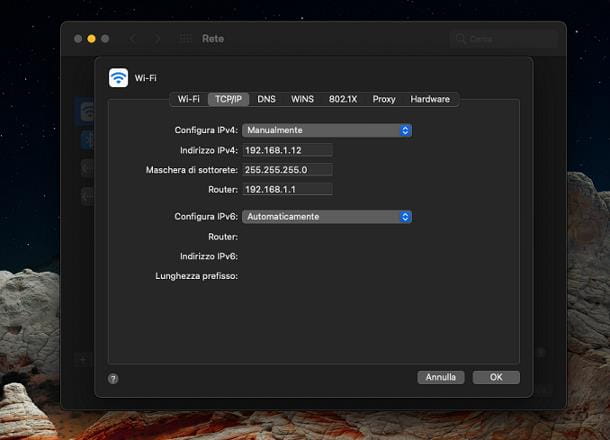
To set a static IP on the Mac, proceed like this: First, click on thenetwork icon (shaped cleats, if you are using Wi-Fi, or showing the symbol , if you are connected via an Ethernet cable) and click on the item Network Preferences, located in the menu that appears.
Now, if you are connected via wireless network, click on the item Wi-Fi located on the left sidebar, then on the button Advanced and then on the board TCP / IP located at the top. At this point, set the drop-down menu Configure IPv4 on the option Manually and fill in the fields that are proposed to you with the requested information.
- IPv4 address: enter theIP to be assigned to the computer, based on that of the router (eg. 192.168.1.X, where X must be a value between 2 and 253).
- Subnet mask: enter the value 255.255.255.0.
- Router: enter theIP address of the router.
When you are done, click on the button OK to apply the changes and that's it.
If, on the other hand, you are connected via a wired network, click on the item Ethernet and, after setting the drop-down menu Configure IPv4 su Manually, enter the same configuration parameters seen a little while ago.
Note: If you don't see the network icon among those located on the Mac menu bar, open the System preference, by clicking on the gear symbol located on the Dock, and click on the item Network, to display the settings screen. To make the icon visible, put the check mark next to the wording Show Wi-Fi status in the menu bar.
How to assign static IP to the printer
The steps to take for set a static IP address on a printer depends on the exact make and model of the device. For this reason, it is not possible for me to show you a procedure that is valid for all printers, however I can provide you with some general indications which, in most cases, are just fine.
For example, if your printer is equipped with LCD screen, first press the physical key of menu / configuration located on it (or press the button on the screen, if the display is a touch-screen type), access the settings of the device and then to the section relating to network configuration.
Now, point to the network type in use (to you Wi-Fi o Ethernet cable), access the section relating to advanced IP settings and choose you want change the IP address. Fill in the fields that are proposed to you as follows.
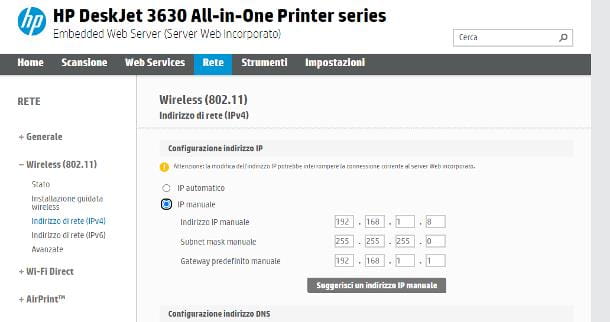
- IPv4 address: the local address to use for the printer, based on that of the router (eg. 192.168.1.X, replacing X with a number between 2 and 253).
- Subnet Mask / Subnet Mask: enter the value 255.255.255.0, or 255.255.248.0 if there are more than 254 devices on the network.
- Default gateway e Primary DNS: Enter the IP address of the router.
- Secondary DNS: leave this field blank.
When you are done, confirm by pressing the button OK and wait a few seconds for the settings to take effect.
If, on the other hand, the printer is not equipped with a touch-screen screen, you must necessarily act from the Web panel of the same, via a PC, a smartphone or a tablet connected to the same network: therefore, first of all, find thecurrent IP address of the printer (if you don't know how to do it, follow the instructions I gave you in this guide) and type it into the browser you usually use. If applicable, enter the username and Password required to access the panel.
At this point, go to the menu of Network, select the type of network you are connected to (eg. wireless) and press on the option relating tonetwork address o IP address; at this point, he specifies that he wants to use a manual IP address and fill in the fields proposed in a similar way to what I explained to you a little while ago. Remember, once the changes are complete, of apply them by pressing the appropriate button.
How to assign static IP to PS4
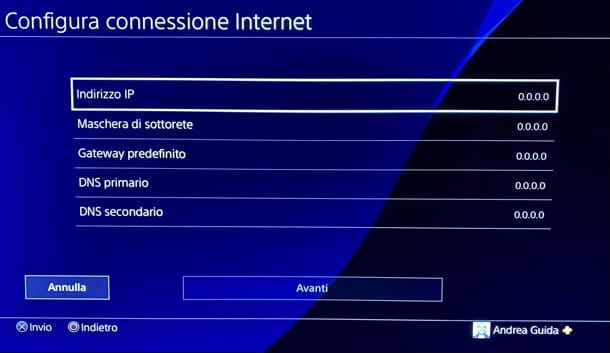
In order to assign a static IP address to the PS4, you must necessarily act in the settings of the same. So, using the pad, select the toolbar top and press onbriefcase icon (Settings).
Now, select the item Network, repeat the same operation with the option Configure Internet Connection and, depending on your needs, choose whether to use a network Wi-Fi (by entering the relevant access key) or wired. Made your choice, select the item custom.
After this step too, you will be asked to set the properties of the connection: select, therefore, the item Manual, type theIP address to be assigned to the console, based on that of the router (eg. 192.168.1.X, replacing X with a digit between 2 and 253) and, in the field Subnet mask, enter the address 255.255.255.0.
Next, enter theIP address of the router (With art. 192.168.1.1) within the fields Default gateway e Primary DNS and leave the field blank Secondary DNS. Infine, premium pulsating NEXT, set the value MTU su Automatic and choose to do not use proxy.
Then check the connection and everything should be fine. If you have any further questions or problems, feel free to check out my tutorial on how to connect your PS4 to the Internet.
How to assign static IP to Raspberry
The procedure to be performed for set a static IP on the Raspberry it varies according to the Linux distribution used on it; in this case, I will refer to Raspberry PiOS (Eg Raspbian), however the steps are easily replicable on the most well-known distributions.
For starters, start the terminal by clicking on the appropriate icon in the menu bar; if you can't find it, open the menu Raspberry (the one depicting a raspberry, located at the top left) and recalls the Terminal/Terminal from the menu Accessories / Accessories.
Now, type in it the command sudo service dhcpcd status, followed by pressing the key Submit, and verify that the server is active; otherwise, enable it by issuing the commands sudo service dhcpcd start and sudo systemctl enable dhcpcd, both followed by pressing the key Submit.
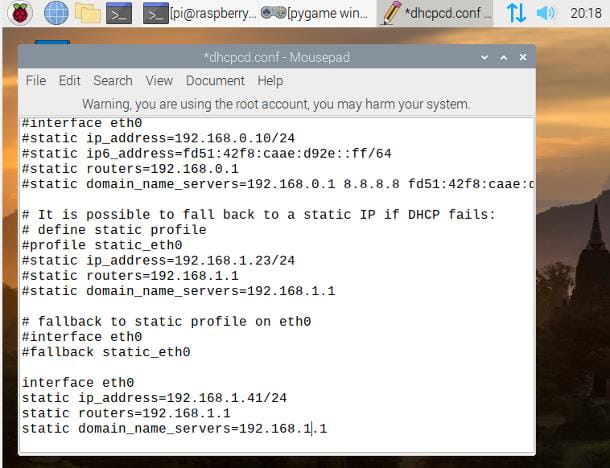
At this point, issue the command sudo mousepad /etc/dhcpcd.conf followed by pressing the key Submit, move to the end of the document, go to the head and insert the following piece of code.
- interface interface_type (eth0 for Ethernet, wlan0 for Wi-Fi)
- static ip_address=IPdaAssegnare/24
- static routers=IPDelRouter
- static domain_name_servers=IPDelRouter
For example, if you want to use the IP address 192.168.1.41 on an Ethernet connection and the router has an IP address of 192.168.1.1, the code will become the following.
- interface eth0
- static ip_address = 192.168.1.41 / 24
- static routers = 192.168.1.1
- static domain_name_servers = 192.168.1.1
Once you have entered the necessary string, use the menu File> Save of Mousepad to save the document, close the text editor and restarts the Raspberry PI: on the next reboot, the IP address should be statically set.
Note: if you access the computer via SSH or another protocol that requires the use of a textual interface only, you can open the dhcpcd.conf file for editing with the text editor dwarf, issuing the command sudo nano dhcpcd.conf; to save the file and exit, press the key combination Ctrl + X and then the keys W e Submit; to restart the computer, use the sudo reboot command.
How to assign static IP from router
A slightly more complex but definitely effective method for assign static IP to a given device, consists in acting from the router: some devices of this type, in fact, allow you to reserve a local address for a particular physical address. In this way, every time the device in question connects to the network, the router will always assign it the same IP.
Unfortunately, however, I am not able to give you precise indications on what to do, as each router has a specific procedure for action; in general, here are the steps to follow.
- Plug in the device (PC, printer, console or other) to the network, turn it on and wait for it to connect.
- Using the browser you usually use, enter the management panel of the router. If you don't know how to do it, follow the instructions I have given you in this guide.
- Identify the section relating to NAT / Local network and, from there, the one dedicated to Advanced Settings. In some cases, you may find options named DHCP reservation, IP assignment or similar.
- If everything went well, you should find yourself in front of the list of devices connected to the router. Click on the button for assign a new IP corresponding to name of the device of your interest, enter thestatic address you prefer in the appropriate field and click on the button for save the applied settings.
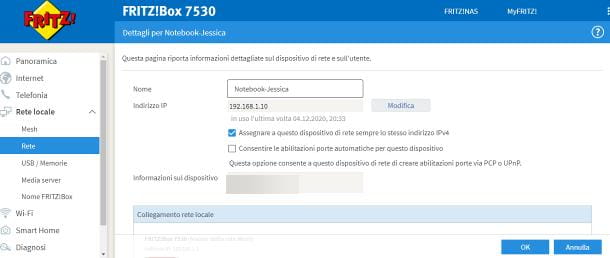
In the specific case of the router I currently use (an AWM! Fritz Box 7530), after logging in to the configuration panel, you must go to the sections Local network e Network (left), locate the name of the device in the right part of the window and click on the symbol of pencil corresponding to it.
Now, to change the IP address in use, click on the button Modification and enter the new one in the appropriate text box; finally, put the check mark next to the wording Always assign the same IPv4 address to this network device and click on the button OK to save the changes made.


![[Review] Samsung Powerbot VR7000: the robot vacuum cleaner from Star Wars](/images/posts/6bc44de38605b5c0fa12661febb1f8af-0.jpg)


